

TABLE OF CONTENTS
PROJECTS
PRECIOUS STRIPED SKIRT
QUICK AND EASY BABY BEANIE
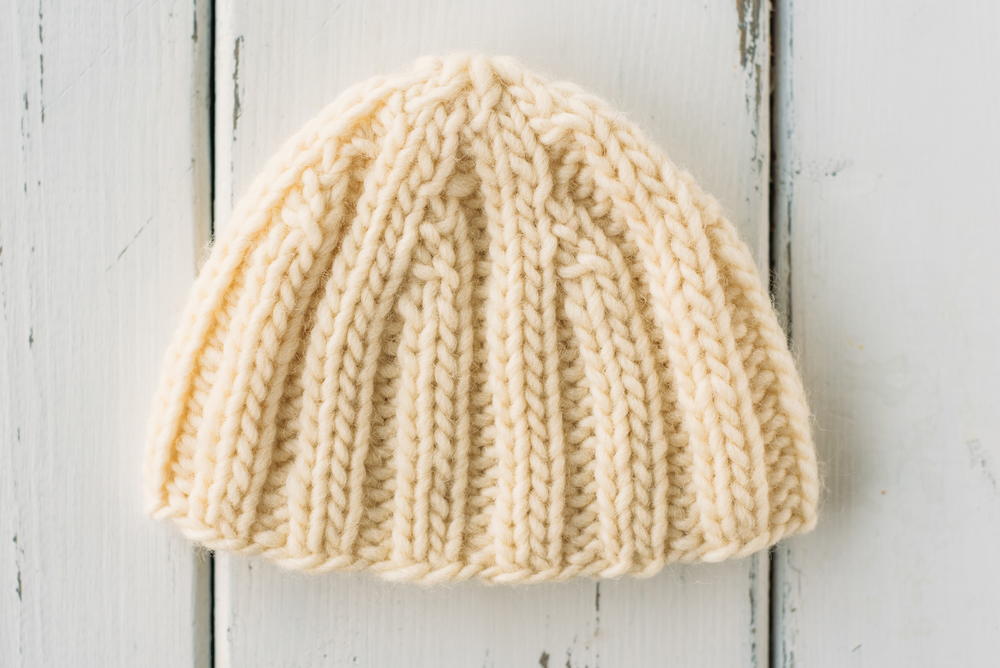
ONE-SKEIN BABY HAT
PATTERN BASICS
SLIP STITCH
KNITTED CAST-ON
LONG TAIL CAST-ON
CABLE CAST-ON
KNIT STITCH
PURL STITCH
BIND OFF
THREE NEEDLE BIND OFF

EDITOR’S NOTE
As managing editor of I Like Knitting magazine, let me be the first to say welcome! I’ve been a yarn lover for most of my life (I was six years old when my grandma showed me how to make my own scarf) and I can honestly say that I have the best job in the world.
While my role does consist of emailing designers and writing up magazine contracts, I count myself incredibly lucky to be able to look at gorgeous projects — from blankets and shawls to the cutest knitting scarves and hats — every day.
Since you are new to our magazine, I truly hope you enjoy this free mini issue: Insanely Cute Baby Knits: 3 Free Knitting Patterns for Baby, that will offer a tiny taste of what the I Like Knitting community can offer you.

About Us
Published six times a year, our magazines contain 25+ new and exclusive knitting patterns in each issue!
So start building your library of knitting blankets, knitting scarf patterns, knitting sweater patterns and more all on your tablet or desktop, and all accessible with an active club membership. Every issue contains 25 to 30 exclusive knitting designs.
Take the next step in your knitting and join our community of talented readers who live to learn new techniques and love to knit!

BEHIND THE SCENES

I Like Knitting editors Nicola Prybell and Caitlin Eaton, hard at work styling projects for a new issue of our bi-monthly magazine.

PATTERNS
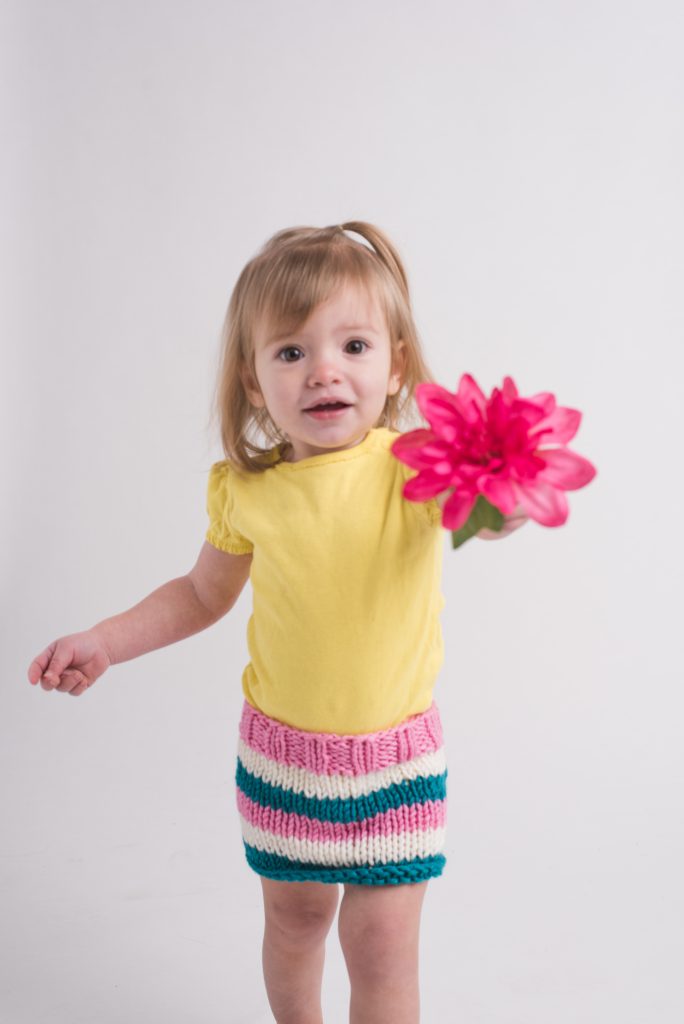
PRECIOUS STRIPED SKIRT
by Janaya Chouinard
Pair this beginner baby project with your little one’s cutest leggings for an outfit that’s fit for all occasions. Not keen on stripes? No problem! Use up whatever yarn is in your stash. This pattern works well with various yarn weights.
Skill Level: Beginner
Size: Newborn: Waist = 13” circumference, Hem = 16” circumference, Height = 6.5”
Gauge: 3 stitches, 4 rows, 1 inches. Stockinette Stitch
MATERIALS
 Yarn: (5) Bulky/Chunky (12-15 stitches for 4 inches). Use three different colors.
Needles: 10 or 6 mm, 11 or 8 mm, Circular Knitting Needles, Double-Pointed Knitting Needles (DPNs)
Notions: Yarn needle for weaving in ends.
ABBREVIATIONS
K – knit
P – purl
dpns – double pointed needles
PATTERN
Stripe Sequence for 3 Colors
Rnd 1-6: Color A
Rnd 7-10: Color B
Rnd 11-14: Color C
Rnd 15-18: Color A
Rnd 19-22: Color B
Rnd 23-26: Color C
With Size US 10 dpns or circulars, cast
on 48. Join to knit in the round. Use a
stitch marker to keep track.
Rnd 1: *K2, P2* around
Rnd 2 – 6: Repeat Round 1
Change to Size US 11 dpns or circulars.
Rnd 7-26: Knit around
Cast off. Weave in all ends.
QUICK AND EASY BABY BEANIE
by Heidi Gustad
Need a quick gift for that baby shower you forgot you were invited to? This Quick and Easy Baby Beanie is just what you need! It works up in a flash and the results look like something straight from an Etsy shop!
Skill Level: Beginner
Size: 6.5 (7, 7.5)” hand circumference x 6.75″ length
Gauge: 30 sts and 44 rows = 4″ [10 cm] in St st after wet blocking
MATERIALS
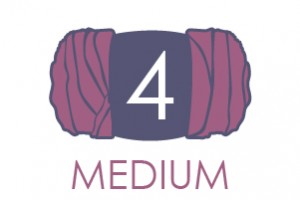 Yarn: (4) Medium Weight/Worsted Weight and Aran(16-20 stitches to 4 inches)
Needles: 9 or 5.5 mm
PATTERN
CO 56 sts, join into rnd.
(k2, p2), rpt ( to ) around.
Rpt row 1 until hat measures 3 inches.
Decrease
(k2, p2, k2, p2tog), , rpt ( to ) around. 49 sts
(k2, p2, k2, p1), rpt ( to ) around.
(k2, p2, k1, p2tog), rpt ( to ) around. 42 sts
(k2, p2, k1, p1), rpt ( to ) around.
(k2, p2, k2tog), rpt ( to ) around. 35 sts
(k2, p2, k1), rpt ( to ) around.
(k2, p1, p2tog), rpt ( to ) around. 28 sts
(k2, p2), rpt ( to ) around.
(k2, p2tog), rpt ( to ) around. 21 sts
(k1, k2tog), rpt ( to ) around. 14 sts
k2tog around. 7 sts.
Finishing
Break yarn, draw tail through last loops, and
tighten to finish. Weave in all ends and block.

ONE-SKEIN BABY HAT
by Robyn Devine
This pattern was specifically designed for use in charity drives, but it’s a classic hat that any new parents would love for their newborn. Made with just one skein of yarn, it’s a quick knit
Skill Level: Beginner
Size: newborn = 12” circumference.
Gauge: 21.5 stitches, 32 rows, 4 inches. stockinette stitch
MATERIALS
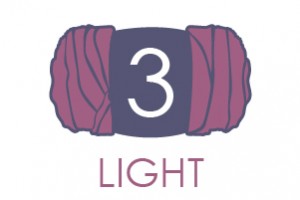 Yarn: (3) Light/DK (21-24 stitches to 4 inches). We use Lion Brand Modern Baby
Needles: 7 or 4.5 mm
Notions: Tapestry needle or crochet hook for weaving in ends
ABBREVIATIONS
CO – cast on
DRnd – decrease round
K – knit
K2TOG – knit two stitches together
P – purl
RND – round
STS – stitches
PATTERN NOTES
This original knit hat was designed specifically for the American Heart Association’s initiative, Little Hats, Big Hearts.
PATTERN
2×2 Ribbing
Using long tail method and brown yarn, CO 64 sts. Divide sts evenly on 3 dpns, and be careful not to twist.
Rnd 1-6: [K 2, P 2] around.
Hat Body
Rnd 7: K all sts around.
Rnd 8: (K3, P1) around.
Rnd 9: K all sts around.
Rnd 10: (K1, P1, K2) around.
Repeat Rnds 7-10 four more times.
Note: Hat should now measure 3.5” from CO edge.
Shape Crown
Rnd 1: (K6, K2tog) around.
Rnd 2: (K3, P1, K3) around.
Rnd 3: (K5, K2tog) around.
Rnd 4: (K1, P1, K4) around.
Rnd 5: (K4, K2tog) around.
Rnd 6: (K3, P1, K1) around.
Rnd 7: (K3, K2tog) around.
Rnd 8: (K1, P1, K2) around.
Rnd 9: (K2, K2tog) around.
Rnd 10: K around.
Rnd 11: (K1, K2tog) around.
Rnd 12: K around.
Rnd 13: K2tog around.
Finishing
Break yarn, leaving a long tail. Use darning needle to thread yarn through remaining sts. Pull yarn tight and secure. Weave in all ends.
MASTER ABBREVIATIONS
Beg – begin/beginning
Bet – between
BO – bind off
Cn – cable needles
CO – cast on
Cont – continue
Dec – decrease
Dpn – double pointed needles
Fl – front loops
Inc – increase
K – knit
K2tog – knit 2 stitches together
Kwise – knitwise
Lp(s) – loop(s)
M1 – make one stitch
M1 p-st – make one purl stitch
P – purl
Pm – place marker
Pop – popcorn
P2tog – purl 2 stitches together
Pwise – purlwise
Rem – remain/remaining
Rep – repeat(s)
Rev St st – reverse stockinette stitch
Rnd(s) – round(s)
RS – right side
Sk – skip
Skp – slip, knit, pass stitch over—one stitch decrease
Sk2p – slip 1, knit 2 together, pass slip stitch over the knit 2 together—two stitches have been decreased
Sl – slip
Sl1k – slip 1 knitwise
Sl1p – slip 1 purlwise
Sl st – slip stitch(es)
Ssk – slip, slip, knit these 2 stitches together—a decrease
St(s) – stitch(es)
St st – stockinette stitch
Tbl – through back loop
Tog – together
WS – wrong side
Wyib – with yarn in back
Wyif – with yarn in front
Yfwd – yarn forward
Yo – yarn over
Yrn – yarn around needle
Yon – yarn over needle
[ ] or ( ) – work instructions within brackets as many times as directed*– repeat the instructions following the single asterisk as directed
* * – repeat instructions between asterisks as many times as directed or repeat from a given set of instructions
PATTERN BASICS
SLIP STITCH
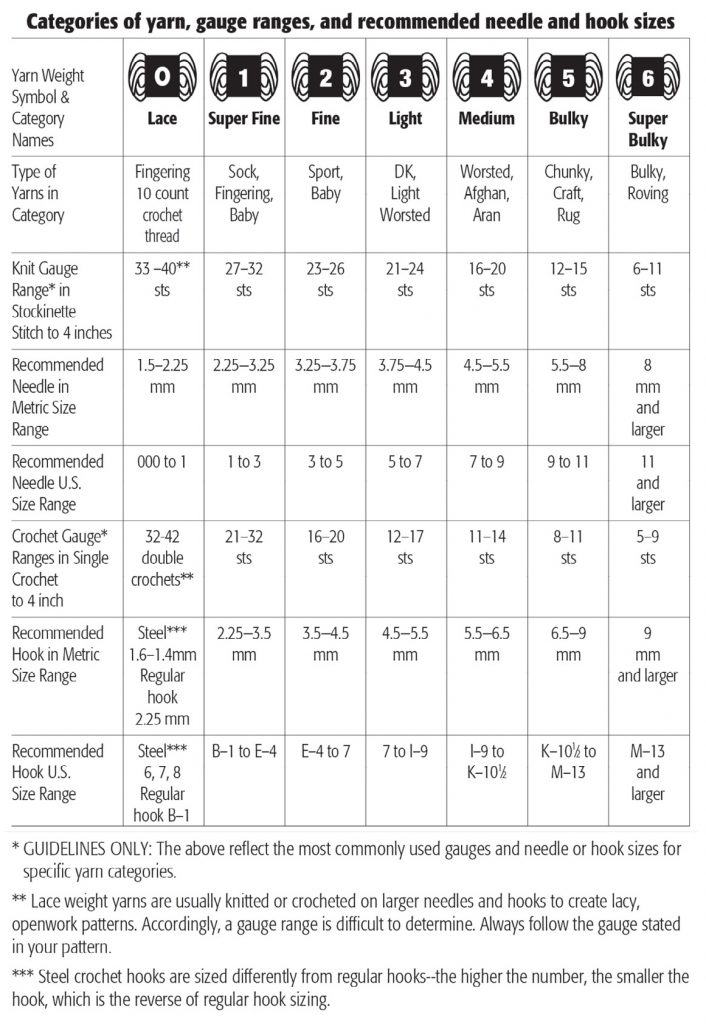
Before starting the slip knot, decide which method of casting on you want to try. If you choose the long-tail cast-on method, leave approximately an inch for every stitch that you’re about to place on the needle. For the knitted cast-on, leave eight to ten inches between the end of the yarn and the slip knot.
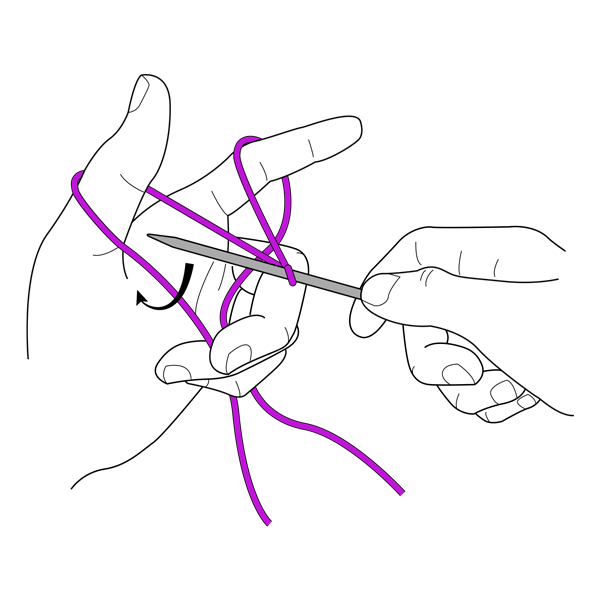
 1 Hold the short end of the yarn in your palm with your thumb. Wrap the yarn around the index and middle fingers twice.
 2 Pull the strand attached to the ball through the loop between your two fingers to form a new loop.
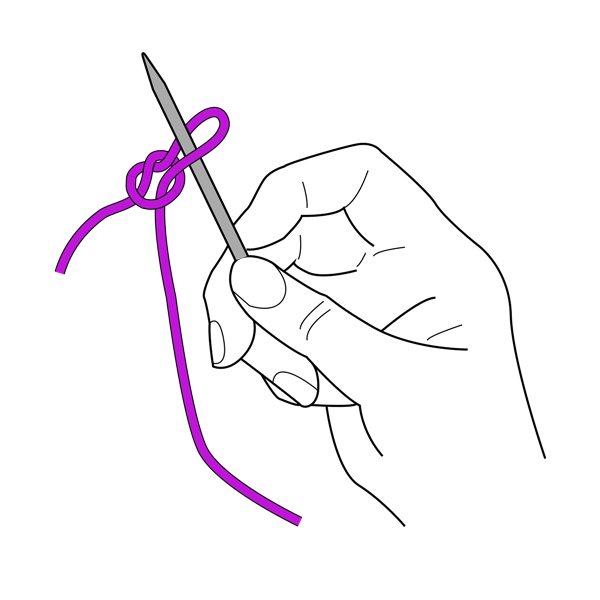 3 Place the new loop on the needle and tighten it by pulling on both ends of the yarn to form the slip knot. You are now ready to begin casting-on.
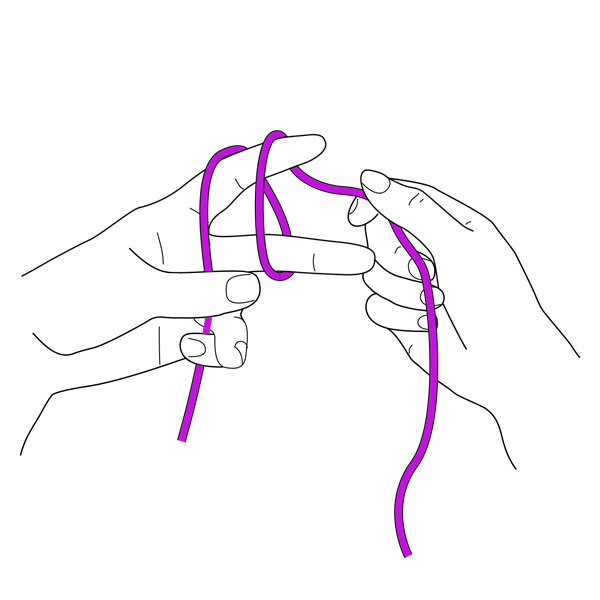
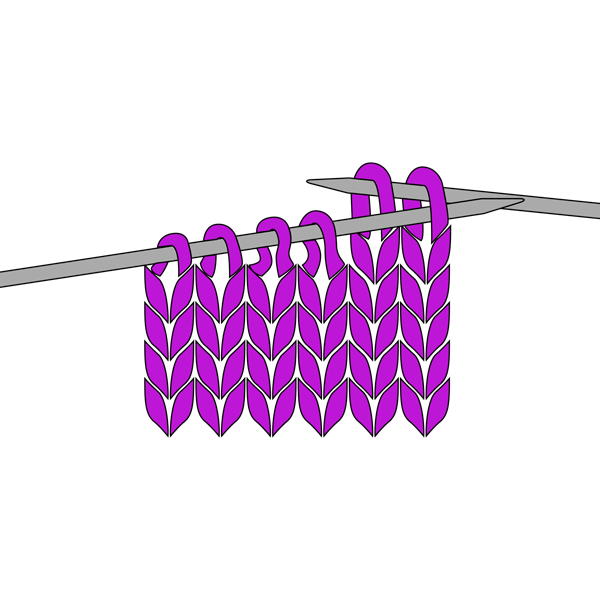
KNITTED CAST-ON
 1 Make a slip knot on the left needle. Insert the right needle knitwise into the stitch on the left needle. Wrap the yarn around the right needle as if to knit.
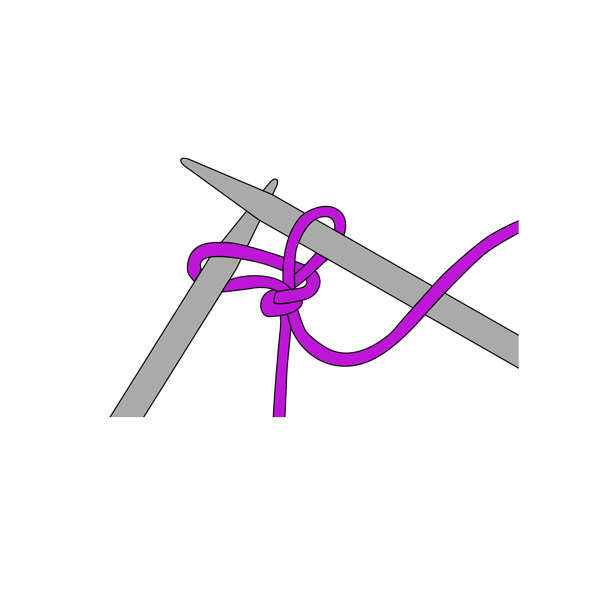 2 Draw the yarn through the first stitch to make a new stitch, but don’t drop the stitch from the left needle.
 3 Slip the new stitch to the left needle as shown. Continue until all the stitches are cast on.
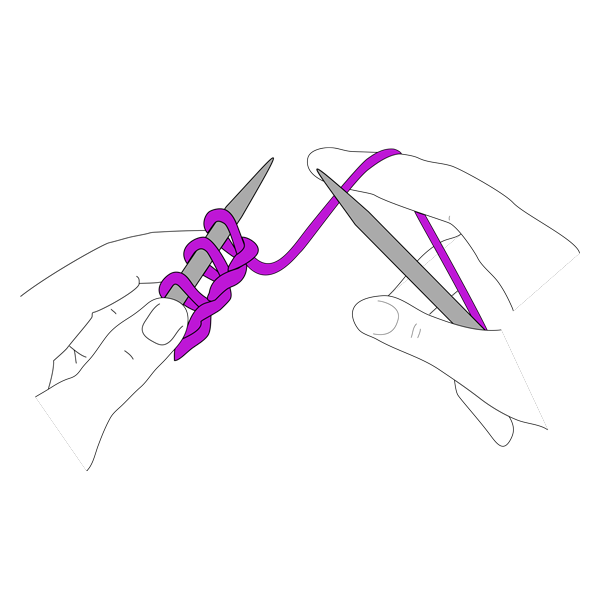
LONG TAIL CAST-ON
 1 Make a slip knot on the right needle, leaving a long tail. Wind the tail end around your left thumb, from the front to the back. Wrap the yarn from the ball over your left index finger and secure the ends in your palm.
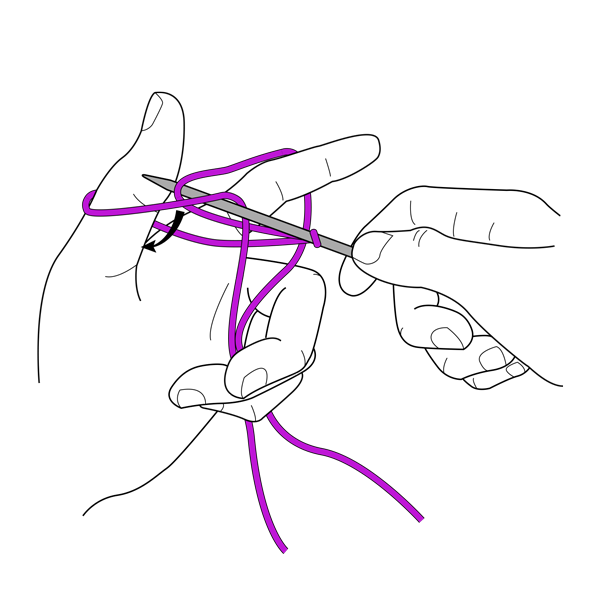 2 Insert the needle upward into the loop on your thumb. With the needle, draw the yarn from the ball through the loop to form a stitch.
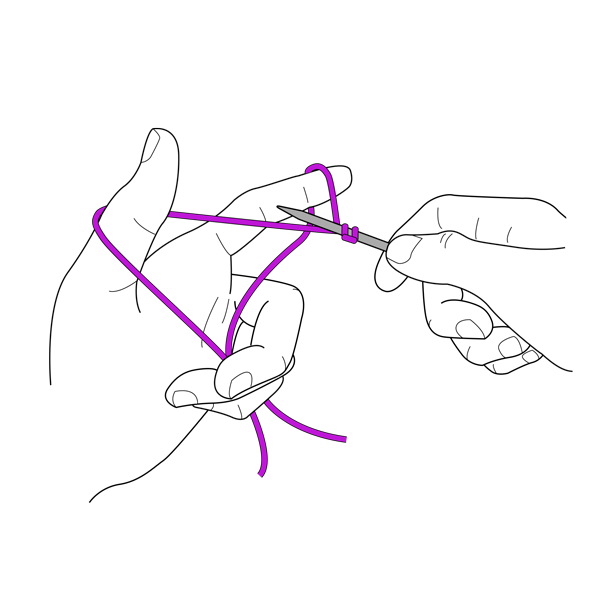 3 Take your thumb out of the loop and tighten the loop on the needle. Continue until all the stitches are cast on.
CABLE CAST-ON
 1 Cast on two stitches using the knitted cast-on method. Insert the right needle between the two stitches on the left needle.
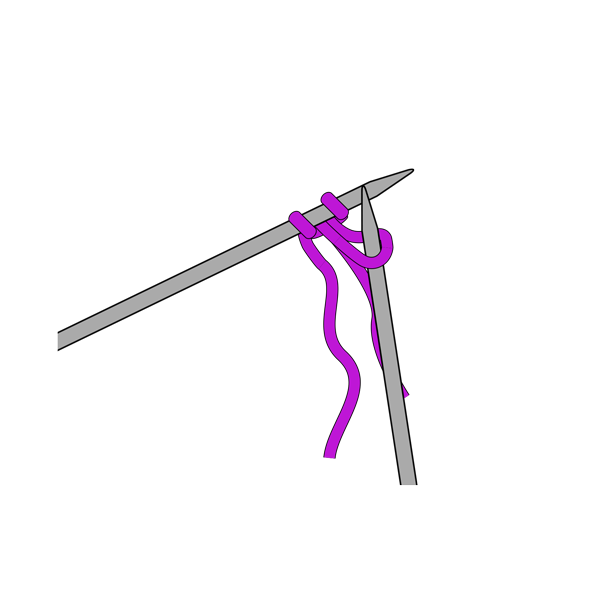 2 Wrap the yarn around the right needle as if to knit and pull the yarn through to make a new stitch.
 3 Place the new stitch on the left needle as shown. Continue as needed, always inserting the right needle in between the last two stitches on the left needle.
KNIT STITCH
 1 Hold the needle with the cast-on stitches in your left hand and the other needle in your right. Wrap the yarn around your fingers.
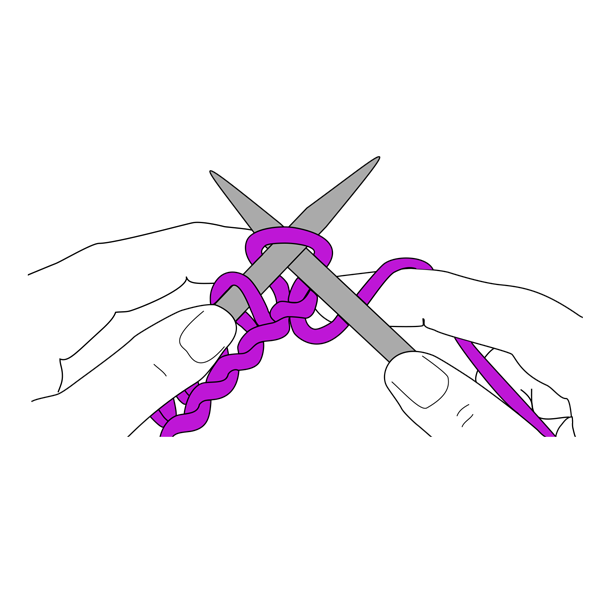 2 Insert the right needle from front to back into the first cast-on stitch on the left needle. Keep the right needle under the left and keep the yarn at the back.
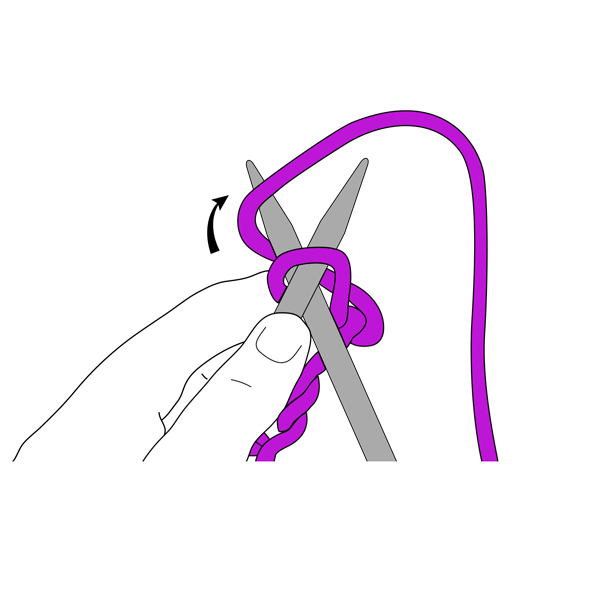 3 Wrap the yarn under and over the right needle in a clockwise motion.
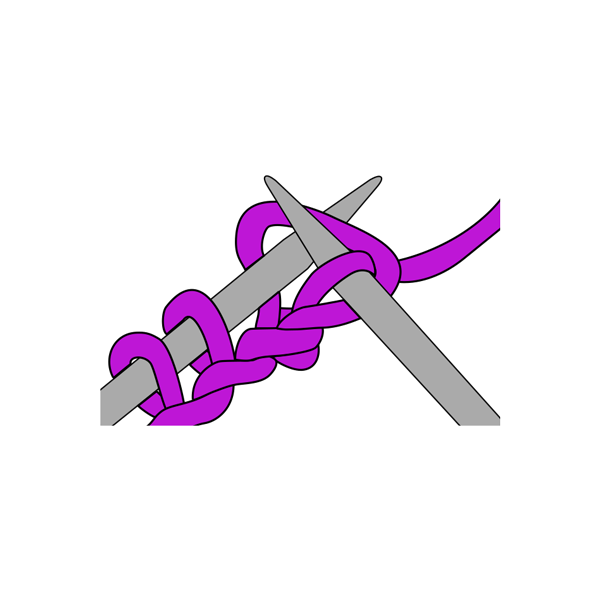 4 With the right needle, pull the yarn through the cast-on stitch.
 5 Slip the cast-on stitch off the left needle, keeping the newly formed stitch on the right one.
PURL STITCH
 1 Hold the working needle in your right hand and the needle with the stitches in your left. The yarn is held and worked with your right hand and is kept to the front of the work.
 2 Insert the right needle from the back to front into the first stitch on the left needle. The right needle now is in front of the left with the yarn in front of the work.
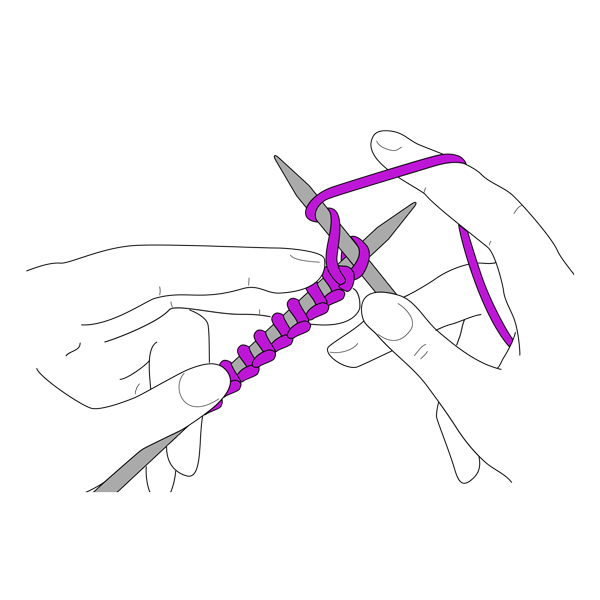 3 Wrap the yarn counterclockwise around the right needle with your right index finger.
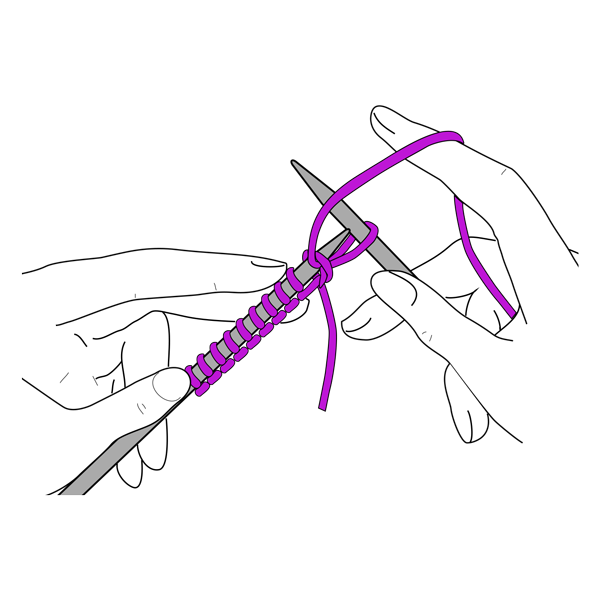 4 Draw the right needle and yarn backward through the stitch on the left needle to form a loop on the right needle.
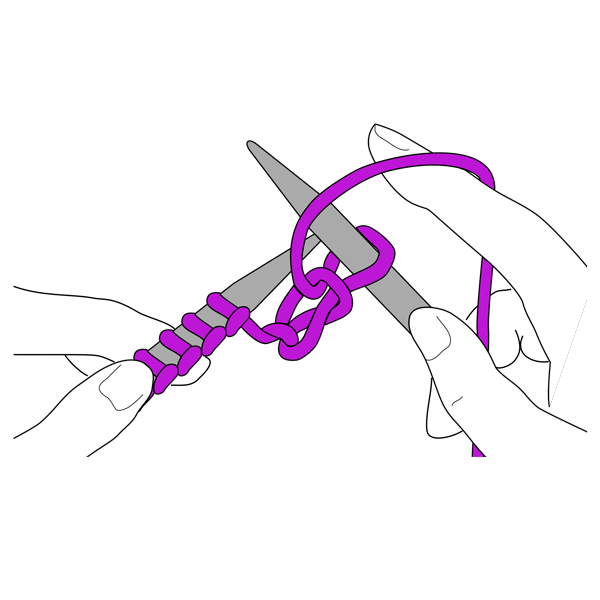 5 Slip the stitch off the left needle and onto the right one.
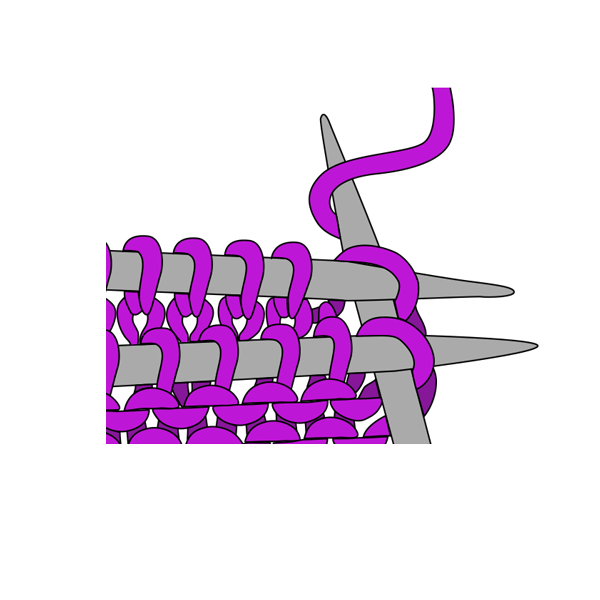
BIND OFF
 1 Knit two stitches. Insert the left needle into the first stitch on the right needle.
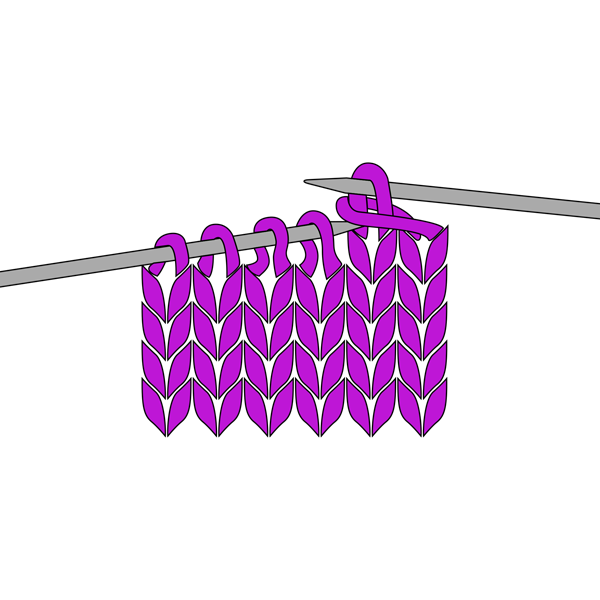 2 Pull this stitch over the second stitch and off the right needle.
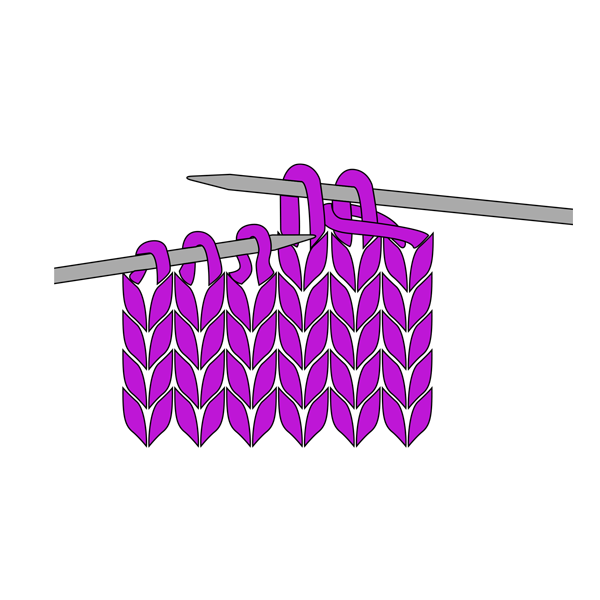 3 One stitch remains on the right needle as shown. Knit the next stitch.
THREE NEEDLE BIND OFF
 1 With the right side of the two pieces facing each other, and the needles parallel, insert a third needle knitwise into the first stitch of each needle. Wrap the yarn around the needle as if to knit.
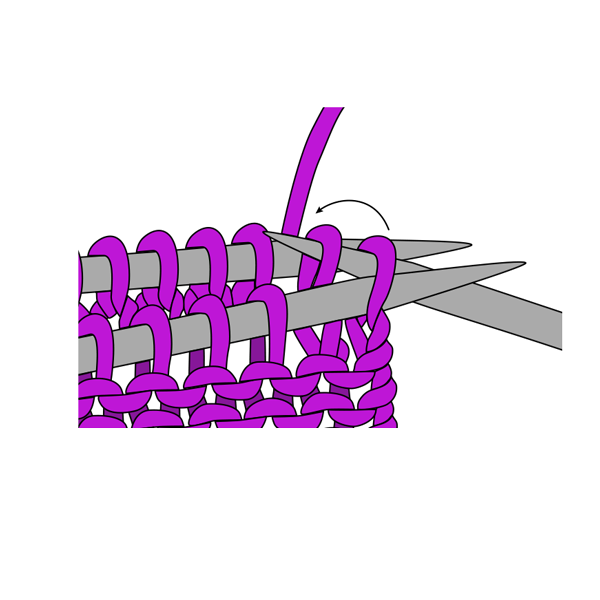 2 Knit these two stitches together and slip them off the needles. Knit the next two stitches together in the same way as shown.
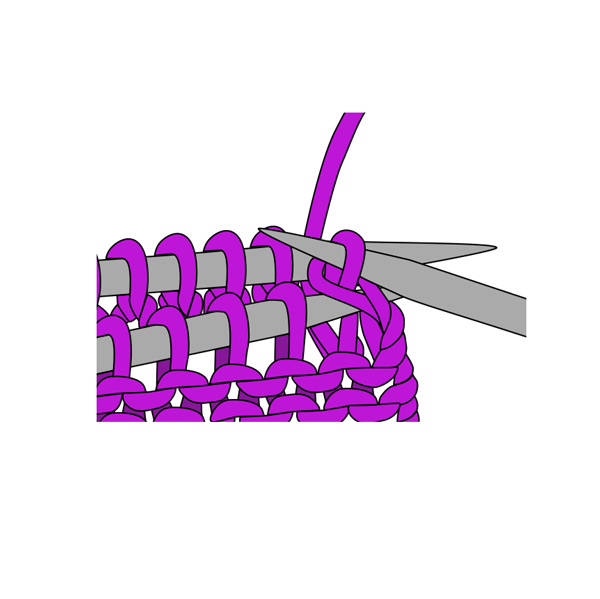 3 Slip the first stitch on the third needle over the second stitch and off the needle.
I am truly grateful for very very useful tips for knitting, for casting on, for binding etc along with abbreviations too!
I like to have pattern for baby blanket too!
Thanks
Your list of terms used by knitters, along with the tutorials on the basic stitches is wonderful to have. I have pictures of the terms and each step of the tutorial for my peruse. This is definitely makes being a Charter Member worthwhile. Thanks… Shirley Taylor
I would like to find the pattern called Dream Baby knitted blanket. I need the picture to see how it looks before I progress on.
Thank you, Marea
Hi Marea, is this the pattern you are looking for? https://www.ilikeknitting.com/magazine/knitting-baby-patterns/baby-blanket/down-to-dream-baby-blanket/
Thank you, I’m wanting a pattern for a young baby who has a large head. What is the size of a toddler’s head?
Hi! We recommend the CYC for standard measurements like this: https://www.craftyarncouncil.com/standards/head-circumference-chart
yes
I am looking for premature baby knitting patterns can you please help. He is 4lb
Hello! We have a variety of baby patterns in a variety of sizes: https://www.ilikeknitting.com/category/knitting-baby-patterns/
Hope this helps! – Nicola, Editor
I love my subscription. So much to learn and use in my knitting. I am an advanced beginner, but have never knitted with colors. I use a magic loop or flex needles. I’m very heavy into socks. Need to learn more! I’m so excited!!!
Thank you very much for the patterns. I knit for the newborns at our hospital, will be
nice to have alittle different style.
my sincere regards Gracie
Thanks for sharing.
I love those patterns.
Will try and follow the instructions.
Thank you very much for accepting my subscription!
I joined so I could get some new born baby patterns. As I am expecting my first great grandchild. So I said I better get knitting.
How can I print the patterns I like?
You are welcome to save this pattern by copying and pasting into a word document or by printing the pattern via the printer icon on the left hand side of your screen. Hope this helps! – Nicola, Editor
This is by far the best site for clear instructions yet.
I WANT TO UNSUBSCRIBE!
Hi there! We are sorry to see you go! Our customer service team can help you unsubscribe if you shoot them an email. We are happy to help! https://www.ilikeknitting.com/contact-us/
The patterns that you have been so easy to follow. No guesswork is involved in making any of these items. I love this website and will continue to tell others that knit too..
Looking for the pattern Richmond Graphic Blanket. Please provide – love the design! Thanks
Here you go! https://www.ilikeknitting.com/magazine/knitting-afghan-patterns/richmond-graphic-blanket/
– Nicola, Editor
Great info! Thanks.
Is there an easy pattern for 1 year old knitted hat?
Hello! We have lots of cute baby hats: https://www.ilikeknitting.com/category/knitting-baby-patterns/baby-hats/
Happy knitting! – Nicola, Editor
How do I unsubscribe? I’m not a knitter!
Hello! Our customer service team can make sure everything is in order if you shoot them an email. We are happy to help! Thanks
Thank you for subscribing me! I’m a beginner knitter. Really excited to start knitting baby’s cardigans!
Thank you. I need a needle chart on sizes, can you help me out. Like needle size 7=4.5 mm
Hello! This chart from the Craft Yarn Council should help! https://www.craftyarncouncil.com/standards/hooks-and-needles
– Nicola, Editor
I love this
Thank you
Thank you for simple demonstration. Looking forward to being a pro like you.
When do I get my first magazine??
Hi Clare! Welcome to I Like Knitting! We are a digital-only publication so you won’t be receiving a copy in the mail. However, you have instant access to all current and past publications! Enjoy! – Nicola
Thank you for adding me. I need more of babies patterns
I need a simple pattern for an Afghan
Hi Jackie! Here are some easy knit afghans you might like:
https://www.ilikeknitting.com/magazine/knitting-afghan-patterns/bonfire-plaid-blanket/
https://www.ilikeknitting.com/magazine/knitting-afghan-patterns/richmond-graphic-blanket/
https://www.ilikeknitting.com/magazine/knitting-afghan-patterns/cobblestone-baby-blanket/
Happy knitting!
Thankyou
You have some very interesting articles and tutorials, thanks
Thank you.
Great ideas
Looking forward to learning new techniques and knitting new items thankyou
Thanks for sharing.
God bless you.
I’ve never worked with DPN. Can I use circular needles with this pattern?
I haven’t checked out the patterns yet. but when I looked further down the page … You have some really good stuff, (yarn/wool sizes, stitch abbreviations, and how to do some stitches.) I want to sell some of my knitted items this fall and winter and in some cases, I don’t know how to do some of the stitches, (like the mattress stitch.) I see it but just don’t get how to do it. Thanks.
I hope that you’ve checked out the videos for this stitch on YouTube.
Thank you very much for the subscription. I really appreciate it.
Regards
Penelope