

Welcome back to the Knit Along party! Today, we’ll be working up the vest and hat. Soon, your little one will be fighting fires with all the necessary equipment and a helpful little Dalmatian.
Gauge:
16 sts and 28 rows= 4” [10 cm] in St st on larger needles (for clothing pieces)
12 sts and 20 rnds = 4” [10 cm] in St st in the round on smaller needles (for toy components)
Pattern Notes:
Vest is worked flat in St st with minimal shaping and finishing, providing a great project for a beginner. The hat is worked in the round and features a sturdy brim that is re-enforced with cardboard. The toy components are all worked in the round at a slighter tighter gauge and are filled with stuffing where appropriate.
Firefighter Vest

With smaller needles and CC1, CO 74 (78, 82, 88, 96, 106)
Rows 1-8: Work in K1, P1 Rib.
Switch to MC and larger needles.
Row 9: Knit across all sts.
Work in St st until piece measures 5¼ (5½, 6, 7, 7¾, 8¾)” from CO edge.
Row 10 (WS): Purl across all sts.
Split for Sleeves and Fronts
Right Front
Row 1: K16 (17, 18, 19, 21, 24), k2tog, k1, move remaining 55 (58, 61, 66, 72, 79) sts to waste yarn.
Row 2: Purl across all sts.
Row 3: K1, ssk, knit to last 3 sts, k2tog, k1 – 16 (17, 18, 19, 21, 23) sts.
Row 4: Purl across all sts.
Row 5: Knit to last 3 sts, k2tog, k1 – 15 (16, 17, 18, 20, 22) sts.
Rep Rows 2-5, 2 (2, 2, 2, 3, 4) more times – 9 (10, 11, 12, 11, 10) sts.
Work even until piece measures 4 (4¼, 4½, 4½, 4¾, 5, 5 ¼)” from sleeve split, ending with a WS row.
Move 9 (10, 11, 12, 11, 10) sts to waste yarn.
Left Front
Place 19 (20, 21, 22, 24, 27) sts for Left Front on needles, k1, ssk, k16 (17, 18, 19, 21, 24) –18 (19, 20, 21, 23, 25) sts.
Row 1: Purl across all sts.
Row 2: K1, ssk, knit to end – 17 (18, 19, 20, 22, 24) sts.
Row 3: Purl across all sts.
Row 4: K1, ssk, knit to last 3 sts, k2tog, k1 – 15 (16, 17, 18, 20, 22) sts.
Row 5: Purl across all sts.
Rep Rows 2-5, 2 (2, 2, 2, 3, 4) more times – 9 (10, 11, 12, 11, 10) sts.
Work even until pieces measures 4 (4¼, 4½, 4½, 4¾, 5, 5¼)” from sleeve split, ending with a WS row.
Move 9 (10, 11, 12, 11, 10) sts to waste yarn.
Back
Put rem 36 (38, 40, 44, 48, 52) sts back on needles.
Row 1: K1, k2tog, knit to last 3 sts, ssk, k1 – 34 (36, 38, 42, 46, 50) sts.
Row 2: Purl across all sts.
Rep last 2 rows 5 (6, 6, 7, 8, 8) more times – 24 (24, 26, 28, 30, 34) sts.
Using a 3-needle Bind Off, BO 9 (9, 9, 9, 12, 15) shoulder sts on both sides. Move rem 6 (6, 8, 10, 6, 4) sts to waste yarn.
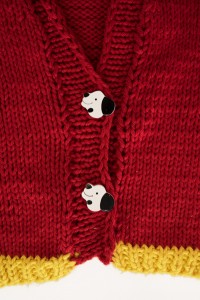
Edge
Beginning at the lower right corner, using MC and smaller needles, pick up and knit 2 sts for every 3 rows across the right front, place back held sts onto needle and knit across, pick up and knit 2 sts for every 3 rows across the left front.
Work in St st for 3 rows.
Evenly space out 2 (2, 2, 2, 2, 3, 3) markers across the Left Front and work buttonholes as follows: *knit to m, yo, k2tog; rep from * 2 (2, 2, 2, 2, 3, 3) times total.
Next Row: Knit across all sts.
Work in St st for 3 rows.
BO all sts knit wise.
Armhole Edging
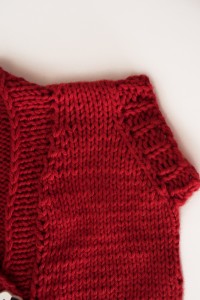
With MC and smaller dpn, pick up and knit 2 sts for every 3 rows, making sure that you end with a multiple of 2 sts.
Work K1, p1 rib for 1”.
BO sts knitwise.
Finishing
Soak piece in lukewarm water with wool wash of your choice. Gently squeeze excess water out and lay flat to dry. Weave in all ends and cut any loose strings.
Sew buttons opposite buttonholes.
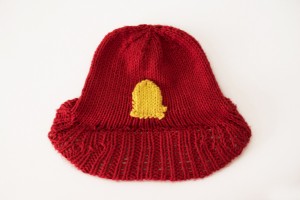
Firefighter Hat and Patch
K2, p1 Rib (work in the rnd)
Rnd 1: *K2, p1; rep from * to end.
Rep Rnd 1 for pattern.
Pattern
With MC and waste yarn, using larger circular needles, provisionally CO 57 (63, 69, 72, 78, 84) sts.
Rnds 1-5: Work in K2, p1 Rib.
Rnd 6: Work K2, p1 Rib for 27 (30, 33, 36, 39, 42) sts, w&t, work in est K2, p1 Rib pattern to 1 st before end of rnd m, w&t, work in est K2, p1 Rib pattern to 1 st before wrapped st, w&t.
Continue to work in the est K2, p1 Rib Pattern, working a w&t 1 st before the previous wrapped st 9 more times.
Join Rnd: Fold the brim section in half. Lay on top of foam and trace the shape onto the foam. Cut out two pieces of foam, trim if necessary and place both pieces of foam to hat brim. Join brim sts to CO edge to encase the foam in the brim as follows: *pick up the first st from the CO edge, knit next st tog with corresponding st on CO edge; rep from * all the way around, making sure to trim the foam edges as needed. Continue to work in est K2, p1 Rib pattern to end of rnd.
Rnd 7 (Dec): (K4, k2tog) 9 (10, 11, 12, 13, 14) times, knit to end – 48 (53, 58, 60, 65, 70) sts.
Knit until hat measures 4 (4½, 5, 5½, 6, 6½)” from join rnd.
Rnd 8 (Dec): (K4, k2tog) 8 (8, 9, 10, 10, 11) times, knit to end – 40 (45, 49, 50, 55, 59) sts.
Rnds 9-10: Knit all sts around.
Rnd 11 (Dec): (K3, k2tog) * 8 (9, 9, 10, 11, 11) times – 32 (36, 40, 40, 44, 48) sts.
Rnd 12: Knit all sts around.
Rnd 13 (Dec): *K2, k2tog; rep from * to end of rnd – 24 (27, 30, 30, 33, 36) sts.
Rnd 14 (Dec): *K1, k2tog; rep from * to end of rnd – 16 (18, 20, 20, 22, 24) sts.
Rnd 15: Knit all sts around.
Rnd 16 (Dec): *K2tog; rep from * to end of rnd – 8 (9, 10, 10, 11, 12) sts.
Cut yarn, leaving a 16” tail, pull tight through all rem sts on the needles.
Patch
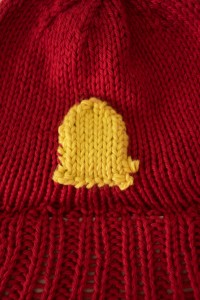
With Larger needles and Yellow, CO 10 sts.
Knit in St st for 2”.
Row 1 (Dec): K1, ssk, knit to last 3 sts, k2tog, k1 – 8 sts.
Row 2 (WS): Purl across all sts.
Row 3 (Dec): K1, ssk, knit to last 3 sts, k2tog, k1 – 6 sts.
Row 4: Purl across all sts.
Row 5 (Dec): K1, ssk, knit to last 3 sts, k2tog, k1 – 4 sts.
Row 6 (Dec): P2tog, p2tog – 2 sts.
Row 7 (Dec): K2tog – 1 st.
Cut yarn, leaving a 12” tail, pull tight.
Sew patch to front of the hat.

Where in the pattern do you pick up the 12 stitches from the shoulders and attach to the back..these stitches were from the right and left front.this is a size 2.
what size range is this?
I have 11 stitches on waste yarn for 18 month size shoulder seams. Pattern calls for 3 needle bind off leaving 8 back stitches. What do I do with the extra 2 shoulder stitches on each side?
There is no sizes listed
Sizing details can be found here: http://www.ilikeknitting.com/ilk-blog/firefighter-set-knit-along/
what size is the toddler’s sweater?
See sizing details here: http://www.ilikeknitting.com/ilk-blog/firefighter-set-knit-along/
what size needles are used in this pattern
See needle details here: http://www.ilikeknitting.com/ilk-blog/firefighter-set-knit-along/