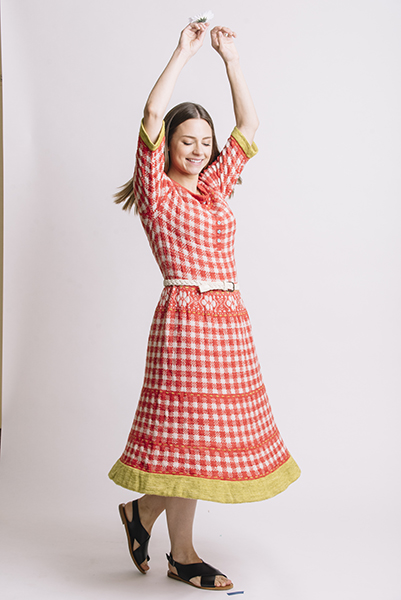
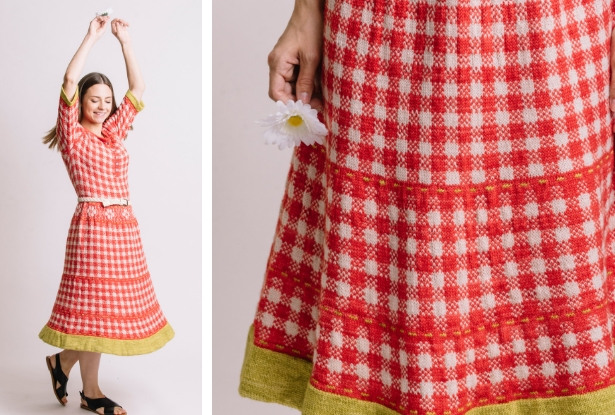
The Giselle Gingham Dress combines a timeless gingham pattern with an easy-to-follow stitch, making it the perfect large project to take on-the-go. With its simple, memorable design, you can knit this dress anytime, anywhere, and once finished, you’ll have a stylish piece ready for summer picnics, outdoor gatherings, and beyond. Embrace the perfect mix of comfort and chic with this fun and fashionable summer essential!
Skill Level: Advanced
Size: Finished Bust Size 28 (32, 36, 38.5, 42.5, 46.5, 50.5)” / 71 (81, 91.5, 98, 108.5, 118.5, 128.5) cm
0-1 “negative ease recommended.
Shown in size 36”
Gauge: 30 sts and 30 rows = 4” [10 cm] in St st after wet blocking
Materials
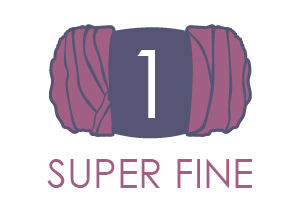 Yarn: Anzula Squishy (80% Merino, 10% Nylon, 10% Cashmere goat; 385 yards [352 meters]/114 grams): Watermelon (MC, 3 (3, 4, 4, 5, 5, 6) balls), Au Naturel (CC1, 2 (2, 3, 3, 4, 4, 5) balls), Avocado (CC2, 2 balls each size)
Needles: US size 1 (2.5 mm) 16” circular or 8” DPNs for button bands, US size 1.5 (2.5 mm) 40” circular, US size 2.5 (3.0 mm) 40” circular, crochet hook for provisional cast-on
Notions: Markers (5), stitch holders, waste yarn for provisional cast-on, five-ten 12mm buttons, tapestry needle, one or two petticoats/crinolines
Abbreviations
Backwards Loop CO
Place loops onto your right-hand needle, first pick up the working yarn over your index finger, from back to front, and place your right-hand needle into the arc as if to knit, slip the stitch onto the needle – you have made a backwards loop.
German Short Row or German Turn and Work (GTW)
Work to desired turn, turn your work, hold working yarn to front, slip stitch from left to right needle and lift working yarn up and over pulling tightly. This creates a double stitch.
Work all double stitches as one stitch, as you encounter them.
Jogless Stripe
When beginning a new stripe, knit one round in the new colour, then before starting the next round, use the right needle to lift the stitch below the first stitch on the left needle up and on to the left needle. Knit these two stitches together. Use this or any preferred jogless stripe technique when needed.
Provisional CO
Using waste yarn and crochet hook, make a slip knot, then make single crochets around knitting needle.
2 x 2 Rib
Rnd 1: *K2, p2; rep from * around.
Rep Rnd 1 for patt.
Pattern Notes
The dress is worked from the neck to end of Raglan Chart, from centre front, over left front, sleeve, back, the other sleeve, and finally back to centre front.
Once the Raglan Chart is complete the body is joined and the beginning of round marker slipped to side seam and the rest of the dress continued in the round without a steek.
Sts are provisionally cast on and joined with a steek (for the Henley detail), neck shaping is worked with Short Rows, a small circular yoke is worked before Raglan shaping to complete the yoke and Henley detail. Once the Raglan Chart is worked to completion (sleeves will have been separated and Henley detail bound off), sts are cast on to join and work the bodice, waist motif, and skirt. The skirt ends with a folded hem. Each sleeve is worked with a folded hem cuff. Then the Henley steek is prepared and cut before working the button bands. Collar is worked and then the piece is blocked and buttons sewn.
Pattern
Provisionally CO 126 (130, 144, 144, 144, 144, 150) sts.
With MC, knit into the provisional CO sts and CO an additional 7 steek sts at the end of row, join to work in the rnd, placing marker to denote beg of rnd. (133 (137, 151, 151, 151, 151, 157) sts; 126 (130, 144, 144, 144, 144, 150 sts, 7 steek sts)
Neck Shaping
Work German Short Rows as follows:
Short Row Set-up Row 1: K steek sts, k94 (97, 108, 108, 108, 108, 112), work GTW.
Short Row Set-up Row 2: P63 (64, 72, 72, 72, 72, 74) sts, work GTW.
Short Row 1: K to 4 sts past the double st created by GTW, work GTW.
Short Row 2: P to 4 sts past double st created by GTW, work GTW.
Work Short Row 1- 2 twice more.
Knit to end of rnd.
Knit 1 rnd (working all double sts as one st) and inc 18 (38, 24, 48, 48, 48, 66) sts evenly across. (144 (168, 168, 192, 192, 192, 216) sts, 7 steek sts)
Joining colours as needed, work Yoke Motif Chart and repeating Floral Rep 6 (7, 7, 8, 8, 8, 9) times across.
After Yoke Motif Chart has been worked and with MC, place Raglan markers as follows:
K steek sts, k37 (45, 46, 52, 53, 52, 62), pm, k51 (55, 53, 63, 61, 63, 63), pm, k38 (47, 48, 53, 54, 53, 64), m1, k38 (47, 48, 53, 54, 53, 64), pm, k51 (55, 53, 63, 61, 63, 63), pm, k37 (45, 46, 52, 53, 52, 64), k steek sts. (253 (295, 295, 337, 337, 337, 379) sts + 7 steek sts)
Work Raglan Chart for chosen size. (317 (347, 379, 401, 441, 493, 515) sts)
Notes for Working Raglan Charts:
The Raglan charts are given by size. The charts do not show the steek sts until the final rnd in which the Henley steek is bound off and centre front sts cast on to join.
The Raglan Charts are separated (in 2 or 3 charts) and begin with centre front; working across left front sts, sleeve sts, back sts, sleeve sts, and right front to end of rnd.
When Raglan increases are complete and suggested length of yoke is achieved, you will separate the sleeve sts from the body sts (see Separating Sleeve sts from Body sts). On the chart you will see the underarm cast on joining the body and ‘no sts’ over the sleeves for the following rounds.
Cyan (bright blue) marks your centre back st and orange/yellow sts show the rnd in which you will bind off your steek sts and cast on sts to join your front, ending the Henley portion of the knit (see Binding off Henley below).
Suggested Yoke Length: Work until yoke/raglan is approx. 6.5 (7, 7.5, 8, 8.5, 8.75, 9)” / [16.5 (17.5, 19, 20, 21, 22, 22.5) cm] from provisional CO, measuring from centre back.
Separating Sleeves from Body
Separate Sleeves from Body, placing markers on either side of underarm CO sts (as shown on chart), to join CO sts at each underarm to complete Gingham patterning, as follows:
Work 45 (51, 57, 61, 67, 76, 81) Left Front sts, pm, place 67 (69, 73, 77, 85, 93, 97) Sleeve sts on holder, CO 11 (13, 16, 19, 22, 19, 23) underarm sts, pm, work 93 (107, 119, 125, 137, 155, 167) Back sts, pm, place 67 (69, 73, 77, 85, 93, 97) Sleeve sts on holder, CO 11 (13, 16, 19, 22, 19, 23) underarm sts, pm, work 45 (51, 57, 61, 67, 76, 81) Right Front sts. (205 (235, 265, 285, 315, 345, 375) sts)
Binding off Henley
Work to rnd shown on chart, BO all steek sts, cont around to end of rnd, CO 5 sts, break yarns. (210 (240, 270, 290, 320, 350, 380) sts)
New Beg of Rnd
Move sts, slipping sts from left to right needle so the new beg of rnd is at the centre of Left underarm CO (edge of one of the 5 st ‘blocks’ and choose a spot more towards the back panel). You may need to work a lift and ktog every so often (a jogless stripe technique) to keep the side seam invisible.
Waist Shaping
Cont to work in Main Motif patt and work waist shaping.
Dec 1 st on either side of side seam markers approx. every 4th rnd 5 (6, 8, 7, 8, 10, 11) times as follows:
*Work to 2 sts before side seam marker, k2tog, work (across Back/Front) to side seam marker, sm, ssk; rep from * once more. (4 sts dec’d)
Work 4 rnds.
(190 (216, 238, 262, 288, 310, 336) sts)
Work in patt until piece meas approx. 7 (7.25, 7.5, 7.5, 7.75, 8, 8.25)” / [17.5 (18, 19, 19, 19.5, 20, 21) cm) from underarm CO.
Work 1 rnd in MC, inc 1 (0, 1, 1, 0, 1, 0) st at each side seam, remove side seam markers. (192 (216, 240, 264, 288, 312, 336) sts)
Work Waist Motif Chart rep 8 (9, 10, 11, 12, 14, 14) times across. (288 (324, 360, 396, 432, 468, 504) sts)
Work 1 rnd in MC, inc 2 (6, 0, 4, 8, 2, 6) sts evenly across. (290 (330, 360, 400, 440, 470, 510) sts)
Work Main Motif Chart for approx. 6 (7, 8.5, 8.5, 9, 9, 10)” / [15 (17.5, 21.5, 21.5, 22.5, 22.5, 25) cm].
Shaping Skirt
*With MC, work 1 rnd.
With MC, work inc rnd as follows:
[K5, m1] to end of rnd.* (348 (396, 432, 480, 528, 564, 612 sts)
Next Rnd: [K3 in MC, k3 in CC2] to end of rnd.
With MC, work 1 rnd.
Next Rnd: With MC, work 1 rnd, inc 2 (4, 8, 0, 2, 6, 8) sts evenly around. (350 (400, 440, 480, 530, 570, 620) sts)
Work Main Motif Chart for approx. 3 (4, 5, 5, 5, 5, 5)” / [7.5 (10, 12.5, 12.5, 12.5, 12.5, 12.5) cm].
Work from * to *. (420 (480, 528, 576, 636, 684, 744) sts)
Next Rnd: [K3 in MC, k3 in CC2] to end of rnd.
With MC, work 1 rnd.
Next Rnd: With MC, work 1 rnd, inc 0 (0, 2, 4, 4, 6, 6) sts evenly around. (420 (480, 530, 580, 640, 690, 750) sts)
Work Main Motif Chart for approx. 3” / [7.5 cm].
With MC, work 1 rnd, inc 0 (0, 4, 2, 2, 0, 0) sts evenly around. (420 (480, 534, 582, 642, 690, 750) sts)
Next Rnd: *K3 in MC, k3 in CC2; work from * to end of rnd.
With MC, work 2 rnds.
Folded Hem
Change to CC2, knit until approx. 3” / [7.5 cm].
Next Rnd: Purl.
Change to smaller needles, work approx. 3” / [7.5 cm].
Once you have worked the folded hem, you may BO all sts and fold hem and hand sew to inside of skirt OR pick up sts from the inside of skirt and BO hem whilst attaching.
Attaching and Binding Off Hem
Turn work inside out. You may use US size 2.5 (3.0 mm) circular for Skirt sts.
With circular needles (or in multiple steps with DPN), pick up the same number of sts on Skirt at the height of hem edge when folded to the inside of skirt.
Align left hand needles of both skirt and folded hem and then with right hand needle, knit into the Hem st and Skirt st. Repeat. You will have 2 sts on right needle, pass one st over the other beg BO. *Knit into next Hem and Skirt sts, BO; rep from * until all sts are bound off.
Sleeves
Replace Sleeve sts from holder to needles.
Right Sleeve
Work in patt over 67 (69, 73, 77, 85, 93, 97) Sleeve sts (begin at back edge) to CO sts, pick up and k11 (13, 17, 19, 22, 19, 22) underarm sts, join to work in rnd. (78 (82, 90, 96, 107, 112, 119) sts)
*Work in patt for approx. 2.5” / [6.5 cm], placing marker at centre underarm.
Dec 1 st on either side of centre marker every 1” / [2.5 cm] as follows:
K1, k2tog, work to last 3 sts, ssk, k1.
Work 5 rnds.
Work the above 6 rnds 4 (4, 5, 5, 5, 5, 6) more times until Sleeve is approx. 5 (6.5, 6.75, 6.75, 7, 7, 7.5)” / [12.5 (16.5, 17, 17, 17.5, 17.5, 19) cm]. (68 (72, 78, 84, 95, 100, 103) sts)
Work 2 rnds in MC.
Work 1 rnd of [k3 in MC, k3 in CC2] to end of rnd AND AT THE SAME TIME, dec 2 (0, 0, 0) 5, 4, 1 sts evenly across. Do not break CC2*. (66 (72, 78, 84, 90, 96, 102) sts)
Left Sleeve
Beg at back edge of underarm CO sts and working in patt, pick up and k11 (13, 17, 19, 22, 19, 22) underarm sts, work 67 (69, 73, 77, 85, 93, 97) Sleeve sts, join to work in the rnd. (78 (82, 90, 96, 107, 112, 119) sts)
Work as Right Sleeve from * to *.
Folded Sleeve Cuff
With MC, knit 2 rnds.
With larger needles and CC2 (break MC), knit 12 rnds or until meas 1.5” / [3.5 cm].
Change to smaller needles.
Next Rnd: Purl.
Knit 13 rnds or until length is the same when folded.
BO all sts and hand sew hem to inside of sleeve OR proceed with binding off and attaching (as with skirt hem) as follows:
The next step may require a st holder or circular needle.
Turn your sleeve inside out. If you used a st holder or circular needles to do this, replace sts to DPNs.
With smallest DPNs, pick up the back loop of sts from Sleeve. It is easiest to pick them up to match the cuff DPNs.
Fold cuff so your Cuff DPN and Sleeve DPN align. As with the folded Hem of Skirt, knit the Cuff st and Sleeve sts together, twice, BO. *Knit next Cuff and Sleeve sts together, BO; rep from * until all sts are bound off.
Steeking
Prepare and cut your steek.
After you have prepared and cut your steek, the next step is to work button bands.
Button Bands
With MC, RS of left Henley edge, and smallest needles, pick up and knit in the ratio of 1st:2rnds in multiple of 4 sts.
Work 5 rows in 2 x 2 Rib.
Mark button location and work buttonhole band as follows:
With MC, RS of right Henley edge, and smallest needles, pick up and knit the same number of sts for left band.
Work 2 rows of 2 x 2 Rib.
Work buttonhole rib, working a (k2tog, yo) buttonhole.
Work 2 rows of 2 x 2 Rib.
BO all sts.
Collar
Carefully place sts from provisional CO (at neck) to smaller circular needles and remove waste yarn.
Working from WS and with MC, knit across sts AND AT THE SAME TIME, pick up 4 sts across the front rib of Button Band and 2 sts of back Button Band. (132 (136, 150, 150, 150, 150, 156) sts)
Purl 1 row.
Next Row: K2 (2, 1, 1, 1, 1, 2), *m1, k4; rep from * 31 (32, 35, 35, 35, 35, 37) times, m1, k2 (2, 1, 1) 1, 1, 2. (33 (34, 38, 38, 38, 38, 39) sts inc’d; 165 (170, 188, 188, 188, 188, 195) sts)
Work 3 rows in St st.
Next Row: K2, m1, k to last 2 sts, m1, k2.
Work the above 4 rows twice more. (171 (176, 194, 194, 194, 194, 201) sts)
Next Row: P2, p2tog, p to last 4 sts, p2togtbl, p2. (2 sts dec’d)
Next Row: K2, ssk, k to last 4 sts, k2tog, k2. (167 (172, 190, 190, 190, 190, 197) sts)
Pick up and k11 sts up the side of Collar, picking up sts more closely together around the ‘bend’ or curve of the collar. (178 (183, 201, 201, 201, 201, 208) sts)
P13, p2tog, p to last 4 sts, p2togtbl, p2, pick up and p11 sts at a similar rate as the previous pick up, along curve and edge AND AT THE SAME TIME, dec 1 (2, 0, 0, 0, 0, 3) st(s) evenly across. (186 (190, 210, 210 210, 210, 214) sts)
Work 2 x 2 Rib to last 2 sts, k2.
Work the above row once more.
BO all sts.
Finishing
Weave in all ends.
Block to measurements in schematic and folding collar over approx.1.25” / [3 cm] and pin in place until dry. Once dress is dry, you may need to steam press collar smooth and tack in front, shoulder, and centre back to keep in place.
Sew on buttons.
Pop on your dress with or without a petticoat and head out to the woods to join the picnic!