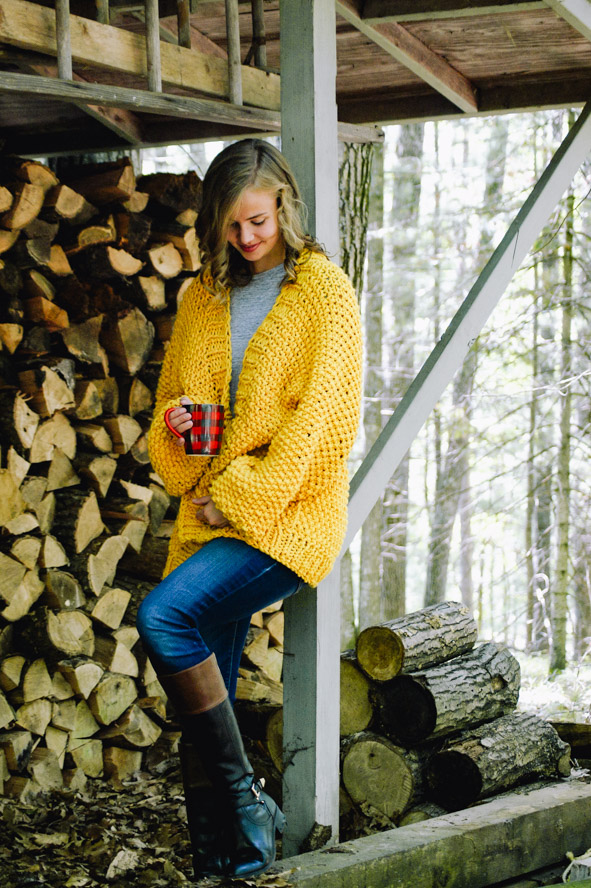
As cozy as a giant hug, this oversized cardigan with balloon sleeves is constructed so there is only one seam! Worked from cuff to center back in two pieces, this project is a breeze to knit and perfect for throwing on when the temperature drops.
Skill Level: Easy
Size: Finished Bust Size 38 (42, 48, 52, 58)” to fit bust 30 (34, 38, 42, 46)”
4-8” positive ease recommended.
Shown in size 48”
Gauge: 8 sts and 12 rows = 4” [10 cm] in Seed st
Materials
 Yarn: Paintbox Yarns Wool Mix Super Chunky (50% Wool, 50% Acrylic; 60 yards [55 meters]/100 grams): 923 Mustard Yellow (11 (12, 12, 14, 15) balls).
Needles: US Size 17 (12 mm) 32” circular needles or longer
Notions: Tapestry needle, stitch holder or scrap yarn
Special Stitches
1×1 Rib
All Rnds: *K1, p1; rep from * around.
Pattern Notes
This pattern is worked in the round from cuff to underarm, then flat from the underarm to the center front and center back. The panels are seamed at the center back, then stitches are picked up along the hem and neckline.
Pattern
Right Sleeve
CO 14 (15, 16, 17, 18) sts, join to work in the rnd, taking care not to twist sts.
Work in 1×1 Rib for 6 rnds.
Next Rnd: *K1, M1; rep from * to the end of the rnd. (28 (30, 32, 34, 36) sts)
Next Rnd: Kfb, *p1, k1; rep from * to the end of the rnd. (29 (31, 33, 35, 37) sts)
Cont working even in Seed st for 48 (49, 50, 51, 51) rows.
Right Front and Back
You will now work the front and back of the cardigan at the same time.
Making sure that the final st worked was P, CO 25 (26, 26, 27, 27) sts using the backwards loop technique. Turn, beg with P, work in Seed st across sts and around sleeve, then pick up and knit 25 (26, 26, 27, 27) sts along the backward loops. Turn, beg with K, work in Seed st across all sts. (79 (83, 85, 89, 91) sts)
Cont working even in Seed st for 25 (26, 29, 31, 31) rows.
Right Back
You will now work the Back of the cardigan only.
Work in Seed st over 40 (42, 43, 45, 46) sts, leaving the rem sts on a stitch holder or scrap yarn. Turn work and cont working even in Seed st for 6 (7, 7, 8, 9) rows.
BO sts.
Left Sleeve
CO 14 (15, 16, 17, 18) sts, join to work in the rnd, taking care not to twist sts.
Work in 1×1 Rib for 6 rnds.
Next Rnd: *K1, M1; rep from * to the end of the rnd. (28 (30, 32, 34, 36) sts)
Next Rnd: Kfb, *p1, k1; rep from * to the end of the rnd. (29 (31, 33, 35, 37) sts)
Cont working even in Seed st for 48 (49, 50, 51, 51) rows.
Left Front and Back
You will now work the front and back of the cardigan at the same time.
Making sure that the final st worked was P, CO 25 (26, 26, 27, 27) sts using the backwards loop technique. Turn, beg with P, work in Seed st across sts and around sleeve, then pick up and knit 25 (26, 26, 27, 27) sts along the backward loops. Turn, beg with K, work in Seed st across all sts. (79 (83, 85, 89, 91) sts)
Cont working even in Seed st for 25 (26, 29, 31, 31) rows.
Left Back
You will now work the Back of the cardigan only.
Work in Seed st for 40 (42, 43, 45, 46) sts, leaving the rem sts on a stitch holder or scrap yarn. Turn work and cont working in Seed st for 6 (7, 7, 8, 9) rows.
BO sts.
Finishing
Lay left and right garment panel at the BO edges and seam along center Back.
Pick up and knit 62 (70, 78, 86, 94) sts along hemline.
Work 1×1 Rib for 6 rows.
BO sts.
Pick up and knit 5 sts along center Front hem edge of right garment piece, transfer 39 (41, 42, 44, 45) held sts from Right Front panel to needle, pick up and knit 13 (14, 15, 16, 17) sts along Back neckline, transfer 39 (41, 42, 44, 45) held sts from Left Front panel to needle, pick up and knit 5 sts down center Front hem edge of left garment piece.
Work 1×1 Rib for 6 rows.
BO sts.
Weave in all ends.


Thank you to the designer for this pattern. I’ve been looking for a seed stitch cardigan to make and I’ve found it! Love it!
I am thoroughly confused. This just isn’t as beginner friendly for me.
I’m stuck on transitioning from the sleeve to the front and back. I got the CO but couldn’t figure out how to pick up along cast on after seed stitches around the sleeve. Am I casting on more stitches or picking up from the stitches already cast on?
Hello Malika! I’ve reached out to the designer for advice and she or I will reply as soon as possible. Thanks! – Nicola, Editor
From the designer: Yes – the new stitches that have been cast on become the side seam, so they need to pick up and knit stitches along the cast on edge in order to work both the front, sleeve and back panels simultaneously.
Hope this helps!
-Nicola, Editor
As I was trying to do the sleeve, I quickly figured out that dpns were needed, a beginner would not know this, so I hope that the designer will update her directions so it will be truly a beginner’s pattern. It is a gorgeous sweater.
I think some suggestions for dpns or magic loop techniques for the sleeves would have been a great help if this is truly a pattern for a beginner. Might I also suggest a diagram so it is easier to visuualize how it is constructed. Very enjoyable knit.
Hi Rachel! Thank you for the feedback. We’ve passed along to the designer. We also noticed, thanks to your comment, that a measurement chart was missing for this pattern and has now been added: https://www.ilikeknitting.com/wp-content/uploads/Poplar-Chart-scaled.jpg
Let us know if you have any other questions/comments. Thank you! – Nicola