

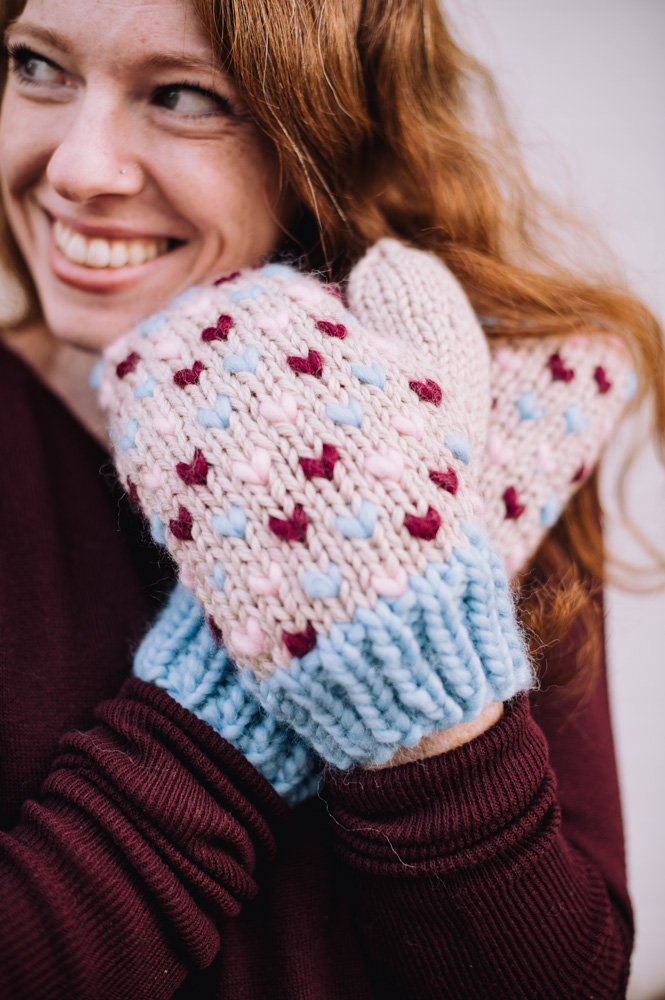
Simple, yet colorful, these classic thrummed mittens are worked from the cuff up, on a neutral background, with three alternating shades of colorful thrums. Easy enough for a first-time thrummer, this is a traditional pattern you’ll come back to again and again. Great as a last minute gift, there’s plenty of room for adaptation with this pattern. For a tonal look, work the mittens using shades of the same color for the thrums and background, or go wild with a random assortment of mixed colors! The thrums create a fuzzy lining on the inside which makes these mittens extra cozy.
Time: Day Project
Skill Level: Easy
Size: Women’s Medium – 9” hand circumference and 10.5” long
Gauge: 14 sts and 20 rnds = 4” [10 cm] in St st using MC held double
Materials
Yarn:
 KnitPicks Wool of the Andes Superwash Bulky (100% superwash wool; 137 yards [125 meters]/100 grams): Oyster Heather (MC, 2 hanks)
KnitPicks Tuff Puff (100% wool; 44 yards [40 meters]/100 grams): Sky (CC1, 1 skein), Flamingo (CC2, 1 skein), Fairy Tale (CC3, 1 skein)
Needles: US size 10 (6.0 mm), 10.5 (6.5 mm) DPNs
Notions: Scissors, tapestry needle, stitch markers, scrap yarn
Special Stitches
Thrum: Insert the right needle into the next stitch, one round below. Take one of your 5” thrums in the appropriate color and fold it in half over your right index finger (or left index finger if knitting Continental style). Place the thrum loop over the right needle tip, as if it were the working yarn and pull the right needle through the work, as if to knit. The thrum should now be incorporated into your work and appear as a stitch on the right needle. Insert the right needle into the next stitch on the left needle (the active stitch above where you just placed the thrum) and knit the stitch. Insert the left needle tip from left to right through the thrum on the right needle and pass it over the stitch you just knit. The thrum should now be secured in place and you should not have increased any stitches. Pull the two tails of the thrum gently to tighten it in place, then continue onto the next stitch as directed in the pattern.
Pattern Notes
Before beginning, you will want to make your thrums. For this pattern, you will be using three colors of thrums. Cut 84 five inch long lengths each of colors CC1, CC2 and CC3. You will be using half your thrums for each mitten. To make the thrums fuller, pull the fibers apart slightly, to create fluffier, more roving-like thrums.
Pattern
Cuff
Using smaller needles and CC1, CO 26 sts, pm and join to beg working in the rnd.
Rnds 1-9: *K1, p1; rep from * to end.
Cut yarn and switch to larger needles.
Thumb Gusset
Using MC held double, cont as follows:
Rnd 10: K13, M1, k13, M1. (28 sts)
Note: As you’re adding the thrums to your work, alternate colors, beginning with CC1, then CC2, then CC3. Continue to rotate between each color, to create a mixed effect on the mittens. For example, if your current thrumming round ends with a CC 2 thrum, then your next thrumming round will begin with a CC3 thrum.
Rnd 11: *K3, thrum; rep from * to end of rnd.
Rnd 12: Knit to end, pm, M1. (29 sts)
Note: The stitches between the marker and the end of the round will be the stitches for the thumb gusset. The number of thumb stitches will increase as you continue to work the hand.
Rnd 13: K1, *thrum, k3; rep from * until 2 sts rem before next marker, knit to end.
Rnd 14: Knit to next marker, sl marker to right needle, M1, knit to end, M1. (2 gusset sts increased)
Rnd 15: *K3, thrum; rep from * to next marker, knit to end.
Rnd 16: Rep Rnd 14.
Rep Rnds 13-16 until you have 15 thumb sts, ending with Rnd 14.
Place the 15 thumb gusset sts onto a holder or scrap yarn. You should now have 28 active hand sts rem.
Hand
Rnd 1: *K3, thrum; rep from * to end.
Rnd 2: Knit.
Rnd 3: K1, *thrum, k3; rep from * until 2 sts rem, k2.
Rnd 4: Knit.
Rep Rnds 1-4 three more times, then rep Rnd 1 once more.
The mitten should now measure about 10”. If you wish to make the hand longer, add additional reps of Rnds 1-4 until you reach ½” shorter than the final desired length, ending with Rnd 1.
Rnd 1 (dec): *(Ssk) twice, k6, (k2tog) twice; rep from * to end. (20 sts rem)
Rnd 2: Thrum, k2, thrum, k3, thrum, k1, thrum, k1, thrum, k3, thrum, k2, thrum, k1.
Rnd 3 (dec): *(Ssk) twice, k2, (k2tog) twice; rep from * to end. (12 sts rem)
Rnd 4 (dec): *Ssk, k2, k2tog; rep from * to end. (8 sts rem)
Place the first 4 sts on one DPN and the last 4 sts on another DPN. Cut the yarn, leaving a 12” tail. Thread the tail onto a tapestry needle and graft the two sets of sts tog, using Kitchener Stitch.
Thumb
Place held 15 thumbs sts back onto larger needles, pick up 1 st from the mitten and set up to begin working in the rnd with MC held double. (16 sts)
Rnds 1-6: Knit.
Rnd 7: K2tog, knit to end. (15 sts rem)
Rnd 8: *K3, k2tog; rep from * to end. (12 sts rem)
Rnd 9: (K2tog) 6 times. (6 sts rem)
Cut the yarn, leaving a short tail. Thread the tail onto a tapestry needle, then thread the needle through all the rem sts and cinch tightly.
Make the second mitten the same.
Finishing
Weave in all yarn ends.
Do you have a pattern like this for toddlers?
Thank you for your time,
Stella
Hi Stella,
Not at the moment, but perhaps this pattern could be modified to match?
https://www.ilikeknitting.com/magazine/knitting-baby-patterns/nanuk-mittens/
Hope this helps! – Nicola, Editor
Hi Stella,
I’m Sophia, the designer of the Heart of Heart Mittens pattern. I just wanted to add on to Nicola’s reply with a couple suggestions, if you want to adapt the toddler’s Nanuk Mittens to match the look of this pattern.
The Nanuk Mittens are knit using worsted weight yarn, so I would suggest a heavy worsted weight yarn for your thrums. Or you can use thin pieces of roving, which is traditional. Don’t try to use a jumbo yarn, like the KnitPicks Tuff Puff we used for these thicker, adult mittens.
You would work the ribbed cuff according to the Nanuk pattern, then beginning from Thumb Gusset Rnd 2 until the end of the Body, you want to work a thrumming pattern only over the 24 hand stitches (do not thrum over the thumb gusset stitches). I would suggest the following thrumming pattern:
–On the first thrummed round, *thrum one stitch, K3; rep to the end of the 24-stitch section.
— On the second round, work regularly according to pattern, with no thrumming
–On the third round; *K2, thrum 1, K3; rep from * until 2 stitches remain, thrum 1, K1
— On the fourth round…work regularly with no thrumming.
Repeating those four rounds will give you a nice staggered appearance.
When you reach the end of the body, I suggest NOT thrumming the last 4 decrease rounds, because it will get too bunchy, especially in such a small mitten.
If you want to thrum with 3 colors, as we did for this adult pattern…all you have to do is alternate between the three colors. So if your colors are RED-YELLOW-BLUE and you finished the last thrumming round with Red, then you should start the next thrumming round with Yellow. This will maintain a perfect sequence across your mitten.
Also, thrumming results in a lot of wee tails on the inside of the mitten, which is super cozy….but if you’re planning to give the mittens to a young toddler, you might want to consider adding a lining, so the child doesn’t rip the thrums out.
I hope those tips help! Happy Crafting!
Sophia