

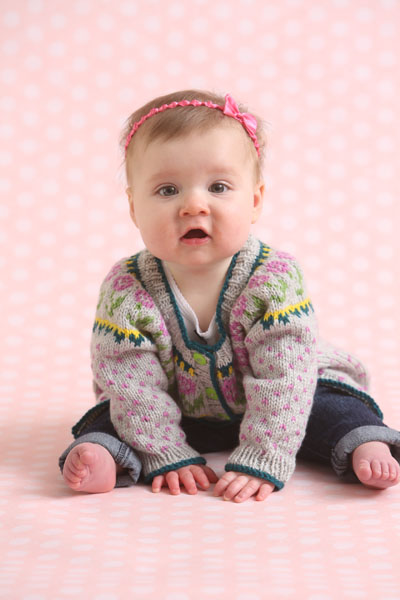
Have fun with this cute little cardi, perfect for your favorite little person. There are no seams in this skill-building knit, so once you’ve sewn on the buttons you’re ready to go!
Skill Level: Intermediate
Size: 3-6 months (12-18 months, 2-3 yr, 4-5 yr); Shown in 12-18 months size; Chest, Buttoned: 22 (23, 24, 25)”
Gauge: 22 sts x 24 rows = 4” [10 cm] in fair-isle knitting after wet blocking
Materials
Yarn:
![]() Universal Yarn Uptown DK (100% anti-pilling acrylic; 273 yards [250 meters]/100 grams): #130 Donahue (MC, 1 (2, 2, 2) balls), #114 Sea (CC1, 1 ball, all sizes), #141 Bright Yellow (CC2, 1 ball, all sizes), #103 Blush (CC3, 1 ball, all sizes), #111 Lime (CC4, 1 ball, all sizes)
Universal Yarn Uptown DK (100% anti-pilling acrylic; 273 yards [250 meters]/100 grams): #130 Donahue (MC, 1 (2, 2, 2) balls), #114 Sea (CC1, 1 ball, all sizes), #141 Bright Yellow (CC2, 1 ball, all sizes), #103 Blush (CC3, 1 ball, all sizes), #111 Lime (CC4, 1 ball, all sizes)
Needles: US size 5 (3.75 mm) 24” circular needles and set of dpns; US size 3 (3.25 mm) 24” circular set of dpns
Notions: Markers, tapestry needle, 3 (3, 4, 4) 1/2” buttons
Pattern Notes
This cardigan is worked seamlessly from the top down.
Color changes are achieved through the fair-isle or stranded method of knitting. On rows where more than one color is used, hold both colors throughout the row.
Pattern
With CC1 and smaller needle, CO 61 (65, 71, 77) sts.
Break CC1.
Collar
Row 1 (RS): With MC, knit.
Row 2 (WS): P2, *k1, p1; rep from * to last st, p1.
Row 3: K2, *p1, k1; rep from * to last st, k1.
Rows 4-5: Rep Rows 2-3.
Row 6: Purl, increasing 26 sts evenly across row. (87 (91, 97, 103) sts)
Yoke
Switch to larger needle.
Work Rows 1-5 of Yoke chart.
Row 6: With MC, purl, increasing 26 (27, 26, 30) sts evenly across row. (113 (118, 123, 133) sts)
Rows 7-18: Work Rows 7-18 of Yoke Chart. (179 (187, 195, 211) sts)
Row 19: With CC2, knit, increasing 16 (24, 28, 28) sts evenly across rnd. (195 (211, 223, 239) sts)
Rows 20-23: Work Rows 20-23 of Yoke chart.
With MC, purl a WS row.
Break all colors except MC and CC3.
Rep Rows 1-6 of Dots chart until piece meas 4 1/2 (5, 5 1/2, 6)” from CO edge, ending with WS row.
Separate Body and Sleeves
Row 1 (RS): Work in patt over 26 (28, 29, 31) Left Front sts, place next 42 (46, 50, 54) sts on holder for Sleeve, CO 2 sts for underarm, work in patt over 59 (63, 65, 69) Back sts, place next 42 (46, 50, 54) sts on holder for Sleeve, CO 2 sts for underarm, work in patt over rem 26 (28, 29, 31) Right Front sts. (115 (123, 127, 135) sts rem for Body)
Work even in Dots patt until piece meas 6 (7, 8, 9)”, ending with RS row.
Break CC3.
With MC, purl a WS row.
Hem
Switch to smaller needle.
Row 1 (RS): K2, *p1, k1; rep from * to last st, k1.
Row 2 (WS): P2, *k1, p1; rep from * to last st, p1.
Rep Rows 1-2, 2 more times.
Switch to larger needle and CC1.
Knit 1 row. Bind off all sts kwise over the next WS row.
Sleeves
Place held Sleeve sts onto dpns.
Rnd 1: Working in Dots patt, pick up and knit 1 st from CO edge, pick up 1 st in gap, work in pattern over held Sleeve sts, pick up 1 st in gap, pick up and knit 1 st from other side of CO edge. (46 (50, 54, 58) sts)
Rnd 2: K1, k2tog, work in patt to last 3 sts, ssk, k1. (44 (48, 52, 56) sts rem)
Work even in Dots patt until Sleeve meas 1”.
Dec Rnd: K1, k2tog, work in patt to last 3 sts, ssk, k1. (2 sts dec’d)
Rep Dec Rnd every 4 (6, 6, 10) rnds, 3 (1, 6, 2) more time(s).
Rep Dec Rnd every 2 (4, -, 8) rnds, 4 (5, -, 3) times. (28 (34, 38, 44) sts rem)
Work even in patt until Sleeve meas 4 (5 1/2 7, 9)”.
Break CC3.
With MC, knit 1 rnd,
Cuff
Rnds 1-6: *K1, p1; rep from * to end.
Switch to larger needle.
Rnd 7: With CC1, knit.
Bind off all sts pwise with CC1.
Finishing
Block piece to finished measurements.
Buttonband
With MC and smaller needle, pick up and knit 57 (65, 69, 77) sts evenly along Left Front from Neck edging to Hem.
Row 1 (WS): P2, *k1, p1; rep from * to last st, p1.
Row 2 (RS): K2, *p1, k1; rep from * to last st, k1.
Rows 3-5: Cont in rib as est’d.
Switch to larger needle.
Row 6: With CC1, knit.
With CC1, bind off all sts kwise over the next WS row.
Buttonhole Band
With MC and smaller needel, pick up and knit 57 (65, 69, 77) sts evenly along Right Front from Neck edging to Hem.
Row 1 (WS): P2, *k1, p1; rep from * to last st, p1.
Row 2 (RS): K2, *p1, k1; rep from * to last st, k1.
Row 3: P1, *p2tog, [yo] 2 times, ssk, [p1, k1] 3 (4, 3, 3) times; rep from * 1 (1, 2, 2) more times, p2tog, [yo] 2 times, ssk, work in rib to end. (3 (3, 4, 4) buttonholes)
Row 4: Work even in rib, working [k1, p1] into double yo.
Row 5: Work even in rib.
Row 6: With CC1, knit.
With CC1, bind off all sts kwise over the next WS row.With CC1, whipstitch around sides of Buttonband and Buttonhole Bands. Weave in ends. Sew buttons to Buttonband opposite buttonholes.
Good evening,
When increasing stitches – m1-make a stitch do you pick up the loop before the next stitch and knit into the back of it, or do you knit into the next stitch twice to increase.
Please advise.
Many thanks,
Helen
Hi Helen, we have an article on the M1 which I hope will help! https://www.ilikeknitting.com/magazine/knitting-articles-and-interviews/make-one-knitting-m1r-and-m1l-tutorial/ -Dana, Editor
Many thanks
Please can you send me yoke chart
Hello! Charts are available for logged-in Gold Members at the bottom of the pattern and appear as a blue button to click and download. – Dana, Editor
I don’t seem to be able to find the definitions for the abbreviations. 2/2 RC, 2/2Lc etc. maybe it’s because I use British abbreviations and I don’t know these. Can someone help please?
Hi Mary! I’m not seeing those abbreviations listed for this pattern. Or are you talking about those abbreviations in general? According to Google, “In knitting, RC stands for Right Cross. It refers to a cable stitch pattern where stitches are crossed to the right, typically using a cable needle. It’s a decorative stitch often found in cable knitting patterns.” So LC is left cross. I hope that helps! -Dana, Editor
Row 19 chart and written instruction do not agree. Which is correct?
Hello! I’ve reached out to the designer for advice and she or I will reply as soon as possible. Thanks! – Dana, Editor
Hi Sue, the designer got back to me and the chart was correct! I’ve updated Row 19 to reflect it should be worked with CC2. Have a good day! -Dana, Editor
Is there an alternate yoke pattern for little boys?
Hi Karen, not for this particular cardigan, but perhaps modifying a more traditional yoke would work? https://www.ilikeknitting.com/magazine/knitting-baby-patterns/chickadee-sweater/?t=26083
– Nicola, Editor
I am looking at Baby’s First Fair Isle Cardigan. I can see the instructions but don’t see how to print them. I have already printed the chart and schematic. Thank you
Hi! You can print using your browser’s print function or the print icon on the left side of the pattern page. Hope this helps.
When I do the make 1s in the yoke chart I do not find that the increases in rows 7-18 take me from 118 stitches to 187 stitches. I fall short by about 16 stitches. I am knitting size 12-18 months. Please explain. Thank you!
Hello Amy! I’ve reached out to the designer for advice and she or I will reply as soon as possible. Thanks! – Nicola, Editor
You have given the pattern baby’s first fair isle cardigan and left out the yoke chart. Please send it
Hi Dawna! The chart is on the far right side of the pattern under the photos. Here is the link: https://www.ilikeknitting.com/wp-content/uploads/Fair-Isle-Cardigan-Chart.pdf
Happy knitting! Nicola, Editor
Boa tarde! meu nome é Cleide. Moro em Uberlândia/MG, Brasil. Quero muito fazer este cardigan, mas quando chego na carreira 7 fico sem saber como prosseguir. Será que você consegue me ajudar? Eu faço MC k1,k1+inc,k1 //CC3 k3, MC k1//MC k1 e depois continuo k1 + inc, k1 CC3 k3…essa sequência está correta? Agradeço.
Hello! I’ve reached out to the designer for advice and she or I will reply as soon as possible. Thanks! – Nicola, Editor
Please send me the Fair Isle cardigan Chart
Fair Isle cardigan Schematic Thank you
Hello Heather! Charts are always on the far right side of the pattern page underneath the photos. Here is a direct link to the charts as well:
https://www.ilikeknitting.com/wp-content/uploads/Fair-Isle-Cardigan-Chart.pdf
https://www.ilikeknitting.com/wp-content/uploads/Fair-Isle-Cardigan-Schematic.pdf
Thanks! – Nicola, Editor
Love this pattern. Thank you
Please send me the yoke chart, i love this sweater.
Hi Mikaela! The charts can be found underneath the photos on the right hand side of the page. I’ve also pasted a link here: https://www.ilikeknitting.com/wp-content/uploads/Fair-Isle-Cardigan-Chart.pdf
Happy knitting! – Nicola, Editor
I also am having problems with row 7 do I start with the first box and read right to left and are the white areas included Do you read the graph from left to right on purl rows
Hello! I’ve reached out to the designer for advice and she or I will reply as soon as possible. Thanks! – Nicola, Editor
Hi, was there an answer to the above question
Hi Lesley! Yes, this is from the designer: “Yes – you will work m1 increases any time there is a “m” square. I’m confused by your question about row 10. The chart is correct – you will simply change colors as indicated in each row, and repeat the stitches inside the red outline. The white spaces on the chart indicate “no squares” or no stitches – they are nothing and you can just ignore them.” – Hope this helps! – Nicola, Editor
Hi Sandy did you get a reply to your question as I’m confused as well
Hi Lesley! From the designer: “Yes, since this sweater is knit flat, odd numbered (RS) rows are read right to left, and even numbered (WS) rows are read left to right.”
Hope this helps! – Nicola, Editor
Hi Sandy! From the designer: “Yes, since this sweater is knit flat, odd numbered (RS) rows are read right to left, and even numbered (WS) rows are read left to right.”
Hope this helps! – Nicola, Editor
i have been making a stitch where the m’s on the yoke chart are, but row 9 doesn’t make sense as I find I have 3 st & adding one makes 4 st. The next row 10 says there are 3 stitches between flowers. HELP. What am I doing wrong? and what do the white boxes on the yoke chart stand for.
Hi Andrea! Sorry for the delay, this is from the designer: “Yes – you will work m1 increases any time there is a “m” square. I’m confused by your question about row 10. The chart is correct – you will simply change colors as indicated in each row, and repeat the stitches inside the red outline. The white spaces on the chart indicate “no squares” or no stitches – they are nothing and you can just ignore them.” – Hope this helps! – Nicola, Editor
Per trovare gli schemi, se avete lo smartphone, dovete impostare i tre puntini in alto a destra su ” sito desktop” e allora saranno visibili i link da scaricare sotto le foto poste sul margine destro..
Hi Lucia, yes, this works as an option but you should still be able to access the diagrams al the way at the bottom of the page on the mobile site. The diagrams will be after the very last photo of the project. We are working to make this experience more user friendly in the near future! – Nicola, Editor
Please send me this pattern by mail! Please let me know how much I owe! Thank you!
I will send you a check!
Hello! Unfortunately we do not have the ability to mail you this pattern. You are welcome to print it off of our website if you so choose. Thanks! – Nicola
Would you please send me the chart too..am itching to get started on this cute pattern! X
HI Sue! The Chart is underneath the photos section above, but you can also click these links here:
https://www.ilikeknitting.com/wp-content/uploads/Fair-Isle-Cardigan-Chart.pdf
https://www.ilikeknitting.com/wp-content/uploads/Fair-Isle-Cardigan-Schematic.pdf
Thanks! – Nicola
Bellíssimo!
Thank you! This looks like a fun one and thank you for such wonderful instructions. Easy to find after explained above.
Found them, ta x
Can you send me the yoke chart please
Sorry for the last email. Just found the chart.
Can you please send me the chart please. I wanted to make the cardigan for my granddaughter. Thank you so much!
Can you send me the chart? Thanks
What do the m’s on the yoke chart mean and what do the white boxes on the yoke chart stand for? Thanks.
I would like to knit this for my little one but yoke chart is missing. Can someone please send it to me?? Please!
Charts are listed under download below the photos on the right-hand side if viewing on your desktop.
I did not receive the yoke chart with the pattern Baby’s First Fair Isle Pattern. Can you send it to me? Thank you, Mary