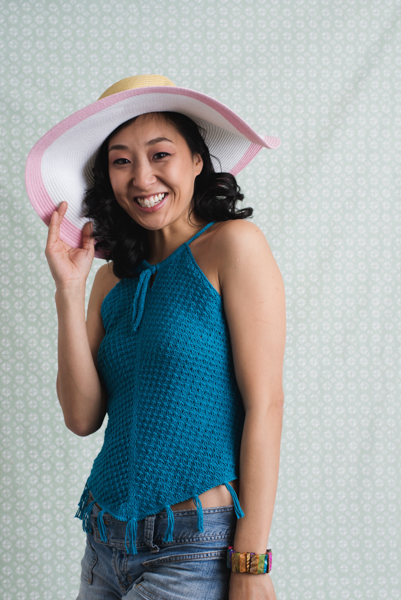
Planning summer holidays on the beach? You cannot miss this top! Dare to show off your bare shoulders wearing this unique and stylish piece. The elegant neckline, feminine silhouette, fringes and texture make this top a must have. Wear it during the day over a bikini at the beach or don it by itself at night during a romantic dinner!
Skill Level: Intermediate
Size: Finished Bust Size approx. 28 (32, 36, 40, 44)” to fit bust 30 (34, 38, 42, 46)
2” negative ease recommended.
Shown in size 32”.
Gauge: 25 sts and 33 rows = 4” [10 cm] in Stitch Pattern after wet blocking
Materials
 Yarn: Garnstudio Drops Safran (100% Cotton; 174 yards [159 meters]/50 grams): 51 Navy (3 (4, 4, 5, 5) balls).
Needles: US size 3 (3.25 mm) 24” / [60 cm] or longer circular; US size 3 (3.25 mm) DPNs for folded neckline and I-cord string.
Notions: Removable markers, tapestry needle, safety pin, US size G/6 (4 mm) to apply fringes.
Special Stitches
Cluster 2 sts – Yo, p2, pass yo over the 2 sts just purled.
Stitch Pattern (worked flat over a multiple of 4 sts + 2)
Row 1 (RS): Knit.
Row 2 (WS): *Cluster 2 sts, p2; rep from * to end.
Row 3: Knit.
Row 4: *P2, cluster 2 sts; rep from * to end.
Rep Rows 1-4 for patt.
Pattern Notes
This top is worked flat top down. Front and back are first worked separately, starting from the folded neckline edge where the I-cord string is applied at the end.
The two pieces are then joined in one and the body is worked flat. Centered increase line (back and front) and side decreases shape the body.
Vertical side seam closes the body at the end.
Fringes are applied at the end to embellish the bottom edge.
Pattern
Front
Folded Neckline
With Provisional CO Method, CO 34 (42, 42, 50, 50) sts.
Work 8 rows in St st (knit on RS, purl on WS). Pm after 17 (21, 21, 25, 25) sts.
Row 9 (RS): Undo the Provisional CO and move sts to DPN. Fold the fabric and carefully knit each st together with the corresponding st from cast-on row (now on DPN). Be careful to leave open side edges to allow the string to pass through the folded neckline at the end.
Row 10 (WS): Purl.
Raglan
Note: Follow written instructions below or work from chart.
Row 1 (RS): P3, M1L, k to 1 st before m, m1L, k1, sm, k1, m1R, k to last 3 sts, m1R, p3. (4 sts inc’d)
Row 2 (WS): K3, p1, *cluster 2 sts, p2; rep from * to 3 sts before m, p3, sm, p3, **p2, cluster 2 sts; rep from ** to last 4 sts, p1, k3.
Row 3: P3, k to 1 st before m, m1L k1, sm, k1, m1R, k to last 3 sts, p3. (2 sts inc’d)
Row 4: K3, p3, *cluster 2 sts, p2; rep from * to 3 sts before m, p3, sm, p3, **p2, cluster 2 sts; rep from ** to last 4 sts, p1, k3.
Row 5: Rep Row 1.
Row 6: K3, *p2, cluster 2 sts; rep from * to 3 sts before m, p3, sm, p3, **cluster 2 sts, p2; rep from ** to last 3 sts, k3.
Row 7: Rep Row 3.
Row 8: K3, cluster 2 sts, *p2, cluster 2 sts; rep from * to 2 sts before m, p2, sm, p2, **cluster 2 sts, p2; rep from ** to last 5 sts, cluster 2 sts, k3.
Row 9: Rep Row 1.
Row 10: K3, p3, cluster 2 sts, *p2, cluster 2 sts; rep from * to 1 st before m, p1, sm, p1, **cluster 2 sts, p2; rep from ** to last 8 sts, cluster 2 sts, p3, k3.
Row 11: Rep Row 3.
Row 12: K3, p1, *cluster 2 sts, p2; rep from * to 2 sts before m, p2, sm, p2, **p2, cluster 2 sts; rep from ** to last 4 sts, p1, k3.
Row 13: Rep Row 1.
Row 14: K3, cluster 2 sts, *p2, cluster 2 sts; rep from * to 3 sts before m, p3, sm, p3, **cluster 2 sts, p2; rep from ** to last 5 sts, cluster 2 sts, k3.
Row 15: Rep Row 3.
Row 16: K3, *p2, cluster 2 sts; rep from * to 2 sts before m, p2, sm, p2, **cluster 2 sts, p2; rep from ** to last 3 sts, k3.
Row 17: Rep Row 1.
Row 18: K3, p1, *cluster 2 sts, p2; rep from * to 2 sts before m, p2, sm, p2, **p2, cluster 2 sts; rep from ** to last 4 sts, p1, k3. (28 sts inc’d in total)
Rep Rows 3-18 once more (34 rows worked; 24 sts inc’d)
Starting from Row 3, keep on working according to above instructions (or chart) until piece meas approx. 28 (32, 36, 40, 44)” in width, ending with Row 6 or Row 14.
Right Back (in working direction)
Folded Neckline
With Provisional CO Method, CO 17 (21, 21, 25, 25) sts.
Work 8 rows in St st (knit on RS, purl on WS).
Row 9 (RS): Undo the Provisional CO and move sts to smaller size DPN. Fold the fabric along and carefully knit each st together with the corresponding st from CO row (now on DPN). Be careful to leave open side edges to allow the string to pass through the Folded Neckline at the end.
Row 10 (WS): Purl.
Raglan
Note: Follow written instructions below or work from chart.
Row 1 (RS): P3, M1L, k to last st before m, m1L, k1. (2 sts inc’d)
Row 2 (WS): P3, *p2, cluster 2 sts; rep from * to last 4 sts, p1, k3.
Row 3: P3, k to last st, m1L k1. (1 st inc’d)
Row 4: P3, *p2, cluster 2 sts; rep from * to last 4 sts, p1, k3.
Row 5: Rep Row 1.
Row 6: P3, *cluster 2 sts, p2; rep from * to last 3 sts, k3.
Row 7: Rep Row 3.
Row 8: P2, *cluster 2 sts, p2; rep from * to last 5 sts, cluster 2 sts, k3.
Row 9: Rep Row 1.
Row 10: P1, *cluster 2 sts, p2; rep from * to last 8 sts, cluster 2 sts, p3, k3. (8 sts inc’d in total)
Left Back (in working direction)
Work Folded Neckline same as for Right Back.
Raglan
Note: Follow written instructions below or work from chart.
Row 1 (RS): K1, m1R, k to last 3 sts, m1R, p3. (2 sts inc’d)
Row 2 (WS): K3, p1, *cluster 2 sts, p2; rep from * to last 3 sts, p3.
Row 3: K1, m1R, k to last 3 sts, p3. (1 st inc’d)
Row 4: K3, p3, *cluster 2 sts, p2; rep from * to last 3 sts, p3.
Row 5: Rep Row 1.
Row 6: K3, *p2, cluster 2 sts; rep from * to last 3 sts, p3.
Row 7: Rep Row 3.
Row 8: K3, cluster 2 sts, *p2, cluster 2 sts; rep from * to last 2 sts, p2.
Row 9: Rep Row 1.
Row 10: K3, p3, cluster 2 sts, *p2, cluster 2 sts; rep from * to last st, p1. (8 sts inc’d in total)
Join Right Back and Left Back and continue working like the Front, starting from Row 11 until the end of Raglan.
Body
Join Front and Back as follows:
Row 1 (RS): Starting from RS Back, k3, k to 1 st before m, m1L, k1, sm, k1, m1R, k to last 3 sts, ssk, k1, join Front, pm, k1, k2tog, k to 1 st before m, m1L, k1, sm, k1, m1R, k to last 3 sts, k3.
Work Body as follows or from chart:
Row 2 (WS): P3, (p2, cluster 2 sts) to 2 sts before m, p2, sm, p2, (cluster 2 sts, p2) to 2 sts before side m, p2, sm, p2, (p2, cluster 2 sts) to 2 sts before m, p2, sm, p2, (cluster 2 sts, p2) to 3 sts, p3.
Row 3: K2, k2tog, k to 1 st before m, m1L, k1, sm, k1, m1R, k to 3 sts before side m, ssk, k2, sm, k2, k2tog, k to 1 st before m, m1L, k1, sm, k1, m1R, k to last 4 sts, ssk, k2.
Row 4: P4, (p2, cluster 2 sts) to 1 st before m, p1, sm, p1, (cluster 2 sts, p2) to 4 sts before side m, p4, sm, p4, (p2, cluster 2 sts) to 1 st before m, p1, sm, p1, (cluster 2 sts, p2) to last 4 sts, p4.
Row 5: Rep Row 3.
Row 6: P1, (p2, cluster 2 sts) to 4 sts before m, p4, sm, p4, (cluster 2 sts, p2) to side m, sm, (p2, cluster 2 sts) to 4 sts before m, p4, sm, p4, (cluster 2 sts, p2) to last st, p1.
Row 7: Rep Row 3.
Row 8: P2, (p2, cluster 2 sts) to 3 sts before m, p3, sm, p3, (cluster 2 sts, p2) to last st before side m, p1, sm, p1, (p2, cluster 2 sts) to 3 sts before m, p3, sm, p3, (cluster 2 sts, p2) to last 2 sts, p2.
Row 9 (RS): Rep Row 3.
Cont working Body, repeating instructions from Row 2 until piece meas 10.5” / [27 cm] from underarm or desired length.
Next Row (WS): Purl.
Next Row (RS): Rep Row 3.
BO all sts on WS.
Finishing
Starting from underarm, seam side edges to join Body.
String
Work a 4 sts I-cord 31.5” / [80 cm] long.
With the help of a safety pin, pass it through the folded edge starting and finishing from the Back central edge.
Fringes
Cut 72 pieces of yarn approximately 6” / [15 cm] long.
Make groups of 4 pieces (each group will be a tassel).
Apply tassels along the bottom edge (9 fringes at Back and 9 at Front evenly distanced).
Wash and block flat.

