

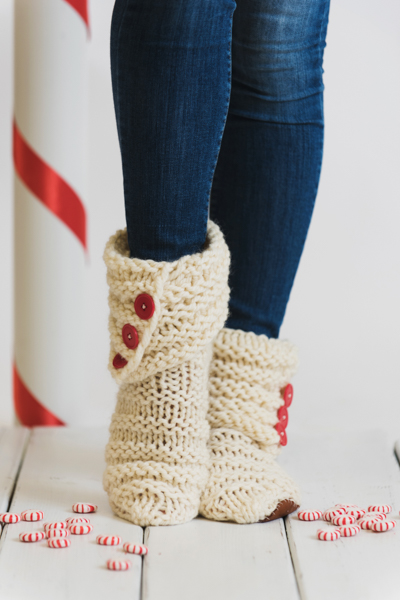
These fun slippers come together fast and will be your go-to cozy companion for winters at home. The finished, flexible style of the slipper is achieved with traditional cuff-down, sock construction techniques and a combination of working flat and in the round.
Skill Level: Intermediate
Size: Finished boots fit a standard women’s size 7-9 shoe (customizable).
Gauge: approx. 10 sts and 12 rows = 4” [10 cm] in St st
Materials
Yarn: Patons Classic Wool Bulky (100% Wool; 78 yards [71 meters]/100 grams): Aran, 2 skeins
Needles: US size 13 (9 mm): circular or DPNs
Notions: 3 markers; tapestry needle; six 1” buttons; scrap leather with coordinating thread.
Abbreviations
sm – slip marker
rm – remove marker
pm – place marker
sl – slip
wyif – with yarn in front
wyib – with yarn in back
Special Stitches
One-Row Buttonhole over 2 sts
One-row buttonholes are used to create three buttonholes on the calf flap section of these boots. See video tutorial (https://www.youtube.com/watch?v=nJxgPwcv6aY) for reference. To create a one-row buttonhole over two stitches as required for this pattern, do the following:
- Sl1 wyif, (sl1 wyib, pass previous stitch over) twice, sl last loop to left needle, turn.
- With yarn in back, Cable Cast On 3 sts, turn.
- Sl1 wyib, pass previous stitch over, sl last loop back to your left needle, continue working row as written without turning work.
A Kitchener Stitch Bind Off is used to form a clean toe at the end of the piece. See video tutorial below pattern for reference. Tutorial (https://www.youtube.com/watch?v=PMzLfwrewQI)
Pattern Notes
This pattern is worked using traditional cuff-down sock construction.
The size is easy to adjust.
The buttonholes are worked on one-row over 2 sts.
Pattern
Boot Slipper (make 2)
Boot Flap (worked flat)
CO 35 sts.
Row 1 (RS): Sl1 wyif, k across.
Row 2 (WS): Sl1 wyif, p to last 3 sts, p2tog, k1 – 34 sts.
Row 3: Sl1 wyif, p to last st, k1.
Row 4: Sl1 wyif, k1, work One-Row Buttonhole over 2 sts, k to last 3 sts, k2tog, k1 – 33 sts.
Rows 5-8: Rep Rows 1-4 – 31 sts.
Rows 9-12: Rep Rows 1-4 – 29 sts.
Rows 13-15: Rep Rows 1-3 – 28 sts.
Row 16 (WS): Sl1 wyif, k to last 3 sts, k2tog, k1 – 27 sts.
Rows 17-19: Rep Rows 1-3 – 26 sts.
Ankle (worked in the rnd)
Rnd 1: With WS facing you, join to work in the rnd, place marker for beginning of rnd, sl1 wyib, p2tog, p23 – 25 sts.
Rnd 2: Knit.
Rnd 3: Sl1 wyib, k24.
Rnd 4: Purl.
Rnd 5: Sl1 wyib, p24.
Rnds 6-13: Rep Rnds 2-5.
Rnd 14: Rep Rnd 2.
Rnd 15: Remove marker, ssk, k11, turn.
Heel Flap (worked flat over 12 sts)
Row 1 (WS): *Sl1 wyif, p1; rep from * 5 more times, turn.
Row 2 (RS): *Sl1 wyif, k1; rep from * 5 more times, turn.
Rows 3-10: Rep Rows 1-2.
Heel Turn (worked flat in short rows over the heel flap sts)
Row 1 (WS): Sl1 wyif, p6, turn.
Row 2 (RS): Sl1 wyib, k1, turn.
Row 3: Sl1 wyif, p2tog, p1, turn.
Row 4: Sl1 wyib, k1, k2tog, k1, turn.
Row 5: Sl1 wyif, p2, p2tog, p1, turn.
Row 6: Sl1 wyib, k3, k2tog, k1, turn.
Row 7: Sl1 wyif, p4, p2tog, turn.
Foot (worked in the rnd)
Set-up Row (RS): Sl1 wyib, k2, pm (this is the new beginning of the rnd), k2, k2tog, pick up and k7, pm, (k1, p1) 6 times, pm, pick up and k7, k3 – 32 sts.
Rnd 1: K to 3 sts before m, ssk, k1, sm, k2tog, (k1, p1) 4 times, ssk, sm, k1, k2tog, k to end of rnd – 28 sts.
Rnd 2: K to m, sm, k1, (k1, p1) 4 times, k1, sm, k to end of rnd.
Rnd 3: K to 3 sts before m, ssk, k1, sm, k2tog, (p1, k1) 3 times, ssk, sm, k1, k2tog, k to end of rnd – 24 sts.
Rnd 4: K to m, sm, (k1, p1) 4 times, sm, k to end of rnd.
Rnd 5: K to 3 sts before m, ssk, k1, sm, (k1, p1) 4 times, sm, k1, k2tog, k to end of rnd – 22 sts.
Rnd 6: K to m, rm, (k1, p1) 4 times, rm, k to end of rnd.
Rnd 7: Purl.
Rnd 8: Sl1 wyib, p21.
Rnd 9: Knit.
Rnd 10: Sl1 wyib, k21.
Rnds 11-18: Rep Rnds 7-10.
Rnds 19-21: Rep Rnds 7-9
Rnd 22: Sl1 wyib, k2, ssk, k1, pm, k2tog, k6, ssk, pm, k1, k2tog, k3 – 18 sts.
Rnd 23: K to m, sm, p to m, sm, k to end of rnd.
Rnd 24: K to 3 sts before m, ssk, k1, sm, k2tog, p to 2 sts before m, ssk, sm, k1, k2tog, k to end of rnd – 14 sts.
Rnd 25: Knit.
Rnd 26: K to 3 sts before m, ssk, k1, sm, k2tog, k to 2 sts before m, ssk, sm, k1, k2tog – 10 sts.
Rnd 27: Knit
Rnd 28: Ssk, k1, sm, k2tog, k1, ssk, sm, k2tog – 6 sts.
Rnd 29: Knit, removing markers.
BO all remaining sts using Kitchener Stitch Method.
Finishing
Weave in all ends.
Attach buttons to non-buttonhole flap of Boot, being careful to place them on the inside of the boot as they’re used to secure the boot flaps in place when they’re folded down.
Cut out four leather pieces as shown (2 pieces for each heel and 2 pieces for the ball of each foot) and sew them to the bottom of your slippers for added grip.
Also,pattern for both feet and how does one adjust size for larger than 7-9
Would love to find this in Crochet!
Hi Tammy! I Like Crochet has these slippers which are similar: https://www.ilikecrochet.com/magazine/crochet-slippers-and-socks/cozy-wintery-boots/
Hope that helps! – Nicola, Editor
After reading the comments about the flap being on the other side, I did a bit of experimenting. The following worked for me:
For the BOOT FLAP, reverse the order on Rows 1-19
Row 1–K across to last st, sl1 wyif
Row 2–K1, p2tog, p to last st, sl1 wyif
Row 3–K1, p to last st, sl1 wyif
Row 4–K1, k2tog, k to last st, sl1 wyif
For the ANKLE, work rounds as instructed until Row 15:
Row 15–K12, pm, ssk, k11, turn
I made two and turned one inside out, that didn’t work too great. Wish there was a right and left flap.
How do you reverse the pattern for the other slipper? So that the button flap is on the other side?
I made the first one, but how do I get the flap to be on the other side for the other slipper?
Though I have very time, this pattern and output looks nice!!!