

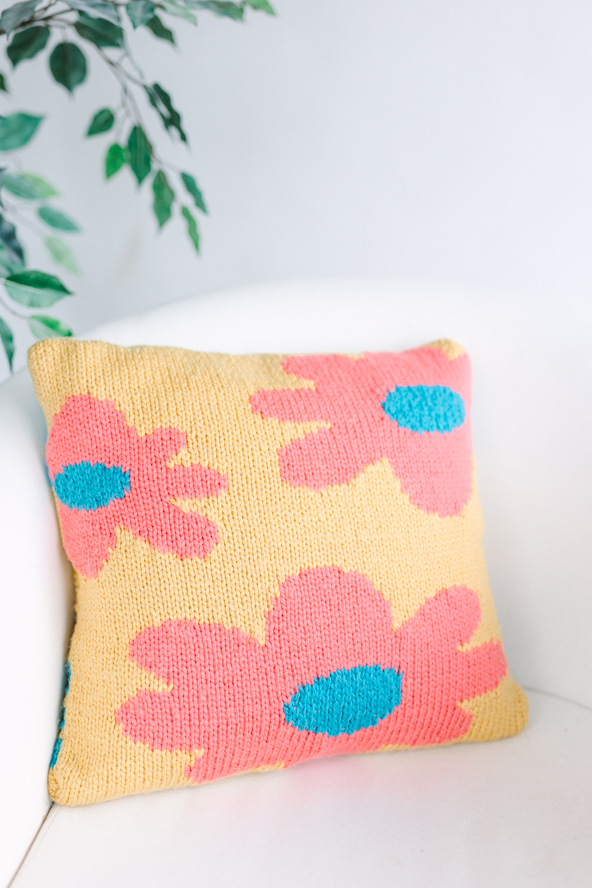
With a nod to the ‘70s, the Flower Power Pillow’s bold graphics mixed with retro colors make you feel groovy. Knit in chunky weight yarn in the intarsia method, this pillow will be brightening up those winter days in anticipation for spring.
Time: 1 Week Project
Skill Level: Intermediate
Size: 17” x 17” Pillow covers have negative ease
Gauge: 14 Sts and 22 rows = 4” [10 cm] in St st
Materials
 Yarn: Cascade Yarns 128 Superwash (100% superwash Merino wool; 128 yds [117 m] 100 g: 821 Daffodil (MC, 2 skeins), 322 Teal (CC1, 1 skein), 315 Georgia Peach (CC2, 1 skein)
Needles: US size 9 (5.5 mm) 24” (60 cm) circular needle or size needed to obtain gauge
Notions: Tapestry needle, scissors, yarn bobbins (optional), 18” x 18” Pillow form insert, four 1” buttons, four 1” plain buttons or 1” circles of craft foam (for backing of buttons)
Downloads
Pattern Notes
The pillow is worked in stockinette stitch back and forth on a circular needle (knit on right side, purl on wrong side).
Button bands are worked in garter stitch back and forth on a circular needle (knit every row)
Stripes on back: carry yarn of alternating color up the side, catching it every other row.
Charts 1 & 2: knit in the intarsia method. Odd number rows (right side) are read right to left. Even number rows are read left to right (wrong side). Use bobbins or balls of yarn for each color break in a row. Lock yarns at color breaks by bring the working yarn under the previous color. Be aware of where a color needs to be in the next row of knitting. Occasionally, you’ll need to carry the yarn along the wrong side to put it in position for the next row.
Flower centers: carry CC1 behind CC2 in the stranded colorwork method.
Pattern
With MC, CO 66 sts. Do not join. Work as follows.
Button Band
Rows 1-7: With MC, knit every row
Pillow Back Lower
Rows 1-14: Knit in St st.
Rows 15-20: With CC1 knit in St st.
Rows 21-22: With MC knit St st.
Rows 23-26: With CC1 knit in St st.
Rows 27-28: With MC knit in St st.
Rows 29-34: With CC1 knit in St st.
Rows 35-42: With MC knit in St st.
Pillow Front
Rows 1-44: With yarns MC, CC1 and CC2 knit Chart 1 in St st leaving 8” tails at color breaks.
Rows 45-92: With yarns MC, CC1 and CC2 knit Chart 2 in St st leaving 8” tails at color breaks.
Pillow Back Upper
Rows 1-8: With MC knit in St st.
Rows 9-14: With CC1 knit in St st.
Rows 15-16: With MC knit in St st.
Rows 17-20: With CC1 knit in St st.
Rows 21-22: With MC knit in St st.
Rows 23-28: With CC1 knit in St st.
Rows 29-41: With MC knit in St st ending on right side.
Buttonhole Band
Rows 1-5: With MC, knit every row ending on the wrong side.
Row 6: K 10, bind off next stitch, K 15, bind off next stitch, K 14, bind off next stitch, K 15, bind off next stitch, K 8.
Row 7: K 9, cast on 3 stitches (E-Loop cast on), K 15, cast on 3 stitches, K 14, cast on 3 stitches, K 15, cast on 3 stitches, K 9.
Row 8: K 8, k2tog, K1, k2tog, K 13, k2tog, K 1, k2tog, K 12, k2tog, K 1, k2tog, K 13, k2tog, K 1, k2tog, K 8.
Rows 9-11: Knit every row. BO.
Finishing
Weave in ends. Lightly block pillow to 17”x 36” dimensions.
Pin the pillow together, wrong sides facing, folding at chart beginning and ending, and at the same time overlapping the button bands with the buttonhole band on top. Sew the tops and bottoms together with the mattress stitch. Tack buttonhole band to buttonband at side edges to reinforce and keep it lying flat. Weave in ends. Align and sew buttons to the button band under the buttonholes. To make the buttons more secure, while attaching the button, sew through a plain button or 1” circle of craft foam placed on the wrong side of the button band aligned with the button. Place the pillow form insert into the cover, button up the buttons and enjoy your new decorative pillow!