

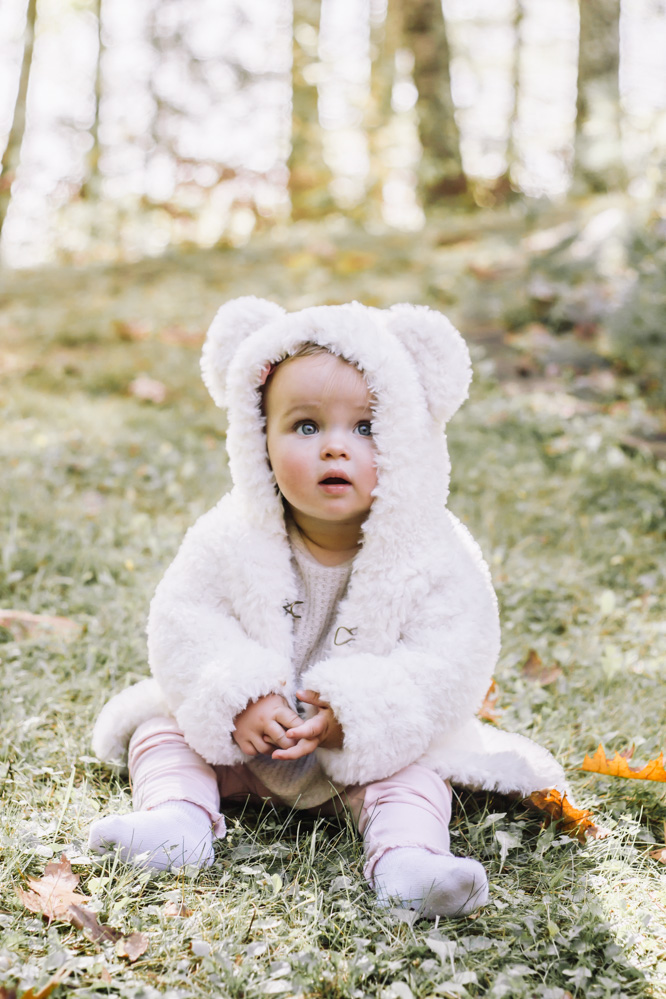
Who doesn’t love a baby in a hooded animal sweater? This one knits up really quickly using super bulky, fur-like yarn. With no edgings and a simple hook and eye closure, this quick knit is also a breeze to finish.
Time: Weekend Project
Skill Level: Easy
Size: 6 months (12 months, 2T, 3T, 4T, 6, 8, 10)
Finished Chest Size 20 (22, 24, 25, 27, 28, 29, 30)”
Shown in size 3T.
Gauge: 8 sts and 12 rows = 4” [10 cm] in St st after wet blocking
Materials
 Yarn: Lion Brand Go for Faux (100% polyester; 65 yards [60 meters]/100 grams): 098 Baked Alaska (2 (3, 4, 4, 5, 6, 7, 9) balls)
Needles: US size 13 (9.0 mm) 24” circular needles and DPNs
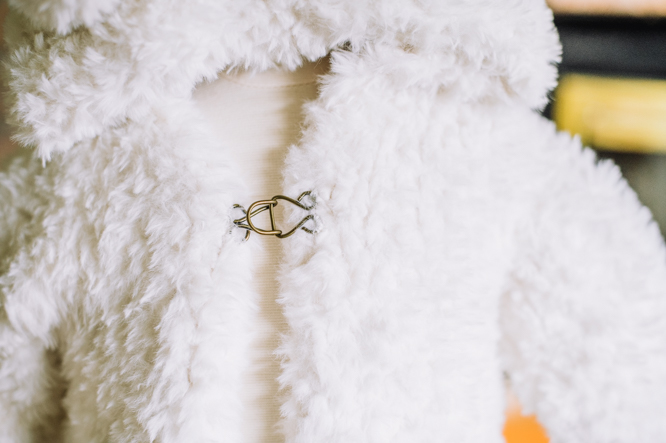
Notions: Markers, stitch holders or waste yarn, tapestry needle, large hook and eye, needle and thread to match yarn
Abbreviations
P2togtbl: Purl 2 sts together through their back loops. (1 st decreased)
M1: Make 1 st by placing a firm backwards loop on the right needle.
M1R: Make 1 right leaning st.
M1L: Make 1 left leaning st.
Pattern Notes
This pattern is worked flat from the bottom up. Sleeves are picked up around the armhole edges for top-down sleeves. The hood is worked from the neck to the front edge. Ears are worked separately and sewn to the hood.
This yarn is unique in that it does not curl at the edges, so it needs no special edge treatments. If you are substituting a different yarn, consider working the first inch of the body in garter stitch, then work the first and last 3 sts of the body in garter stitch. Finish the sleeves with 2” of garter stitch as well.
Pattern
Body
Using circular needle, CO 40 (44, 48, 50, 54, 56, 58, 62) sts. Beg with a WS (purl) row, work in St st until piece measures 8 (9, 9.5, 10.5, 11, 11.5, 12, 12.5)” from CO edge, or to desired length to underarm, ending after a WS row.
Separate back and fronts:
With RS facing, k10 (11, 12, 12, 13, 13, 14, 15), turn. Place next 20 (22, 24, 26, 28, 30, 30, 32) sts on holder or waste yarn for Back, and place last 10 (11, 12, 12, 13, 13, 14, 15) sts on separate holder or waste yarn for Left Front.
Right Front
Work even for 2 (2.5, 3, 3.5, 3.75, 4, 4, 4.25)”, ending after a WS row.
Row 1 (RS): BO 2 (2, 3, 3, 3, 3, 3, 3), k to end. (8 (9, 9, 9, 10, 10, 11, 12) sts rem)
Row 2: P to last 2 sts, p2togtbl. (7 (8, 8, 8, 9, 9, 10, 11) sts rem)
Row 3: K1, ssk, k to end. (6 (7, 7, 7, 8, 8, 9, 10) sts rem)
Row 4: P.
Row 5: K1, ssk, k to end. (5 (6, 6, 6, 7, 7, 8, 9) sts rem)
Row 6: BO 2 (3, 3, 3, 3, 3, 4, 4), p to end. (3 (3, 3, 3, 4, 4, 4, 5) sts rem)
Row 7: K.
BO rem sts. Break yarn and pull though last st.
Back
Place held Back sts onto needle and join yarn to work a RS row. (20 (22, 24, 26, 28, 30, 32) sts)
Work even for 5.5”, ending after a WS row.
BO 2 (3, 3, 3, 3, 4, 4, 4) sts at beg of next 2 rows, then 3 (3, 3, 3, 4, 4, 4, 5) sts at beg of next 2 rows. Place rem 10 (10, 12, 14, 14, 14, 14, 14) sts on holder for back of neck.
Left Front
Place held Left Front sts back onto needle and join yarn to work a RS row. (10 (11, 12, 12, 13, 13, 14, 15) sts)
Work even for 2.5 (3, 3.5, 3.75, 4, 4, 4.25)”, ending after a WS row.
Row 1 (RS): BO 2 (2, 3, 3, 3, 3, 3, 3), p to end. (8 (9, 9, 9, 10, 10, 11, 12) sts rem)
Row 2: K to last 2 sts, k2tog. (7 (8, 8, 8, 9, 9, 10, 11) sts rem)
Row 3: P1, p2togtbl, p to end. (6 (7, 7, 7, 8, 8, 9, 10) sts rem)
Row 4: K.
Row 5: P1, p2togtbl, p to end. (5 (6, 6, 6, 7, 7, 8, 9) sts rem)
Row 6: BO 2 (3, 3, 3, 3, 3, 4, 4), k to end. (3 (3, 3, 3, 4, 4, 4, 5) sts rem)
Row 7: P.
BO rem sts. Break yarn and pull through last st.
Sew shoulder seams.
Hood
With RS facing, beg at right front edge, pick up 8 (8, 8, 8, 8, 9, 9, 9) sts up to held back neck sts, place held back sts onto left needle and k across, pick up 8 (8, 8, 8, 8, 9, 9, 9) sts down to left front edge. (26 (26, 28, 30, 30, 32, 32, 32) sts)
Set-up Row (WS): P13 (13, 14, 15, 15, 16, 16, 16), pm, p to end.
Inc Row: K to 1 st before next m, M1R, k1, sl m, k1, M1L, k to end. (2 sts increased)
Work 3 (3, 3, 3, 1, 1, 1, 1) rows even.
Rep Inc Row. (30 (30, 32, 34, 34, 36, 36, 36) sts)
Work 3 (3, 3, 3, 1, 1, 1, 1) rows even.
Rep Inc Row. (32 (32, 34, 36, 36, 38, 38, 38) sts)
Sizes 4T (6, 8, 10) ONLY:
Work 1 row even.
Rep Inc Row. (38 (40, 40, 40) sts)
All Sizes:
Work even until hood measures 5 (5.5, 6, 7, 8.5, 9.5, 10.5, 10.5)”, ending after a WS row.
Dec Row: K to 3 sts before m, k2tog, k1, sl m, k1, ssk, k to end. (2 sts decreased)
Next Row: P.
Rep last 2 rows once. (28 (28, 30, 32, 34, 36, 36, 36) sts rem)
Rep Dec Row. (26 (26, 28, 30, 32, 34, 34, 34) sts rem)
WS Dec Row: P to 3 sts before m, p2togtbl, p1, sl m, p1, p2tog, p to end. (2 sts decreased)
Rep last 2 rows once more. (20 (20, 22, 24, 26, 28, 28, 28) sts rem)
Place half of sts on left needle and half on right needle. Fold work in half with WS tog. Break yarn, leaving a long tail. Graft the 2 sides tog.
Sleeves
With dpns, beg at underarm, pick up 7 (8, 9, 10, 10, 11, 11, 12) sts up to shoulder seam and 7 (8, 9, 10, 10, 11, 11, 12) sts down to underarm. (14 (16, 18, 20, 20, 22, 22, 24) sts)
Join to work in the rnd and pm for beg of rnd.
Work in St st for 4 (4, 5, 5, 5, 5, 6, 6)”.
Dec Rnd: K1, k2tog, k to 3 sts before BOR, ssk, k1. (18 (18, 20, 22, 24, 26, 26, 26) sts rem)
Work even until sleeve measures 8 (9, 10, 10.5, 11, 11, 12, 13)”, or to desired length. BO all sts.
Ears
Make two.
CO 3.
Row 1: K.
Row 2: K1, M1, k1, M1, k1. (5 sts)
Row 3: K.
Row 4: K1, [M1, k1] 4 times. (9 sts)
Rows 5-13: K.
Row 14: SSK twice, k1, k2tog twice. (5 sts rem)
Row 15: K.
Row 16: SSK, K1, K2tog. (3 sts rem)
Row 17: K.
Break yarn and pull through rem sts.
Finishing
Fold ears in half with tails together and down. Align CO/BO edges so that top of ear forms an arc. Bend ear ends forward to create a cup shape. Sew bottom edge of ears to hood.
Sew hook and eye to front of sweater using needle and thread.
Weave in ends. Wash and block.
This is a lovely pattern. So far there are at least 2 errors. Is there an updated pattern with necessary corrections? It would be really appreciated. I don’t expect to knit this for a while. A request – whenever a pattern is revised it would be great to have the date for the most current version on the pattern. Thank you!
Hi Jacque! Please let me know which errors you may have found and I can reach out to the designer for advice. If an update is made to this pattern, an “Updated MM/DD/YY” will be added to the relevant portion of the pattern. – Nicola, Editor
I am working on the left front. Row 1 (RS) says to purl after the bind off. Everywhere else in the pattern has you knitting on the right side. Row 2 (WS) has you knitting. I am confused. Would appreciate your help.
Row 1 (RS): BO 2 (2, 3, 3, 3, 3, 3, 3), p to end. (8 (9, 9, 9, 10, 10, 11, 12) sts rem)
Row 2: K to last 2 sts, k2tog. (7 (8, 8, 8, 9, 9, 10, 11) sts rem)
Row 3: P1, p2togtbl, p to end. (6 (7, 7, 7, 8, 8, 9, 10) sts rem)
Hi Jill, that looks like it’s just a typo. Continue to knit on the right side.
Hi! I’m knitting a size 4T and am running into a problem with the sleeve instructions. If I’m reading it correctly I pick up and knit 20 stitches for the sleeve however the pattern indicates that I should work the decrease rows until I have 24 stitches remaining. Is this a misprint or am I misunderstanding the number of stitches I have to pick up for the sleeves in the beginning? Any help would be greatly appreciated. Thanks.
Hello Debbie! I’ve reached out to the designer for advice and she or I will reply as soon as possible. Thanks! – Nicola, Editor
Hi Debbie- no idea how this happened, but the number of stitches after decreasing is wrong. You should decrease two stiches to end up with 18.
Is there a pattern diagram for assembling the hoodie? I’m not quite clear on sewing the shoulder seams. I am new to sewing and selected this pattern as it says it’s easy but I’ve knitted this up three times thinking I did something wrong because the shoulders and not the same on both sides. Any help would be appreciated, thank you.
Hello! I’ve reached out to the designer for advice and she or I will reply as soon as possible. Thanks! – Nicola, Editor
Hi Allison- I wonder if you’re having trouble because of the yarn? It can be very hard to see individual stitches in this type of yarn. I would use safety pins to hold the shoulders together before sewing anything- that way you can match up the edges. Hope that helps!
Can you replace it with a super bulky/chunky wool knit if you would rather do a natural fiber yarn? I know you won’t get the faux fur/sherpa look.
Hello! I’ve reached out to the designer for advice and she or I will reply as soon as possible. Thanks! – Nicola, Editor
Hi Jennifer-
You can certainly replace the yarn BUT if you don’t use the sherpa type yarn, the edges of the sweater will curl. The sherpa yarn is nice because then edgings (like ribbing) aren’t needed.