

TABLE OF CONTENTS
PROJECTS
EASY CABLE KNIT HEADBAND
CUTE SUNGLASSES CASE
SPRING MEADOW SCARF
PATTERN BASICS
SLIP STITCH
KNITTED CAST-ON
LONG TAIL CAST-ON
CABLE CAST-ON
KNIT STITCH
PURL STITCH
BIND OFF
THREE NEEDLE BIND OFF

EDITOR’S NOTE
As managing editor of I Like Knitting magazine, let me be the first to say welcome! I’ve been a yarn lover for most of my life (I was six years old when my grandma showed me how to make my own scarf) and I can honestly say that I have the best job in the world.
While my role does consist of emailing designers and writing up magazine contracts, I count myself incredibly lucky to be able to look at gorgeous projects — from blankets and shawls to the cutest knitting scarves and hats — every day.
Since you are new to our magazine, I truly hope you enjoy this free mini issue: Beat the Heat: 3 Free Summer Knitting Patterns, that will offer a tiny taste of what the I Like Knitting community can offer you.

About Us
Published six times a year, our magazines contain 25+ new and exclusive knitting patterns in each issue!
So start building your library of knitting blankets, knitting scarf patterns, knitting sweater patterns and more all on your tablet or desktop, and all accessible with an active club membership. Every issue contains 25 to 30 exclusive knitting designs.
Take the next step in your knitting and join our community of talented readers who live to learn new techniques and love to knit!

BEHIND THE SCENES

I Like Knitting editors Nicola Prybell and Caitlin Eaton, hard at work styling projects for a new issue of our bi-monthly magazine.

TUTORIAL
HOW TO KNIT A CABLE
by Jessica Potasz
Hi, this is Jessica from Mama In A Stitch Blog, and today I’d like to share with you how to knit a simple cable. I was always intimidated by cables until I finally tried them out and realized how easy they are to complete. Cables are classic, yet they have also become very trendy! You can find them on everything from knitwear to blankets.
MATERIALS
- Yarn: I’ve used Lion Brand Wool Ease Thick & Quick Super Bulky. *You may use any size yarn with the appropriate needles to practice this cable
- Knitting Needles: I’ve used US Size 15 Knitting Needles
- Cable Needle: you can see it pictured below
INSTRUCTIONS
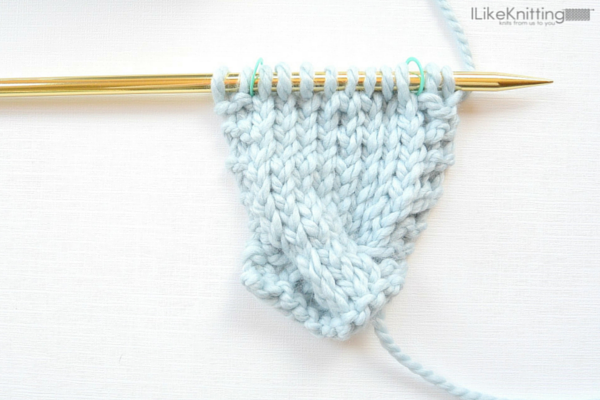
**You can see how to do it with this picture tutorial, but you can also found the written pattern below.

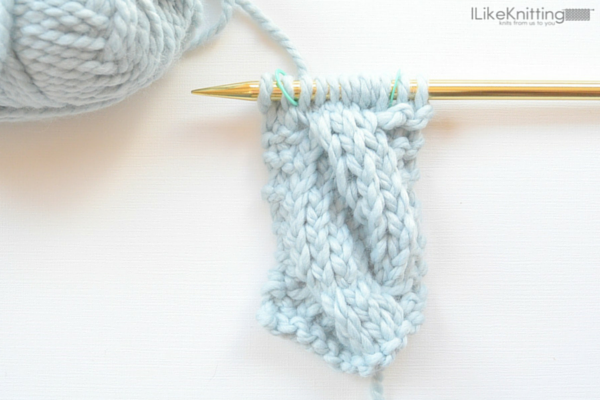
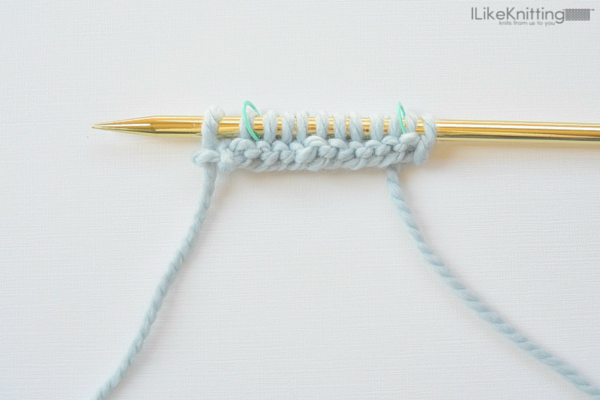
I’ve knit cast on 12 stitches. I will work a few rows (as seen in the pattern below) and then do my cable row.
Placed my stitch markers 2 stitches in, with 8 stitches inside the place markers (these 8 stitches will make up my cable).
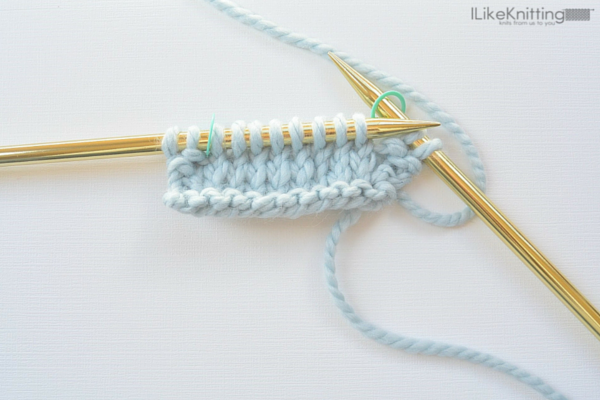
Knitting my next row, I will now prepare to make my cable row as I’ve reached my stitch marker.
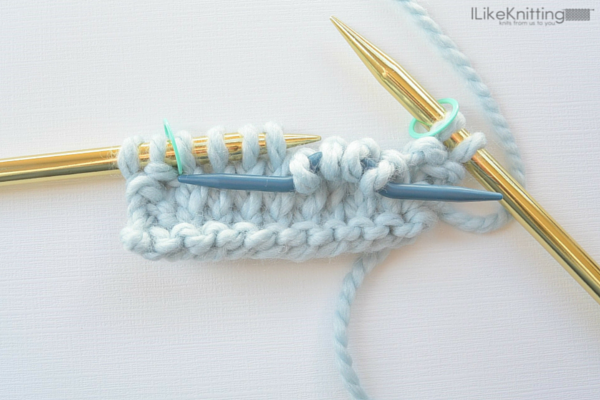
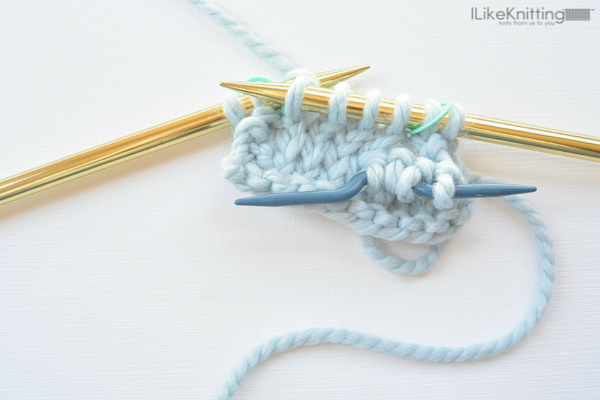
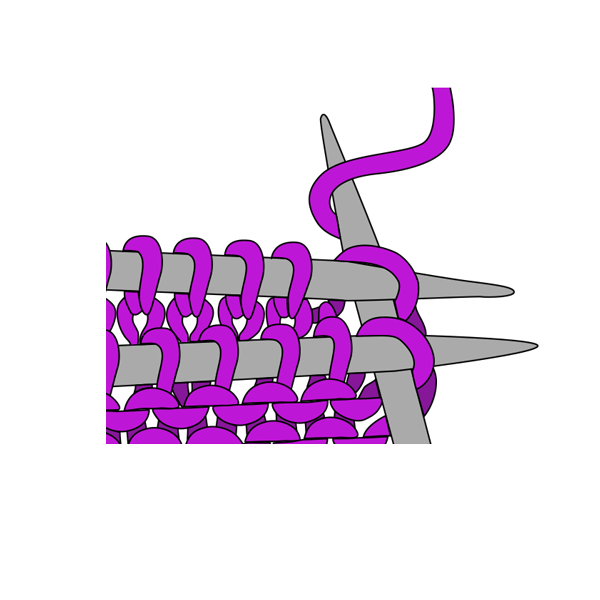
Slide off the first four stitches of the cable section onto the cable needle.
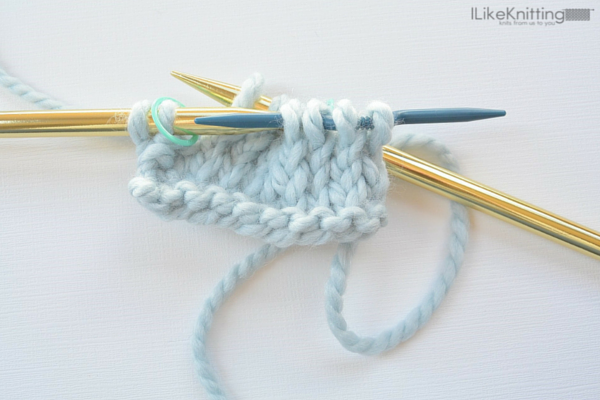
With the four stitches held in front on the cable needle, knit the following four from your knitting needle just as you normally would.
Now slide the stitches from your cable needle back onto your knitting needle. (Some people knit them right off of the cable needle. That’s fine too!)
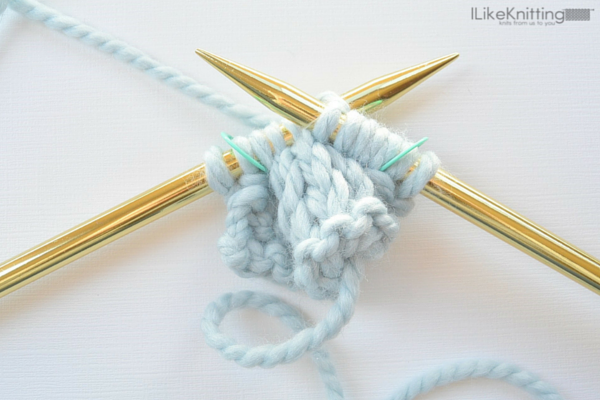
Now knit those four stitches just as normal off of your needle.
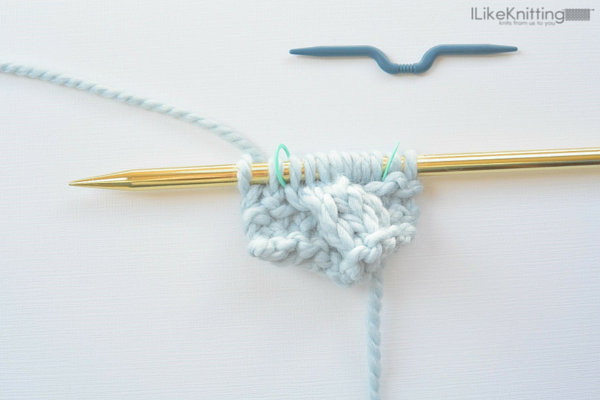
Finish your row. Congrats, you’ve finished your cable row! The rest is easy.
Continue the pattern. This one has 9 rows of stockinette between each cable row.
Make another cable row as the pattern calls for. You can see that you’re forming a beautiful cable! It’s that simple!
ABBREVIATIONS
K – knit
P – purl
4/4 LC – this means the left stitch cable. Slide 4 stitches onto cable needle, hold in front, and knit the next four off of your knitting needle, then knit four off of your cable needle or slide them back onto original needle to knit from there.
PATTERN FOR THIS 8 STITCH CABLE WITH LEFT TWIST
Knit cast on 12 stitches
Row 1: Knit across (Place stitch markers two stitches in on both sides)
Row 2: K2, p8, k2
Row 3 & 4: Repeat rows 1 & 2
Row 5: K2, 4/4 LC, k2
Row 6: K2, p8, k2
Row 7: Knit across row
Row 8 & 9: Repeat row 6 & 7
Row 10 & 11: Repeat row 6 & 7
Row 12 & 13: Repeat row 6 & 7
Row 14: Repeat row 6
Row 15: K2, 4/4 LC, k2
Repeat rows 6-15 as many times as you’d like to make your cable longer.
Cables look complex, but they are quite easy, don’t you think? I hope that you can enjoy making cables in some of your knitting projects!
PATTERNS

EASY CABLE KNIT HEADBAND
by Heidi Gustad
This simple knitting pattern is called the Easy Cable Knit Headband because you can use it to show off your newly acquired cabling skills! You can use this free knitting pattern to practice cables and to master this fun look that’s bursting with texture.
Go ahead and fall in love with this knitted headband because it makes for great DIY gifts. Feel free to make this headband knitting pattern in a range of lush colors to match any outfit. You can also use bulkier or thinner yarn than what is called for in the pattern below to create a wide range of sizes and weights for any season. You’ll want to wear this knit headband all day long and feel so accomplished once you’ve mastered a new skill in your knitting repertoire!
Skill Level: Beginner
Size: Knitting Needle Size 13 or 9 mm, Double-Pointed Knitting Needles (DPNs)
Gauge: Gauge is not needed for project.
MATERIALS
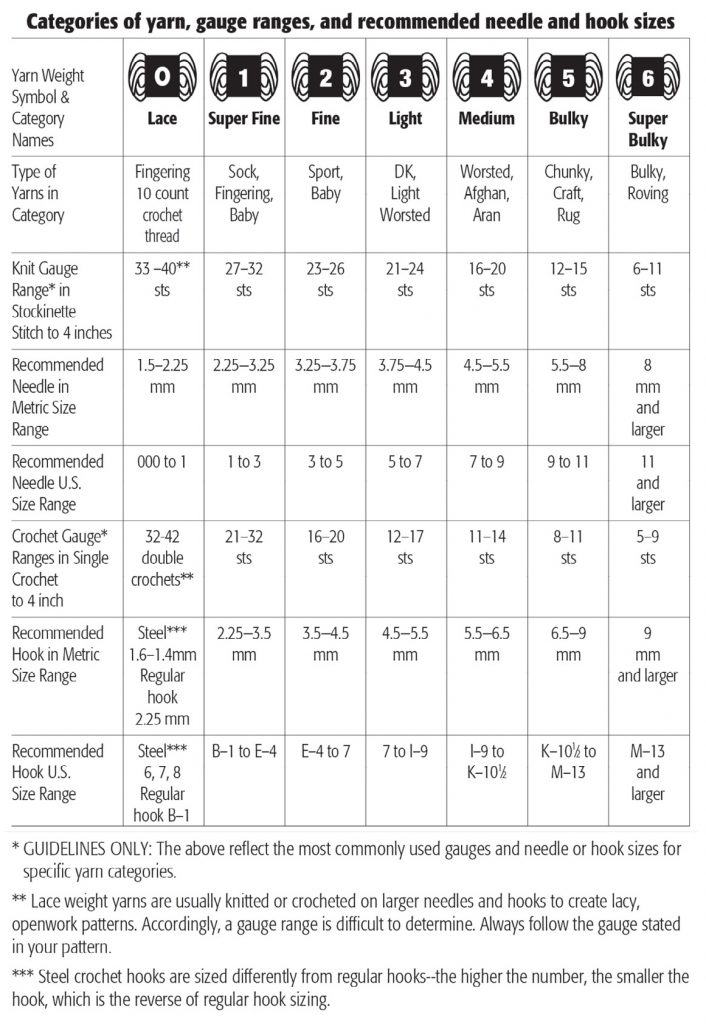
 Yarn: Yarn Weight(6) Super Bulky/Super Chunky (4-11 stitches for 4 inches)
Needles: 13 or 9mm (DPNs)
Notions: Tapestry needle
PATTERN
Provisional CO 11
Row 1: (RS) K across
Row 2: (WS) K1, P9, K1
Row 3: K1, C6F, K4
Row 4: K1, P9, K1
Row 5: K across
Row 6: K1, P9, K1
Row 7: K4, C6B, K1 Row 8: K1, P9, K1
Repeat from row 1 until you’ve reached the size that you need! Then, join the provisional cast on on the other end with kitchener stitch, and your headband is ready to wear.
CUTE SUNGLASSES CASE
by Jessica Potasz
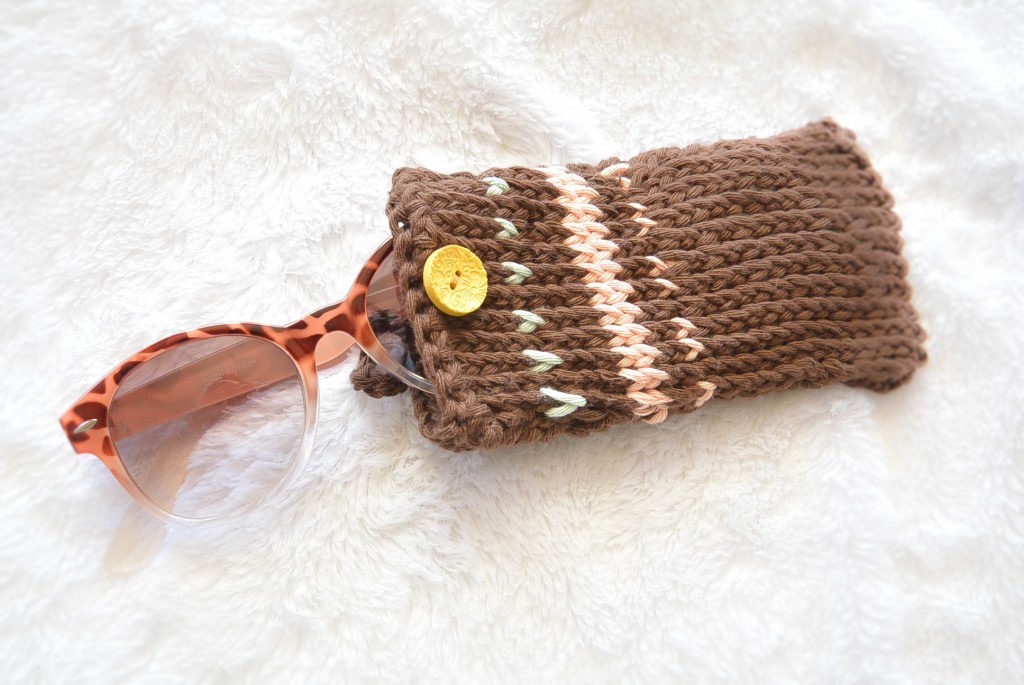
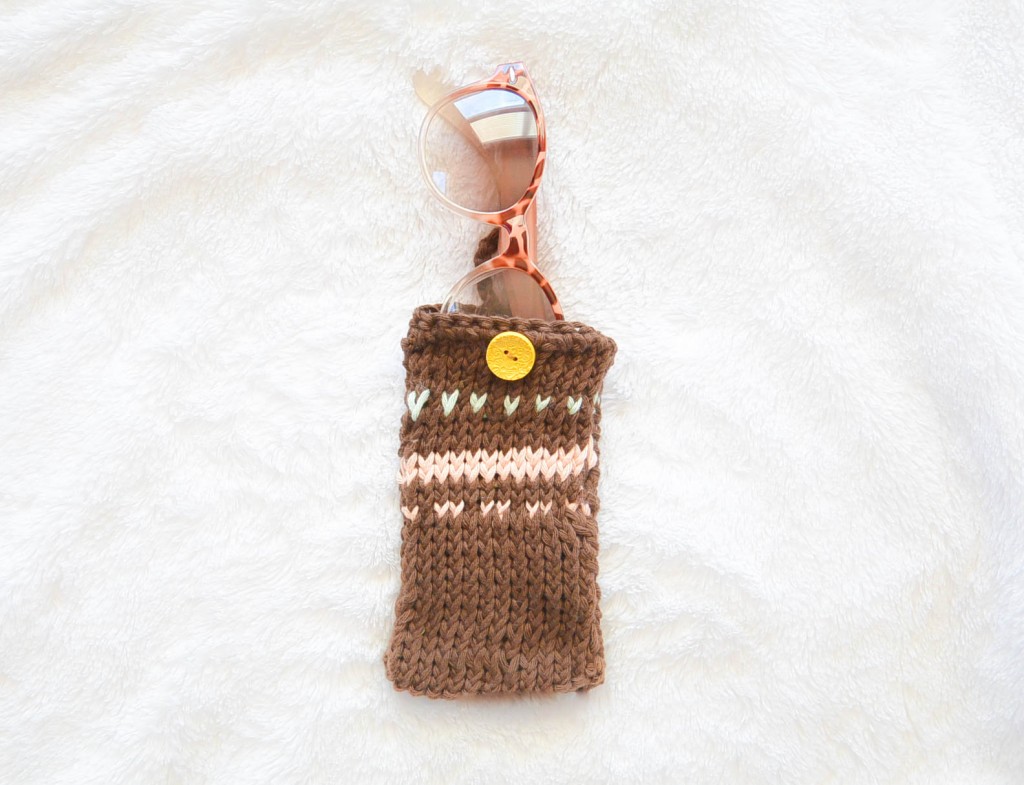
Hi knitters! This is Jessica from Mama In A Stitch Blog and today I’d like to share a simple, trendy, spring time sunglasses case pattern with you. This case is made with a lightweight cotton that is perfect for the warmer months, but you can use any worsted weight yarn that you have in your stash. In fact, this could be the perfect little summer stash buster project. Get rid of some of that left over yarn and make yourself this cute little bag to throw in your purse to protect your sunglasses. This is definitely a beginner friendly pattern. You do have to do simple color changes, but it’s so easy! If you know how to knit and purl, you can do this for sure.
Skill Level: Beginner
Size: Approx. 6.5” in length
Gauge: Gauge is not needed for project.
MATERIALS
Yarn: Worsted Weight Yarn (I used Drops Paris Cotton in Brown, Peach and Light Mint Green)
Needles: US Size 8, 5.0 mm Knitting Needles
Notions: Tapestry Needle to weave in ends
PATTERN
Cast on 14 stitches
Knit (garter stitch) each row until your piece measures 6.5” inches long
Once you have a piece that measures 6.5 inches long, you will begin to work in stockinette stitch. This means you will purl the following row, then knit. Alternate knit and purl rows until you have another 3.0” of stockinette. At 3.0” inches and ending on a WS row, you will then pick up your peach color yarn.
Next row: Knit 2 Peach, Knit 1 Brown across row
Next two rows: Continue in stockinette with Brown
Next two rows: Continue in stockinette stitch with Peach
Next three rows: Continue in Stockinette with Brown
Next row: Pick up your mint color yarn, and alternate knit 1 mint, knit 1 brown across row
Now, continue working in stockinette with brown only until you have 6.5” of stockinette or a total length of 13”.
The entire piece should measure 13” in length.
Assembly:
Fold your piece where the garter stitches meet the stockinette stitches. Whip stitch around three sides of the piece, working through both fabrics. Tie off, weave in ends. Leave the top open for your sunglasses!
If you know how to crochet, I’ve made the button closure by simply single crocheting around the upper portion of the case. When you reach the center back side of the case, chain 12, then reattach chain to case. Tie off, weave in ends.
If crochet isn’t your thing, you can simply take a piece of yarn and secure it to the center back, make a loop for your button, and tie it off. Weave in your ends.
Place your button in the center front of the case. With your needle and thread, secure the button to your knitting. Tie off and cut off excess thread.
This case is just right for sunglasses, but realized that my iPhone fits in it perfectly as well! I hope you enjoy this easy springtime knitting project!

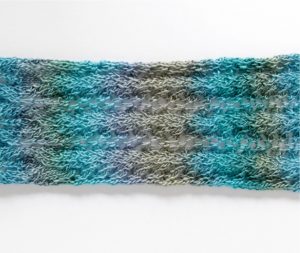
SPRING MEADOW SCARF
by Heidi Gustad
It can be so hard to find knit scarf patterns that are light and lacy enough for the warm- er months, so when you find a pattern like this, you have to seize the moment. Knit yourself a Spring Meadow Scarf for the most stunning lacy addition to your wardrobe in years. Nothing quite beats the blues, grays and greens of this yarn, reminiscent of a quiet pond on a lazy day. This scarf is knit in five lovely sections and four transitions that seamlessly join them together.
Skill Level: Intermediate
Size: One size, [Finished size approximately 6”x58”].
Gauge: 1 stitches, 2 rows, 3 inches. stockinette stitch
MATERIALS
 Yarn: 1 skein Red Heart Boutique Unforgettable yarn in Tidal (100% acrylic; 270 yards/247 meters/100 grams)
Needles: US size 8 (5 mm) straight 9-inch knitting needles
Notions: Tapestry needle
SPECIAL STITCHES
Vine Lace, Fern Lace, Star Rib Mesh, and a custom transition between sections.
PATTERN NOTES
This pattern is worked flat.
PATTERN
Spring Meadow ScarfCO 33 sts using a long tail cast on.
Section 1 & 5: Vine Lace
Rows 1 & 3: (WS) p
Row 2: (RS) k4, (yo, k2, ssk, k2tog, k2, yo, k1), k2
Row 4: k3, (yo, k2, ssk, k2tog, k2, yo, k1), k3 Repeat rows 1-4 15 times.
The second time you work vine lace (section 5 of the scarf), end it with the following:
Row 5: (WS) p
Row 6: k
Row 7: p & BO this row
Transition 1, 3 & 4
Use this to transition: from the first vine lace section to the first fern lace section, from the star rib mesh section to the second fern lace section, and from the second fern lace section to the second vine lace section.
Row 1: (WS) p
Row 2: k
Do not repeat rows 1 & 2.
Section 2 & 4: Fern Lace
Row 1 & all odd rows: (WS) p
Row 2: k2, (yo, ssk, k5, k2tog, yo, k1), k1
Row 4: k2, (yo, k1, ssk, k3, k2tog, k1, yo, k1), k1
Row 6: k2, (yo, k2, ssk, k1, k2tog, k2, yo, k1), k1
Row 8: k2, (yo, k3, sl 1, k2tog, psso, k3, yo, k1), k1
Row 10: k4, (k2tog, yo, k1, yo, ssk, k5) end k4 instead of k5
Row 12: k3, [k2tog, (k1, yo) twice, k1, ssk, k3]
Row 14: k2, (k2tog, k2, yo, k1, yo, k2, ssk, k1), k1
Row 16: k1, k2tog, (k3, yo, k1, yo, k3, sl 1, k2tog, psso) rep to last 10 sts, end k3, yo, k1, yo, k3, ssk, k1
First Fern Lace Section: Repeat rows 1-16 twice.
Second Fern Lace Section: Repeat rows 1-16, 2 .5 times, which means you’ll work rows 1-16 twice and rows
1-8 one last time after that.
Transition 2
Use this to transition from the first fern lace section to the star rib mesh section.
Row 1 & all odd rows: (WS) p
Row 2: k2, yo, (ssk, k5, k2tog, M1, k1, M1), rep to last 11 sts, end ssk, k5, k2tog, yo, k2
Row 4: k2, yo [k1, ssk, k3, k2tog, (k1, M1) twice] rep to last 11 sts, end k1, ssk, k3, k2tog, k1, yo, k2
Row 6: k2, yo, (k2, ssk, k1, k2tog, k2, M1, k1, M1) rep to last 11 sts, end k2, ssk, k1, k2tog, k2, yo, k2
Row 8: k2, yo, (k3, sl 1, k2tog, psso, k3, M1, k1, M1) rep to last 11 sts, end k3, sl 1, k2tog, psso, k3, yo, k2
Row 10: k
Spring Meadow Scarf Section 3: Star Rib Mesh
Rows 1 & 3: (WS) p
Row 2: k1, (yo, sl 2 knitwise, k1, p2sso, yo, k1)
Row 4: ssk, yo, k1, (yo, sl 2 knitwise, k1, p2sso, yo, k1), yo k2tog
Repeat rows 1-4 20 times.
Work transition 3, fern lace section 2, transition 4 and vine lace 2.
Block scarf to finish.
MASTER ABBREVIATIONS
Beg – begin/beginning
Bet – between
BO – bind off
Cn – cable needles
CO – cast on
Cont – continue
Dec – decrease
Dpn – double pointed needles
Fl – front loops
Inc – increase
K – knit
K2tog – knit 2 stitches together
Kwise – knitwise
Lp(s) – loop(s)
M1 – make one stitch
M1 p-st – make one purl stitch
P – purl
Pm – place marker
Pop – popcorn
P2tog – purl 2 stitches together
Pwise – purlwise
Rem – remain/remaining
Rep – repeat(s)
Rev St st – reverse stockinette stitch
Rnd(s) – round(s)
RS – right side
Sk – skip
Skp – slip, knit, pass stitch over—one stitch decrease
Sk2p – slip 1, knit 2 together, pass slip stitch over the knit 2 together—two stitches have been decreased
Sl – slip
Sl1k – slip 1 knitwise
Sl1p – slip 1 purlwise
Sl st – slip stitch(es)
Ssk – slip, slip, knit these 2 stitches together—a decrease
St(s) – stitch(es)
St st – stockinette stitch
Tbl – through back loop
Tog – together
WS – wrong side
Wyib – with yarn in back
Wyif – with yarn in front
Yfwd – yarn forward
Yo – yarn over
Yrn – yarn around needle
Yon – yarn over needle
[ ] or ( ) – work instructions within brackets as many times as directed*– repeat the instructions following the single asterisk as directed
* * – repeat instructions between asterisks as many times as directed or repeat from a given set of instructions
PATTERN BASICS
SLIP STITCH
Before starting the slip knot, decide which method of casting on you want to try. If you choose the long-tail cast-on method, leave approximately an inch for every stitch that you’re about to place on the needle. For the knitted cast-on, leave eight to ten inches between the end of the yarn and the slip knot.
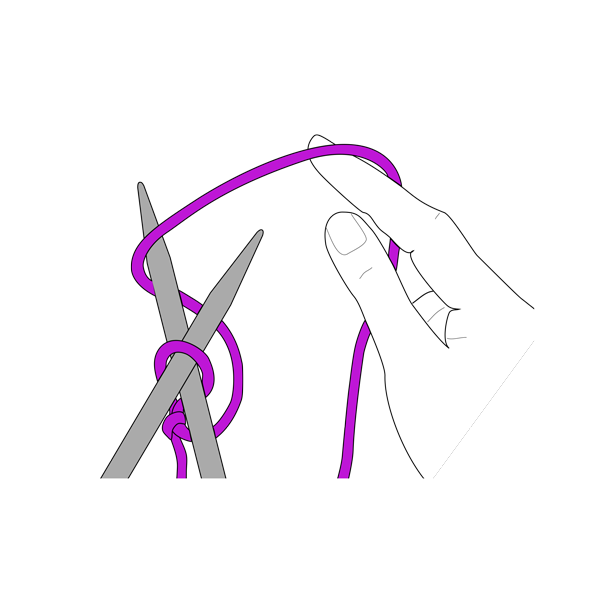
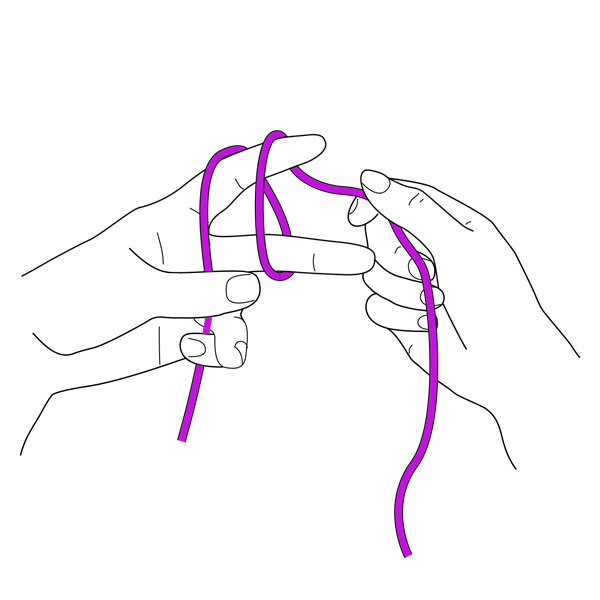 1 Hold the short end of the yarn in your palm with your thumb. Wrap the yarn around the index and middle fingers twice.
 2 Pull the strand attached to the ball through the loop between your two fingers to form a new loop.
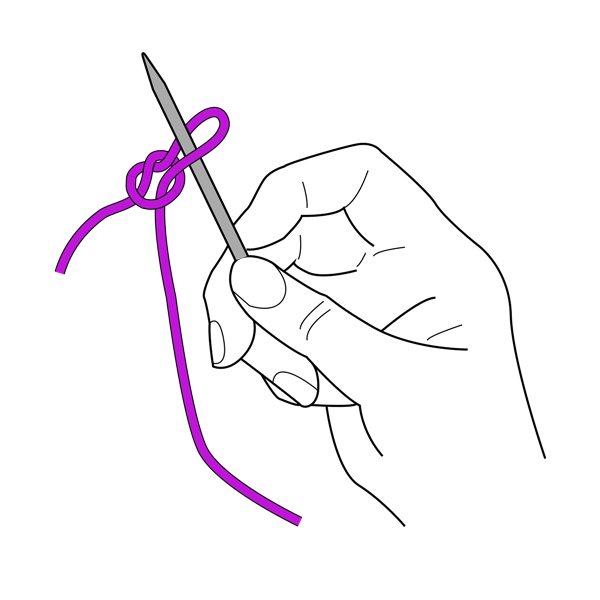 3 Place the new loop on the needle and tighten it by pulling on both ends of the yarn to form the slip knot. You are now ready to begin casting-on.
KNITTED CAST-ON
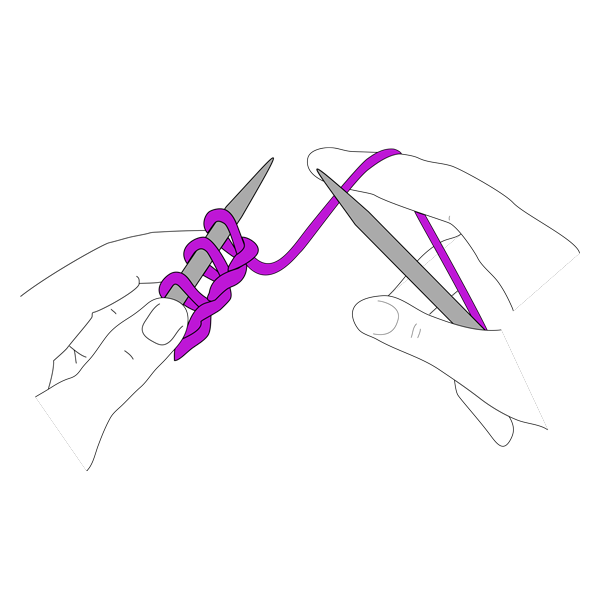
 1 Make a slip knot on the left needle. Insert the right needle knitwise into the stitch on the left needle. Wrap the yarn around the right needle as if to knit.
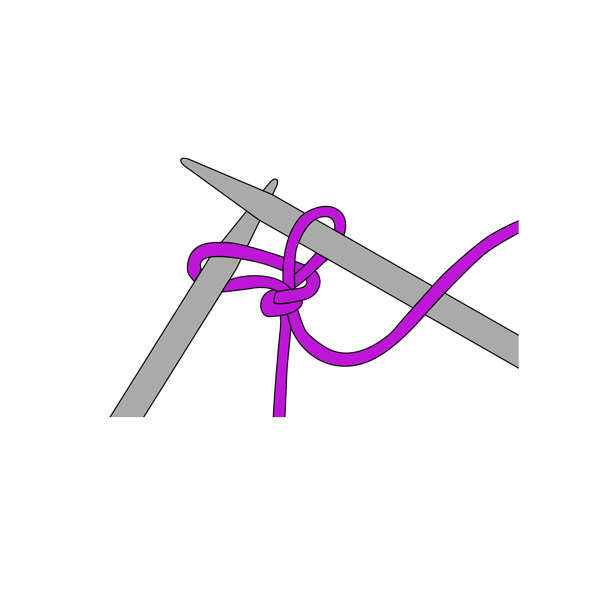 2 Draw the yarn through the first stitch to make a new stitch, but don’t drop the stitch from the left needle.
 3 Slip the new stitch to the left needle as shown. Continue until all the stitches are cast on.
LONG TAIL CAST-ON
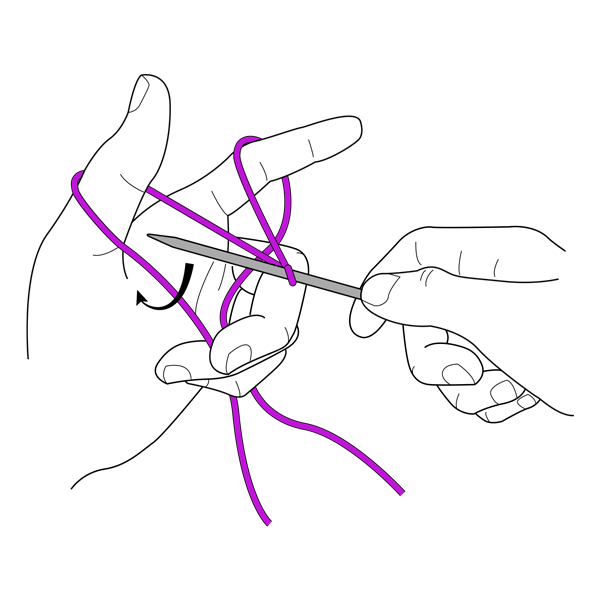 1 Make a slip knot on the right needle, leaving a long tail. Wind the tail end around your left thumb, from the front to the back. Wrap the yarn from the ball over your left index finger and secure the ends in your palm.
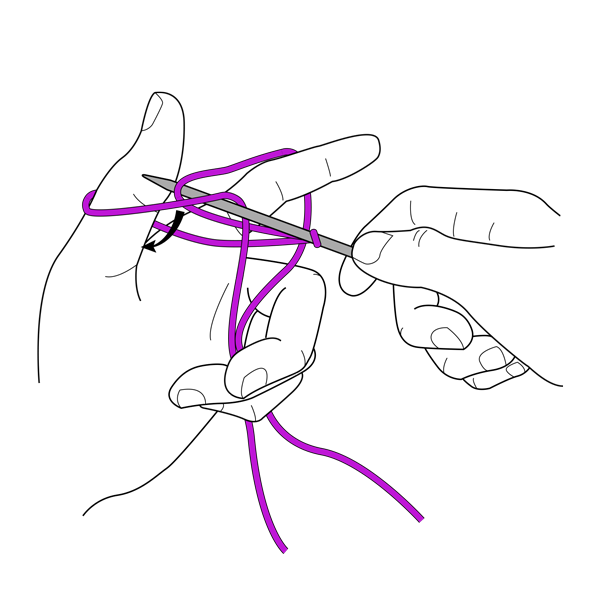 2 Insert the needle upward into the loop on your thumb. With the needle, draw the yarn from the ball through the loop to form a stitch.
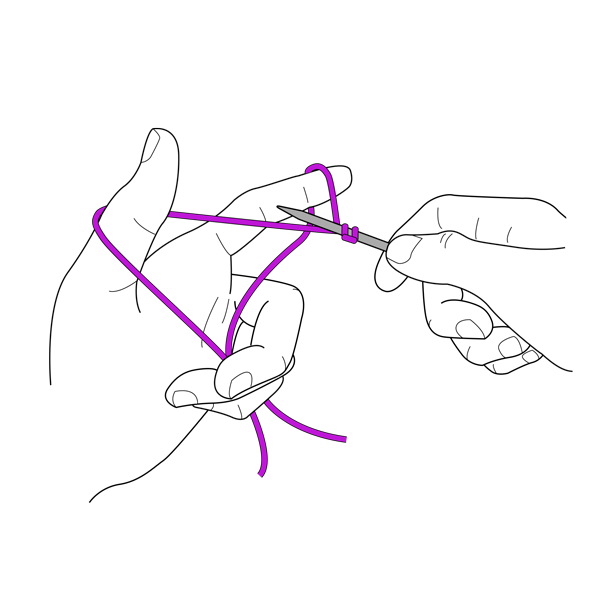 3 Take your thumb out of the loop and tighten the loop on the needle. Continue until all the stitches are cast on.
CABLE CAST-ON
 1 Cast on two stitches using the knitted cast-on method. Insert the right needle between the two stitches on the left needle.
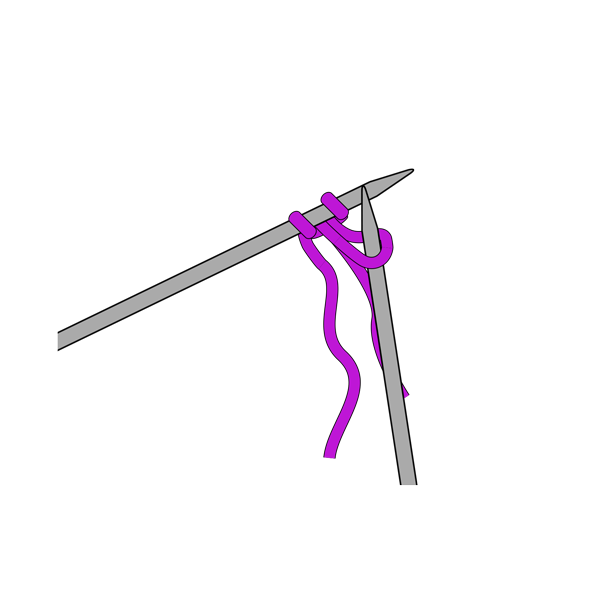 2 Wrap the yarn around the right needle as if to knit and pull the yarn through to make a new stitch.
 3 Place the new stitch on the left needle as shown. Continue as needed, always inserting the right needle in between the last two stitches on the left needle.
KNIT STITCH
 1 Hold the needle with the cast-on stitches in your left hand and the other needle in your right. Wrap the yarn around your fingers.
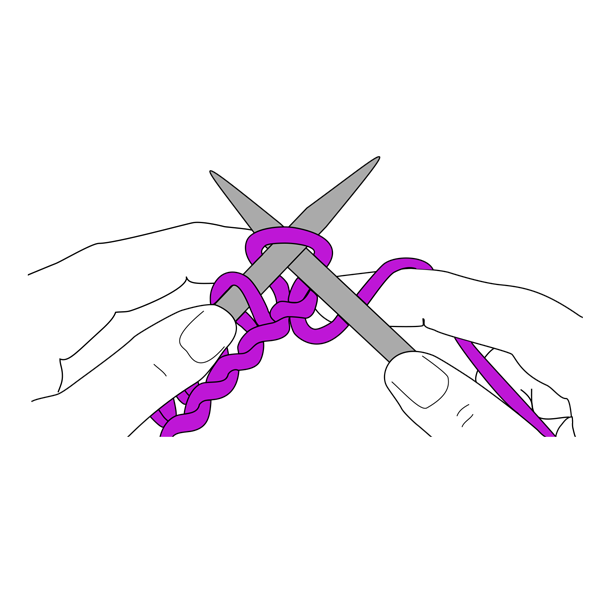 2 Insert the right needle from front to back into the first cast-on stitch on the left needle. Keep the right needle under the left and keep the yarn at the back.
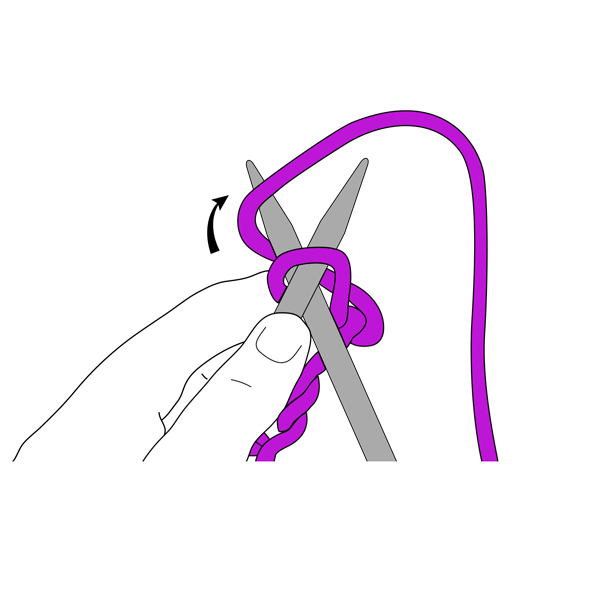 3 Wrap the yarn under and over the right needle in a clockwise motion.
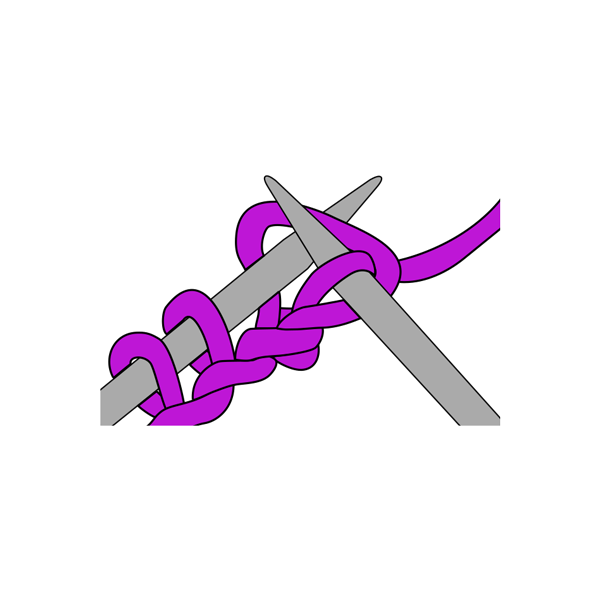 4 With the right needle, pull the yarn through the cast-on stitch.
 5 Slip the cast-on stitch off the left needle, keeping the newly formed stitch on the right one.
PURL STITCH
 1 Hold the working needle in your right hand and the needle with the stitches in your left. The yarn is held and worked with your right hand and is kept to the front of the work.
 2 Insert the right needle from the back to front into the first stitch on the left needle. The right needle now is in front of the left with the yarn in front of the work.
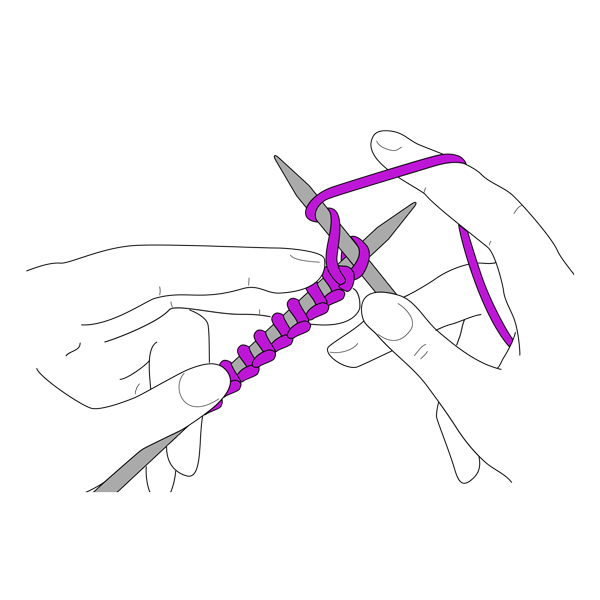 3 Wrap the yarn counterclockwise around the right needle with your right index finger.
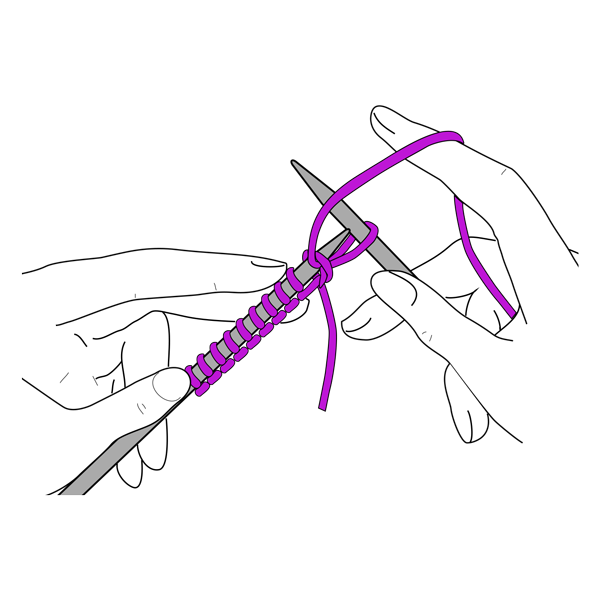 4 Draw the right needle and yarn backward through the stitch on the left needle to form a loop on the right needle.
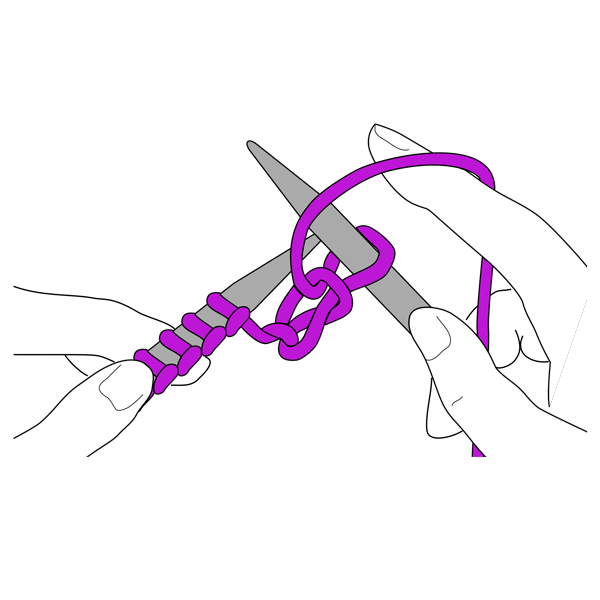 5 Slip the stitch off the left needle and onto the right one.
BIND OFF
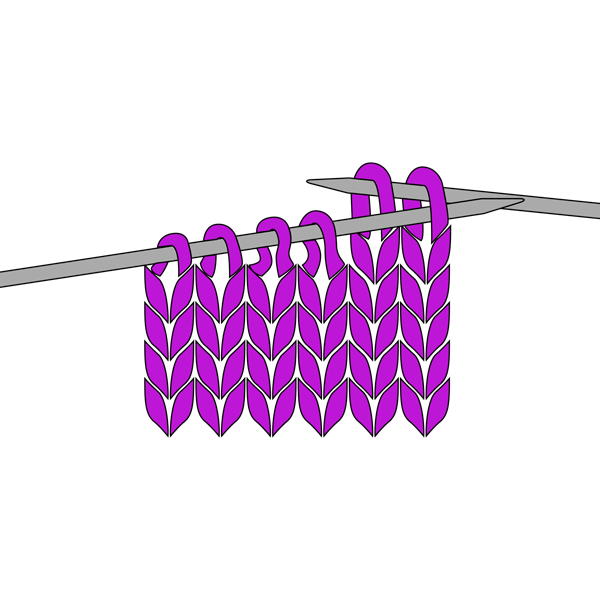 1 Knit two stitches. Insert the left needle into the first stitch on the right needle.
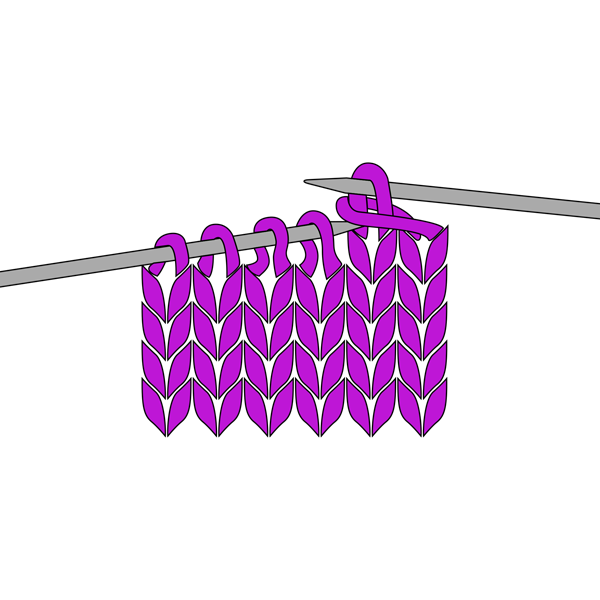 2 Pull this stitch over the second stitch and off the right needle.
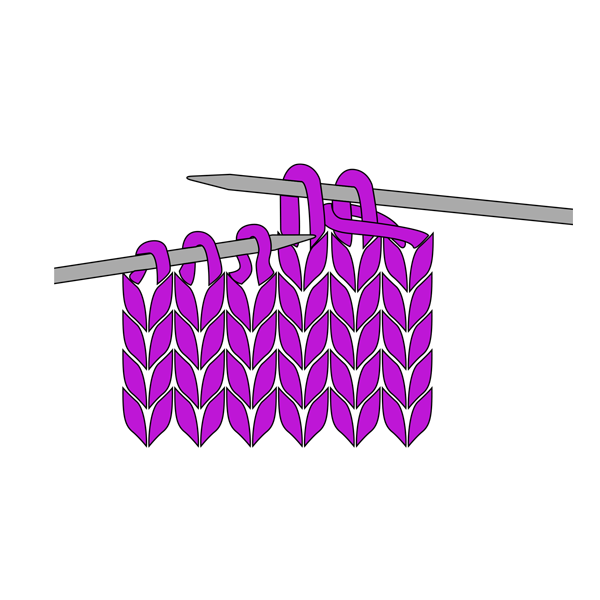 3 One stitch remains on the right needle as shown. Knit the next stitch.
THREE NEEDLE BIND OFF
 1 With the right side of the two pieces facing each other, and the needles parallel, insert a third needle knitwise into the first stitch of each needle. Wrap the yarn around the needle as if to knit.
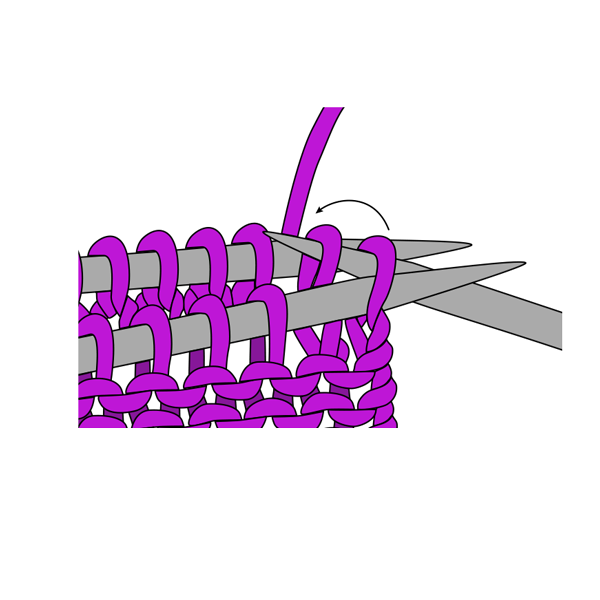 2 Knit these two stitches together and slip them off the needles. Knit the next two stitches together in the same way as shown.
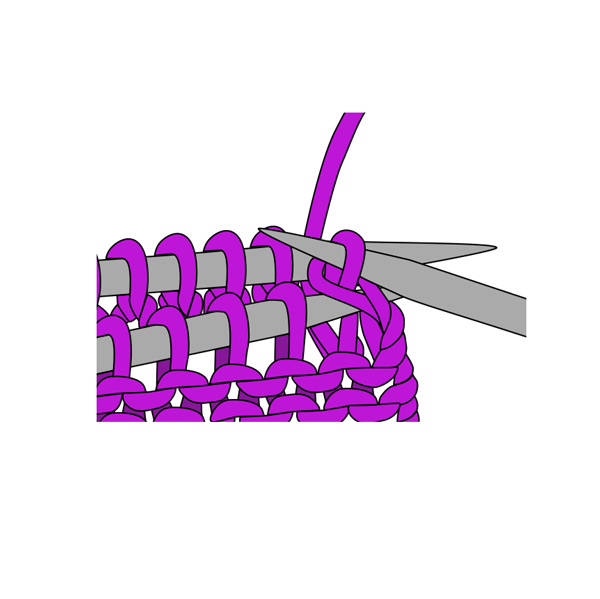 3 Slip the first stitch on the third needle over the second stitch and off the needle.
I have put your email address in as you said, but I am being told it’s incorrect and it can’t be sent.
Dawn knitter Richens
Our customer service team can make sure everything is in order if you shoot them an email. We are happy to help! Thanks
Really excited to have become a member. I love what I am seeing. I have been knitting for a long time but it is always great to learn something new. Really looking forward to having a goos look around the site.
Lots of interesting knitting! And always something new. Thank you all!!!
Wow I just subscribed and I am seeing wonderful stitches, cast on directions cast off directions, there are terrific patterns, I am anxious to learn new knitting methods,
Thank you
Welcome! So glad to hear! – Nicola, Editor
Tried to change my password, HA HA, an you refused????? Mow what????
Hi Helen, looks like you might be having trouble accessing your account? Our customer service team can make sure everything is in order if you shoot them an email. We are happy to help! Thanks 🙂 https://www.ilikecrochet.com/contact-us/
really love the demonstrations you show. They are really informative. I would like to sign up but at the moment i do not have any money to do so.. don’t get paid until Monday.
I am mostly a sewer, but I’ve found your info to be a refresher course, as I also love knitting.
Thank you so much!!
I really enjoyed learning these great knitting techniques very new to me.
Thank you for getting in touch with you and tuning in to this site. I’m loving it
Thanks so much.
Thank you so much for these wonderful patterns. I look forward to learning as well as producing a wonderful gift.
Thanks for providing patterns that are quick and fun!
Do you have directions for Left handers?
Hello Connie! We do not have specific patterns for left handers. Sorry about that! – Nicola, Editor
I’ve been knitting for years but only garter and stockinette stitches. I’m now attempting patterns and I find your directions extremely clear and straightforward. Thank you so much. Keep well.
Dorothy
Thank you for the freebies. I would like to print it out but I have tried but it does not work, how can I get a printed copy?
Thank you, Roseline
You are welcome to save this pattern by copying and pasting into a word document or by printing the pattern via the printer icon on the left hand side of your screen. Hope this helps! – Nicola, Editor
It would not let me put in my password in the beginning, so I still can not put one in. What do I do??
Hi there, looks like you might be having trouble accessing your account? Our customer service team can make sure everything is in order if you shoot them an email. We are happy to help! Thanks
Thank you
Very interesting, I like how you show how to make the sittiching.
Lots of information, good directions. Thanks
I to would like to STOP getting these messages!!!! I’m not impressed with your Free” Not so Free” patterns.
Hello! Please contact our customer service team for further assistance: https://www.ilikeknitting.com/contact-us/
Thanks! – Nicola, Editor
Please stop sending these to me please
Hello! Please reach out to our customer service team for assistance regarding your email preferences. Thanks! https://www.ilikeknitting.com/contact-us/
– Nicola, Editor
UNSUBSCRIBE!!!!!!!!
Hello! Please contact our customer service team for assistance: https://www.ilikeknitting.com/contact-us/
How does one do the kitchener stitch?
Hello! Here’s a tutorial on the kitchener stitch! https://www.ilikeknitting.com/magazine/knitting-articles-and-interviews/knit-kitchener-stitch-tutorial/
– Nicola, Editor
So far I’m not impressed. Patterns are not to my taste and I’m a long time knitter not in need of being taught the basics. Perhaps your magazine is not for me.
Hello! Sorry to hear that. Some of our free patterns are more on the beginner side of things, so we do encourage you to do some browsing of our other patterns: https://www.ilikeknitting.com/view-topics/
Let us know if we can answer any questions! – Nicola, Editor
I want to unsubscribe!!!!!!!!!
Hello Gloria! We are sorry to see you go! Please reach out to our customer service team for assistance: https://www.ilikeknitting.com/contact-us/
Thanks! – Nicola
Love it!
Love the simplicity. At age 80 , it helps. Been knitting for 65 years, now I appreciate simple. Thank you and thanking my daughter-in-law for sending me this site
Awsome !!!!!
Pattern basics are an excellent reference.
Where can i find out how to do vine st etc for the scarf
Hello Margaret! IT looks like a portion of the insturctions is missing so thank you for bringing that to our attention! We will update the pattern shortly. The Vine Stitch is as follows:
CO 33 sts using a long tail cast on.
Section 1: Vine Lace
Rows 1 & 3. (WS) p
Row 2. (RS) k4, (yo, k2, ssk, k2tog, k2, yo, k1), k2
Row 4. k3, (yo, k2, ssk, k2tog, k2, yo, k1), k3
Repeat rows 1-4 15 times.
WHICH
Which cable cast on stitch is the most popular
I taught myself to knit when I was 8 years old, I’m now almost 80. I wish I could have had computers and this site back then, it would have been so much easier. Thank You. I’ve learned new cast-ons and bind-offs.