

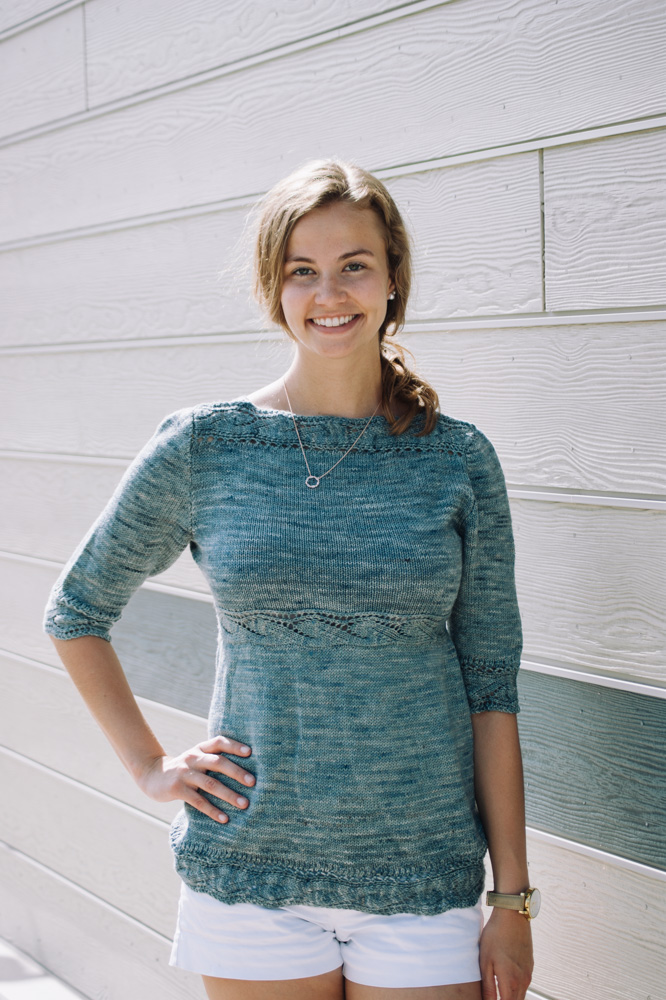
The hem of this tunic is reminiscent of the patterns in the sand that the waves leave behind. This tunic is knit in the round with set-in sleeves. The surprise deep-v neckline on the back back of this piece truly adds drama to this already beautiful tunic.
Time: 60 Hour Pattern
Skill Level: Advanced
Size: Finished Bust Size 34 (38, 42, 46, 50, 54, 58, 62)” to fit bust 32 (36, 40, 44, 48, 52, 56, 60)”
2” positive ease recommended.
Shown in size 34”
Gauge: 24 sts and 32 rows = 4” [10 cm] in St st on larger needles after wet blocking
32 rows = 4” in Lace Charts on smaller needles after wet blocking
Waist Lace = 2” wide at widest point on smaller needles
Materials
 Yarn: Alainn Yarns Worn Suitcase Sport (80% Superwash Merino, 20% Nylon; 328 yards [300 meters]/100 grams): Riverstone (4 (4, 5, 5, 6, 6, 7, 7) skeins)
Needles: US size 4 (3.5 mm) straight or circular, US size 5 (3.75 mm) 16” and 32-60” circular.
Notions: Removable markers, stitch holders, waste yarn for provisional cast-on, tapestry needle
Abbreviations
LLI (Left lifted increase): Insert left needle from back to front underneath stitch 2 rows below the next stitch on the right needle. Knit this stitch through back loop.
PU: Pick up and knit.
RLI (Right lifted increase): Insert right needle back to front into stitch 1 row below the first stitch on your left needle and slip to left needle. Then knit the stitch.
Pattern
Waist band
With smaller needles, provisionally CO 17 sts.
Setup Row (WS): P.
Rows 1-18: Work Waist Lace Chart Rows 1-18.
Rep Rows 1-18, 12 (13, 15, 17, 19, 20, 21, 23) times.
Rep Rows 1-17 once more.
Place provisional sts on needles. Attach beg to end using Kitchener St, being careful not to twist work.
Body Bottom
With larger needles, starting at Kitchener join, PU 176 (192, 216, 244, 272, 284, 300, 324) sts along non scalloped edge of waist band. PM for beg of rnd.
Rnd 1: [K4 (3, 4, 5, 6, 5, 4, 5), m1] 5 (64, 12, 9, 3, 3, 15, 13) times, [k3 (0, 3, 4, 5, 4, 3, 4), m1] 16 (0, 4, 8, 20, 28, 10, 8) times, [k4 (0, 4, 5, 6, 5, 4, 5), m1] 10 (0, 24, 18, 6, 6, 30, 26) times, [k3 (0, 3, 4, 5, 4, 3, 4), m1] 16 (0, 4, 8, 20, 28, 10, 8) times, [k4 (0, 4, 5, 6, 5, 4, 5), m1] 5 (0, 12, 9, 3, 3, 15, 13) times. (52 (64, 56, 52, 52, 68, 80, 68) sts inc’d; 228 (256, 272, 296, 324, 352, 380, 392) sts)
Work in St st until piece meas 10 (10.25, 10.5, 10.75, 11, 11.25, 11.5, 11.75)” from Waistband.
Roman Stripe
Setup Rnd: K around, dec 76 (84, 92, 96, 108, 116, 128, 132) sts evenly. (152 (172, 180, 200, 216, 236, 252, 260) sts)
Rnds 1-6: [Work Roman Stripe Chart Rows 1-6] around.
Rnd 7: K around, inc (dec, -, dec, -, dec, -, inc) 1 (1, 0, 2, 0, 2, 0, 1) sts evenly. (153 (171, 180, 198, 216, 234, 252, 261) sts)
Break yarn.
Bottom Edging
With smaller needles, provisionally CO 17 sts.
Setup Row: P.
Rnd 1: Work Right Side Lace Chart to last st, ssp using 1 st from edging and 1 st from bottom of Body, turn.
Rnd 2: Sl 1, work next row of Right Side Lace Chart.
Rep Rnds 1-2 until all sts from bottom of Body have been worked, chart has been worked through 17 (19, 20, 22, 24, 26, 28, 29) times.
Place provisional sts on needles. Attach beg to end using Kitchener St.
Body Top
Using Kitchener seam as Center Back, divide waistband into 4 sections, remover marker at Center Front. Place markers 1” from either side of Center Back marker.
Setup Rnd (RS): With larger needles, CO 16 sts, pm, PU 38 (42, 48, 55, 62, 65, 69, 75) sts between marker 1” from Center Back and Left Side marker for Left Back, pm, PU 88 (96, 108, 122, 136, 142, 150, 162) sts between Left Side and Right Side markers for Front, pm, PU 38 (42, 48, 55, 62, 65, 69, 75) sts from Right side Marker to marker 1” from Center back for Right Back, pm, PU 16 sts between markers on each side of Center Back. (196 (212, 236, 264, 292, 304, 320, 344) sts)
Setup Row (WS): K2, p to m, k2, p to 2 sts before last m, k2, p to last 2 sts, k2.
Row 1: Work Left Side Lace Chart, p2, k to 2 sts before last m, p2, work Right Side Lace Chart.
Row 2: Work Right Side Lace Chart, k2, p to 2 sts before last m, k2, work Left Side Lace Chart.
Rep Rows 1-2 until piece meas 4 (4.25, 4.5, 4.75, 5, 5.25, 5.5, 5.75)” from Waist Band, ending with a WS row.
AT THE SAME TIME
Work Waist Inc Row every 4 (3, 3, 4, 5, 3, 3, 3) rows 7 (6, 4, 7, 7, 2, 8, 6) times, then every 0 (4, 4, 5, 0, 4, 4, 4) rows 0 (3, 5, 1, 0, 8, 4, 6) times. (28 (36, 36, 32, 28, 40, 48, 48) sts inc’d; 102 (114, 126, 138, 150, 162, 174, 186) sts for Front)
Waist Inc Row (RS): Work in patt to 2nd m, LLI, sm, RLI, work in patt to next m, LLI, sm, RLI, work in patt to end of row. (4 sts inc’d)
AT THE SAME TIME
Work Neckline Dec Row every 2 rows 10 (7, 16, 13, 10, 7, 4, 15) times, then every 4 rows 17 (20, 17, 20, 23, 26, 29, 25) times.
Neckline Dec Row (RS): Work to m, sm, p2, k2tog, work in patt to 4 sts before last m, ssk, p2, work in patt to end of row. (2 sts dec’d)
Neckline Decreases will continue after Underarm Separation.
Separate for Underarm
Next Row (RS): Work to 7 (13, 13, 19, 25, 31, 37, 36) sts before 2nd m, BO 14 (26, 26, 38, 50, 62, 74, 72) sts, work 7 (13, 13, 19, 25, 31, 37, 36) sts before next m, BO 14 (26, 26, 38, 50, 62, 74, 72) sts, work to end of row. (88 (88, 100, 100, 100, 100, 100, 114) sts for Front)
Place Front and Left Back sts on holders.
Right Back
Cont Neckline Decreases.
Row 1 (WS): Work in patt to last st, k1.
Row 2: P1, k2tog, work in patt to end of row.
Rep Rows 1-2, 2 more times. (2 sts dec’d)
Cont in patt until piece meas 7 (7.5, 8, 8.5, 9, 9.5, 10, 10.5)” from underarm BO. Place rem sts on holder. (8 non-lace sts, 9-16 lace sts)
Left Back
Cont Neckline Decreases.
Attach yarn to WS of Left Back sts.
Row 1 (WS): K1, work in patt to last st.
Row 2: Work in patt to last 3 sts, ssk, p1.
Rep Rows 1-2, 2 more times. (2 sts dec’d)
Cont in patt until piece meas 7 (7.5, 8, 8.5, 9, 9.5, 10, 10.5)” from underarm BO, ending with a RS row. Place rem 24 sts on holder. (8 non-lace sts, 9-16 lace sts)
Front
Attach Yarn to WS of Front sts.
Row 1 (WS): K1, p to last st, k1.
Row 2: P1, k2tog, k to last 3 sts, ssk, p1. (2 sts dec’d)
Rep Rows 1-2, 2 more times. (4 sts dec’d; 82 (82, 94, 94, 94, 94, 94, 108) sts)
Work in patt until piece meas 4.25 (4.75, 5.25, 5.75, 6.25, 6.75, 7.25, 7.75)” from Underarm BO, ending with a WS row.
Shoulder Shaping
Rows 1-2: Work to last 8 sts, W&T.
Rows 3-4: Work to last 16 sts, W&T.
Rows 5-6: Work to last 24 sts, W&T.
Row 7: Work to end of row, hiding wraps.
Row 8 (WS): Work in patt, hiding wraps.
Yarn Over Border
Row 1 (RS): Work in patt, while decreasing 29 (29, 31, 31, 31, 31, 31, 37) sts evenly. (53 (53, 63, 63, 63, 63, 63, 71) sts)
Row 2: K1, p1, [yo, p2tog] to last st, k1.
Row 3: P1, p to last st, k1.
34 (38, 62) Only
Row 4 (WS): K1, p27 (27, -, -, -, -, -, 36), M1P, p to last st, k1, CO 17 sts. (71 (71, -, -, -, -, -, 89) sts)
42 (46, 50, 54, 58) Only
Row 4 (WS): K1, p to last st, k1, CO 17 sts. (- (-, 80, 80, 80, 80, 80, -) sts)
All Sizes
Lace Edging
Switch to smaller needles.
Rnd 1: Work Right Side Lace Chart to last st, ssp using 1 st from edging and 1 st from bottom of Body, turn.
Rnd 2: Sl 1, work next row of Right Side Lace Chart.
Rep Rows 1-2 until Right Side Lace Chart has been worked 5 (6, 7, 7, 7, 7, 7, 8) times, there are no shoulder sts left to decrease.
BO all sts.
Sleeves
Provisionally CO 68 (68, 68, 82, 82, 94, 94, 94) sts. PM, join in the rnd, being careful not to twist work.
Rnd 1: K.
Cont in St st, working Inc Row every 6 (4, 2, 4, 2, 2, 2, 2) rnds 6 (5, 1, 7, 8, 10, 13, 13) times, then every 0 (6, 4, 6, 4, 4, 4, 4) rnds 0 (3, 10, 2, 7, 6, 5, 5) times. (12 (16, 22, 18, 30, 32, 36, 36) sts inc’d; 80 (84, 90, 100, 112, 126, 130, 130) sts)
Inc Rnd: RLI, k to last st, LLI. (2 sts inc’d)
Cont in St st until piece meas 5.5 (5.5, 5.75, 5.75, 6, 6, 6.25, 6.25)”.
BO for Sleeve Cap
Next Rnd: Work to last 7 (13, 13, 19, 25, 31, 37, 36) sts, BO 14 (26, 26, 38, 50, 62, 74, 72) sts. (66 (58, 64, 62, 62, 64, 56, 58) sts)
Row 1 (RS): K to last st, p1.
Row 2: K1, p to last st, k1.
Dec Row: P1, k2tog, work to last 3 sts, ssk, p1. (2 sts dec’d; 64 (56, 62, 60, 60, 62, 54, 56) sts)
Cont in patt while working Dec Row every 2 rows 7 (3, 4, 3, 2, 3, 0, 1) times, then every 4 rows 4 (9, 9, 11, 13, 13, 17, 17) times, then every 2 rows 8 (4, 5, 4, 3, 4, 1, 2) times. (26 (24, 26, 24, 24, 22, 18, 16) sts)
BO 9 (8, 9, 8, 8, 7, 6, 5) sts at the beg of next 2 rows.
BO final 8 (8, 8, 8, 8, 8, 6, 6) sts.
Sleeve Cuff
Place provisional sts on larger needles.
Setup Rnd: K, dec 24 (24, 24, 26, 26, 30, 30, 30) sts evenly. (44 (44, 44, 56, 56, 64, 64, 64) sts)
Rnds 1-6: [Work Roman Stripe Chart Rows 1-6] around.
Next Rnd: K, inc (inc, inc, dec, dec, dec, dec, dec) 1 (1, 1, 2, 2, 1, 1, 1) sts evenly. (45 (45, 45, 54, 54, 63, 63, 63) sts)
Break yarn.
Edging
With smaller needles, provisionally CO 17 sts.
Setup Rnd (WS): P.
Rnd 1: Work Right Side Lace Chart to last st, ssp using 1 st from edging and 1 st from bottom of Body, turn.
Rnd 2: Sl 1, work next row of Right Side Lace Chart.
Rep Rnds 1-2 until all sts from bottom of Sleeve have been worked.
Place provisional sts on needles. Attach beg to end using Kitchener St.
Finishing
Set in sleeves.
Weave in ends.
Block to schematic measurements.
Hi! I’m logged in as a Gold Member. I’ve tried both the Pattern’s buttons at the bottom of the pattern. I’ve also tried https://www.ilikeknitting.com/collections/knitting-sweater-patterns/waters-edge-tunic/?t=52523. Neither take me to the lace pattern or the pattern schematics. Please help!
Hi Joy! The charts will appear in your downloads section either in your browser or on your computer. Be sure to check where things save that you download and you’ll be able to find the charts there once you click the buttons to download. Hope this helps! – Nicola, Editor
Where are the charts and schematic for this pattern?
Hi! Click this link instead: https://www.ilikeknitting.com/collections/knitting-sweater-patterns/waters-edge-tunic/?t=52523
Charts are available for logged-in Gold Members at the bottom of the pattern and appear as a blue button to click and download. – Nicola, Editor
Just wondering, could this little sweater be worn reversed? With a tank under it, of course.
Hi Mary Beth! We’ve reached out to the designer for advice and she or I will reply as soon as possible. Thanks! – Nicola
You should be able to, other than the neckline, the sweater is the same in the front and back. I haven’t tried it on backward on anyone, so no guarantees unfortunately!
It would be nice if this pattern had an alternative where the back would have a boat neck like the front.
Hi Dale! Interesting idea! The designer says “other than the neckline, the sweater is the same in the front and back” so you could in theory adjust the pattern to make the neckline the same on both sides. Hope that helps! – Nicola