

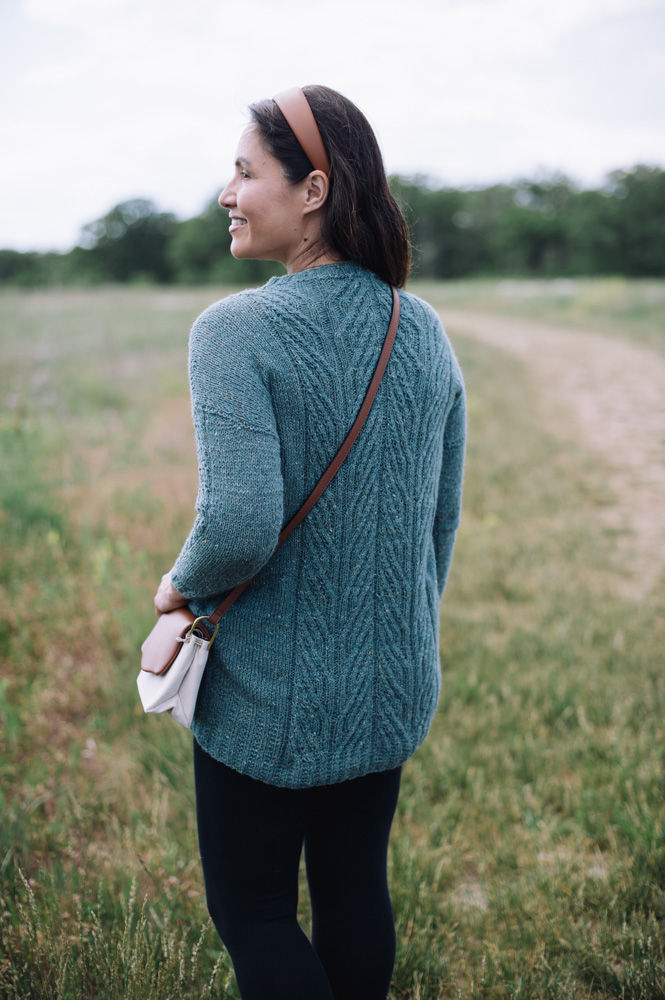
This garment is embellished with lovely cable stitches, positioned on each panel creating a beautiful textured sweater. The relaxed fit and pockets make it a comfortable piece you’ll want to wear all season long.
Time: 3-6 Weeks Project
Skill Level: Intermediate
Size: Finished Bust Size 32 (38, 40.5, 44, 46.5, 52.5, 55.5, 58, 64)” to fit bust 28 (32, 36, 40, 44, 48, 52, 56, 60)”
2.5”-6” positive ease recommended
Shown in size 40.5”
Gauge: 22 sts and 27 rows = 4” [10 cm] in St st after wet blocking
Materials
 Yarn: Valley Yarns Worthington (50% wool, 25% alpaca, 25% viscose; 174 yards [159 meters]/50 grams): 13 Arctic (6 (7, 8, 8, 9, 9, 10, 10, 11) balls)
Needles: US size 5 (3.75 mm) 29” or longer circular needle;
US size 4 (3.5 mm) and US size 3 (3.25 mm) circular needle for neck trim
Spare circular needle same or smaller size for working on Neckline Trim (optional)
Notions: Stitch markers, removable markers, scrap thread or stitch holders for holding live sts, cable needle, tapestry needle, row counter (optional).
Special Stitches
Knitted CO method
Step 1: Insert the right needle into the first st on left needle and work a knit stitch, but do not slip it off of the left needle.
Step 2: Place the newly pulled up st onto the left needle.
Rep Steps 1-2 until instructed number of stitches has been cast on.
Sewn BO method
Cut the working yarn to about 3 times as long as your finished piece of knitting. Thread that yarn onto a blunt needle. *Pass the yarn needle through the first two sts from right to left. Pass the yarn needle through the first st on the knitting needle from left to right. Drop the first st off the knitting needle*. Repeat from * to * until one st rem. Sew through this last st from right to left.
Kitchener Stitch (grafting)
Step 1: Insert the yarn needle knitwise into the first stitch on the front knitting needle. Draw through the stitch and slip the stitch off of the front needle.
Step 2: Insert the yarn needle purlwise into the next stitch on the front knitting needle. Draw through the stitch. Leave the stitch on the needle.
Step 3: Insert the yarn needle purlwise into the first stitch on the back knitting needle. Draw through the stitch and slip the stitch off of the back needle.
Step 4: Insert the yarn needle knitwise into the next stitch on the back knitting needle. Draw through the stitch. Leave the stitch on the needle.
Rep Steps 1-4 across.
Pattern Notes
The garment body is worked in pieces from bottom up. Sleeves are worked from armholes (dropped shoulders) down. There are two patch pockets on the front. The shoulders are shaped with short rows. The neckline is rounded at front.
Pattern
Back
Hem
With largest needle, CO 88 (104, 112, 120, 128, 144, 152, 160, 176) sts.
Row 1 (RS): K to end.
Row 2 (WS): K1, *p2, k2, rep from * to last 3 sts, p2, k1.
Rep last 2 rows 7 more times.
Beg Cable Panel
Row 1 (RS): Work in pattern first 11 (19, 23, 27, 31, 39, 43, 47, 55) sts, pm, work first st of Row 1 of Back Cable Panel chart, then work next 32 chart sts twice, then work last st of chart, pm, cont in set pattern to end.
Row 2 (WS): Work in pattern to m, sl m, work next row of Back Cable Panel as set to m, sl m, cont in pattern to end.
Work as set until 2 full rep of Back Cable Panel are completed, ending with a WS row.
Beg St st For Body
Next Row (RS): K to m, sl m, work next row of Back Cable Panel as set to m, sl m, k to end.
Next Row (WS): K1, p to m, sl m, work next row Back Cable Panel as set to m, sl m, p to last st, k1.
Work even until a total of 8 full Back Cable Panel rep are completed, ending with a WS row.
Armhole Shaping
Inc Row (RS): Using Knitted CO method, CO 3 sts, k3, cont in pattern as set to end. (91 (107, 115, 123, 131, 147, 155, 163, 179) sts)
Inc Row (WS): Using Knitted CO method, CO 3 sts, k1, p2, cont in pattern as set to end. (94 (110, 118, 126, 134, 150, 158, 166, 182) sts)
Work in pattern for 40 (42, 48, 50, 56, 56, 60, 60, 62) more rows, ending with a WS row.
Shoulder Shaping
Note: When wrapped sts are worked over the Chart sts, cont cables in pattern only bet inner most wrapped sts; the rest of the sts should be worked as they appeared, k or p.
Short Row 1 (RS): Work in pattern to last 7 (8, 9, 9, 10, 12, 13, 14, 15) sts, W&T.
Short Row 2 (WS): Work in pattern first 6 (8, 9, 9, 10, 12, 13, 13, 15) sts, pm, cont in pattern to last 7 (8, 9, 9, 10, 12, 13, 14, 15) sts, W&T.
Short Row 3: Work in pattern first 6 (8, 9, 9, 10, 12, 13, 13, 15) sts, pm, cont in patt to m, remove m, W&T.
Short Rows 4-5: Work in pattern first 6 (8, 8, 9, 10, 12, 12, 13, 15) sts, pm, cont in pattern to m, remove m, W&T.
Short Rows 6-7: Work in pattern first 6 (8, 8, 9, 10, 11, 12, 13, 15) sts, pm, cont in pattern to m, remove m, W&T.
Short Row 8 (WS): Work in pattern to m, remove m, W&T.
Next 2 Rows: Cont in pattern across, working wrapped sts tog with wraps.
Place first and last 25 (32, 34, 36, 40, 47, 50, 53, 60) shoulder sts and center 44 (46, 50, 54, 54, 56, 58, 60, 62) neck sts on hold, each on a separate piece of scrap yarn.
Front
Work as for Back up to Beg Cable Panel.
Beg Cable Panel
Row 1 (RS): Work in pattern first 27 (35, 39, 43, 47, 55, 59, 63, 71) sts, pm, work Row 1 of Front Cable Panel across next 34 sts, pm, cont in set pattern to end.
Row 2 (WS): Work in pattern to m, sl m, work next row of Front Cable Panel chart to m, sl m, cont in patt to end.
Work as set until 2 full rep of Front Cable Panel are completed, ending with a WS row.
Beg St st For Body
Next Row (RS): K to m, sl m, work next row of Front Cable Panel to m, sl m, k to end.
Next Row (WS): K1, p to m, sl m, work next row of Front Cable Panel to m, sl m, p to last st, k1.
Work even until a total of 8 full Front Cable Panel rep are completed, ending with a WS row.
Armhole Shaping
Inc Row (RS): Using Knitted CO method, CO 3 sts, k3, cont in pattern as set to end. (91 (107, 115, 123, 131, 147, 155, 163, 179) sts)
Inc Row (WS): Using Knitted CO method, CO 3 sts, k1, p2, cont in pattern as set to end. (94 (110, 118, 126, 134, 150, 158, 166, 182) sts)
Work in pattern for 40 (42, 48, 50, 56, 56, 60, 60, 62) more rows, ending with a WS row.
Shoulder and Neck Shaping
Place center 18 (18, 20, 20, 20, 22, 22, 24, 24) sts onto scrap yarn, leaving the scrap yarn ends loose so that you can add more sts onto it as you shape the neckline.
Either place on hold or leave Left front sts on the working circular needle while working Right Front shaping.
Right Front Neck and Shoulder Shaping
Short Row 1 (RS): Work in pattern across to neck center sts.
Short Row 2 (WS): Work in pattern to last 7 (8, 9, 9, 10, 12, 13, 14, 15) sts, W&T.
Short Row 3: Work in pattern to last 4 (4, 4, 5, 5, 5, 5, 5, 5) sts and place then onto scrap yarn for neck.
Short Row 4: Work in pattern to last 6 (8, 9, 9, 10, 12, 13, 13, 15) sts before last shoulder wrapped st, W&T.
Short Row 5: Work in pattern to last 3 (4, 4, 4, 4, 4, 5, 5, 5) sts and place them onto scrap yarn for neck.
Short Row 6: Work in pattern to last 6 (8, 8, 9, 10, 12, 12, 13, 15) sts before last shoulder wrapped st, W&T.
Short Row 7: Work in pattern to last 3 (3, 4, 4, 4, 4, 4, 4, 5) sts and place them onto scrap yarn for neck.
Short Row 8: Work in pattern to last 6 (8, 8, 9, 10, 11, 12, 13, 15) sts before last shoulder wrapped st, W&T.
Row 9 (RS): Place last 3 (3, 3, 4, 4, 4, 4, 4, 4) sts onto scrap yarn for neck.
Row 10 (WS): Sl 1, p to last st, working wrapped sts tog with wraps, k1.
Place these 25 (32, 34, 36, 40, 47, 50, 53, 60) right shoulder sts onto separate scrap yarn.
Left Front Neck and Shoulder Shaping
Short Row 1 (RS): Join yarn at neck edge, work in pattern to last 7 (8, 9, 9, 10, 12, 13, 14, 15) sts, W&T.
Short Row 2: (WS): Work in pattern across to neck center sts.
Short Row 3: Work in pattern to last 6 (8, 9, 9, 10, 12, 13, 13, 15) sts before last shoulder wrapped st, W&T.
Short Row 4: Work in pattern to last 4 (4, 4, 5, 5, 5, 5, 5, 5) sts and place them onto scrap yarn for neck.
Short Row 5: Work in pattern to last 6 (8, 8, 9, 10, 12, 12, 13, 15) sts before last shoulder wrapped st, W&T.
Short Row 6: Work in pattern to last 3 (4, 4, 4, 4, 4, 5, 5, 5) sts and place them onto scrap yarn for neck.
Short Row 7: Work in pattern to last 6 (8, 8, 9, 10, 11, 12, 13, 15) sts before last wrapped st, W&T.
Short Row 8: Work in pattern to last 3 (3, 4, 4, 4, 4, 4, 4, 5) sts and add them to neck.
Short Row 9: K3 (3, 3, 4, 4, 4, 4, 4, 4) sts and place them onto scrap yarn for neck, then k to end, working wrapped sts tog with wraps.
Place these 25 (32, 34, 36, 40, 47, 50, 53, 60) left shoulder sts onto separate scrap yarn.
Finishing 1
Block Back and Front to measurements.
Graft the shoulders using Kitchener Stitch method.
Neckline Trim
Transfer 44 (46, 50, 54, 54, 56, 58, 60, 62) live Front neck sts onto spare circular needle.
With RS facing and largest needle, beg at the center Back, k22 (23, 25, 27, 27, 28, 29, 30, 31), pick up and k2 sts from the shoulder seam, k3 (3, 3, 4, 4, 4, 4, 4, 4), m1, k3 (3, 4, 4, 4, 4, 4, 4, 5), m1, k3 (4, 4, 4, 4, 4, 5, 5, 5), m1, k4 (4, 4, 5, 5, 5, 5, 5, 5), m1, k18 (18, 20, 20, 20, 22, 22, 24, 24), m1, k4 (4, 4, 5, 5, 5, 5, 5, 5), m1, k3 (4, 4, 4, 4, 4, 5, 5, 5), m1, k3 (3, 4, 4, 4, 4, 4, 4, 5), m1, k3 (3, 3, 4, 4, 4, 4, 4, 4), pick up and k2 sts from the shoulder seam, k22 (23, 25, 27, 27, 28, 29, 30, 31). (100 (104, 112, 120, 120, 124, 128, 132, 136) sts)
Place BOR and work in the round.
Rnd 1: P around.
Rnd 2: *P1, k2, p1, rep from * to end.
Rep last rnd 3 more times.
Change to smaller needle and work in pattern for 2 more rnds.
Change to smallest needle and work in pattern for 2 more rnds.
BO all sts using Sewn BO method.
Sleeves
With RS facing and largest size, beg at underarm, pick up and k32 (34, 37, 39, 44, 44, 47, 47, 48) sts to shoulder seam, pick up and k32 (34, 37, 39, 44, 44, 47, 47, 48) sts to opposite underarm point. (64 (68, 74, 78, 88, 88, 94, 94, 96) sts)
Pm on either side of center 26 (28, 30, 32, 36, 36, 38, 38, 40) sts for beg of short-row shaping.
Pm on either side of center 16 sts for cable panel.
Next Row (WS): K around.
Short Row 1 (RS): K to first cable m, work Row 1 of Sleeve Cable Right (or Left) chart across next 16 sts to next cable m, k to next m, remove m, W&T.
Short Row 2 (WS): P to cable m, work next row of Sleeve Cable Right (or Left) to next cable m, p to next m, remove m, W&T.
Short Row 3: K to first cable m, work next row of Sleeve Cable Right (or Left) to next cable m, k to wrapped st, work it tog with wrap, W&T.
Short Row 4: P to first cable m, work next row of Sleeve Cable Right (or Left) to next cable m, p to wrapped st, work it tog with wrap, W&T.
Rep Short Rows 3-4 twice more.
Next 2 Rows: Work in patt as set to end, working wrapped st tog with wrap.
Sleeve Shaping
Cont even in pattern as set for 6 (4, 4, 4, 2, 2, 2, 2, 2) rows.
Dec Row (RS): K3, k2tog, cont in pattern across to last 5 sts, ssk, k3. (2 sts decreased)
Rep Dec Row every 6th (4th, 4th, 4th, 2nd, 2nd, 2nd, 2nd, 2nd) row 14 (9, 9, 11, 4, 5, 12, 5, 8) more times, then every 0 (6, 6, 6, 4, 4, 4, 4, 4))th row 0 (7, 8, 6, 18, 15, 11, 14, 12) times, ending with WS row. (34 (34, 38, 42, 42, 46, 46, 54, 54) sts rem)
Change to smaller needle.
Cuff
Row 1 (RS): K1, *p1, k2, p1, rep from * to last st, k1.
Row 2 (WS): K1, *k1, p2, k1, rep from * to last st, k1.
Rep last 2 rows 4 more times.
BO all sts using Sewn BO method or in Rib patt.
Pockets (Make 2)
Pocket Hem
With largest needle, CO 30 sts.
Row 1 (RS): K to end.
Row 2 (WS): K1, *k1, p2, k1, rep from * to last st, k1.
Rep last 2 rows 3 more times.
Pocket Body
Next Row (RS): K to end.
Next Row (WS): K1, p to last st, k1.
Rep these last 2 rows 19 more times.
BO all sts.
Finishing 2
Block the sleeves to measurements without stretching the cuffs.
Block pockets.
Sew pockets to the front at desired height.
Sew sleeve and body seams.
Weave in ends. Block one more time if desired.
Quick?, why are there only singular photos of each knitting project pattern? Quite honestly, unless I can see more than just a side/front/whichever angle photo not about to pick up my needles. New subscriber & doubtful I’ll renew, very disappointing.
Hello! Additional photos are on the right hand side of the screen on a computer and at the end of the pattern on mobile devices. Hope this helps! – Nicola, Editor