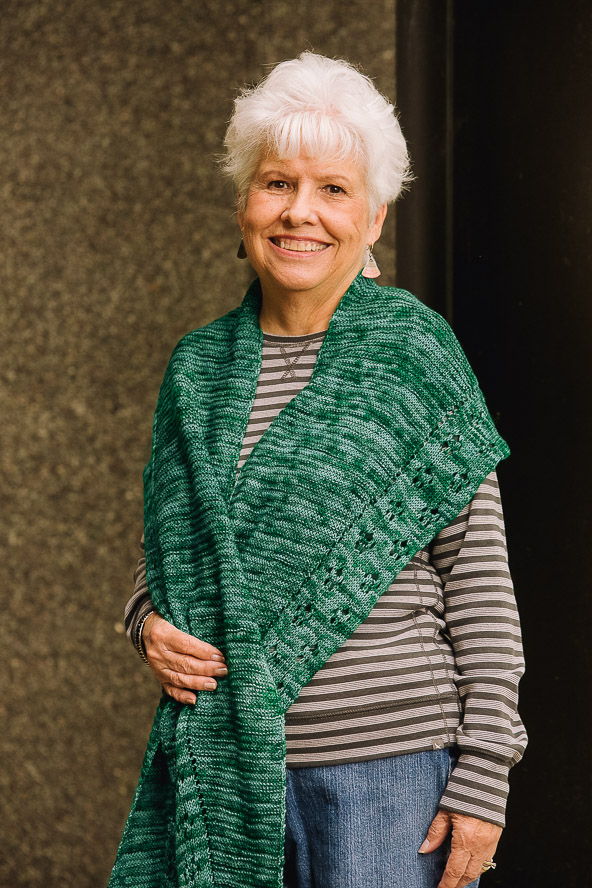
This oversized yet cozy and elegant shawl is inspired by nature and the world around us. The beautiful green hues of the scarf are reminiscent of the last of the green grass on a crisp fall day while yarnovers and decreases create little lacy paw prints throughout
Skill Level: Intermediate
Size: 115” long and 14” wide, measured at its widest point, after blocking
Gauge: 24 sts x 10 rows = 4” [10 cm] in garter st after wet blocking
Materials
Yarn:
![]() MadelineTosh Tosh Sock (100% superwash merino wool; 395 yards [361 meters]/100 grams): Cedar (2 balls)
MadelineTosh Tosh Sock (100% superwash merino wool; 395 yards [361 meters]/100 grams): Cedar (2 balls)
Needles: US size 6 (4.0 mm) straight needles
Notions: Two stitch markers; two row counters, tapestry needle
Pattern Notes
The shawl is knit side to side with the body of the shawl and lace border worked simultaneously. All increases and decreases are worked in the garter stitch body of the shawl. The lace border is comprised of two parts: the paw prints pattern and the scalloped edging; both worked simultaneously. The stitch count of the lace patterns vary depending on the rows being worked. Stitch counts are given in the written instructions after each row. Charted and written instructions are included for both the paw prints pattern and the scalloped edging.
Special Stitches
Paw Prints Stitch
Row 1 (WS): P3, pfb, p to marker. (16 sts)
Row 2 (RS): K10, ssk, yo twice, k2tog, k2. (16 sts)
Row 3: P3, pfb, p to marker. (17 sts)
Row 4: K8, ssk, yo, ssk, k1, k2tog, yo, k2tog. (15 sts)
Row 5: P to marker. (15 sts)
Row 6: K10, ssk, yo, k1, yo, k2tog. (15 sts)
Row 7: P11, pfb, p to marker. (16 sts)
Row 8: K2, ssk, yo twice, k2tog, k to marker. (16 sts)
Row 9: P12, pfb, p3. (17 sts)
Row 10: Ssk, yo, ssk, k1, k2tog, yo, k2tog, k to marker. (15 sts)
Row 11: P to marker. (15 sts)
Row 12: K1, ssk, yo, k1, yo, k2tog, k to marker. (15 sts)
Scalloped Edging Stitch
Row 1 (WS): P4.
Row 2 (RS): K1, kfb, k2. (5 sts)
Row 3: P all sts. (5 sts)
Row 4: K2, kfb, k2. (6 sts)
Row 5: P all sts. (6 sts)
Row 6: K3, kfb, k2. (7 sts)
Row 7: P all sts. (7 sts)
Row 8: K4, bo3. (4 sts)
Pattern
CO 23.
Set up row: K3, p1, pm, k15, pm, k4.
Increase Section
Row 1 and all wrong side rows: Work scalloped edging pattern, sm, work paw print lace pattern, sm, p1, k to last st, p1.
Row 2 (right side) and all increase rows: Increase this row and every 4th row of the paw print lace pattern until paw print lace pattern has been repeated 24 times and scalloped edging pattern has been repeated 24 times. Garter section = 52 stitches.
K to 2 sts before marker, yo, k2, sm, work paw print lace pattern, sm, work scalloped edging pattern.
Row 4 and all non-increase right side rows: K to 4 sts before marker, k2tog, yo, k2, sm, work pawprint lace pattern, sm, work scalloped edging pattern.
Straight Section
Row 1 and all wrong side rows: Work scalloped edging pattern, sm, work paw print lace pattern, sm, p1, k to last st, p1.
Row 2 and all right side rows: K to 4 sts before marker, k2tog, yo, k2, sm, work pawprint lace pattern, sm, work scalloped edging pattern.
Repeat these two rows until the paw prints lace pattern has been worked 18 times and the scalloped edging pattern has been worked 27 times.
Decrease Section
Row 1 and all wrong side rows: Work scalloped edging pattern, sm, work paw print lace pattern, sm, p1, k to last st, p1.
Row 2 (right side) and all decrease rows: Decrease this row and every 4th row of the paw print lace pattern until paw print lace pattern has been repeated 24 times and scalloped edging pattern has been repeated 24 times. Garter section = 4 stitches.
K to 5 sts before marker, k2tog, yo, k2tog, k1, sm, work paw print lace pattern, sm, work scalloped edging pattern.
Row 4 and all non-decrease right side rows: K to 4 sts before marker, k2tog, yo, k2, sm, work pawprint lace pattern, sm, work scalloped edging pattern.
Finishing
Purl one row.
Bind off loosely; wet block, pinning points of scalloped edging to accentuate scalloped edge and open up lace pattern. Weave in ends.


Where are the main stitches for the shawl? If I work the Paw print stitches then the Scalloped edging how do I do the main part?
A lovely shawl that really will become a regular companion – perfect for chilly autumn evenings. Love the pattern!