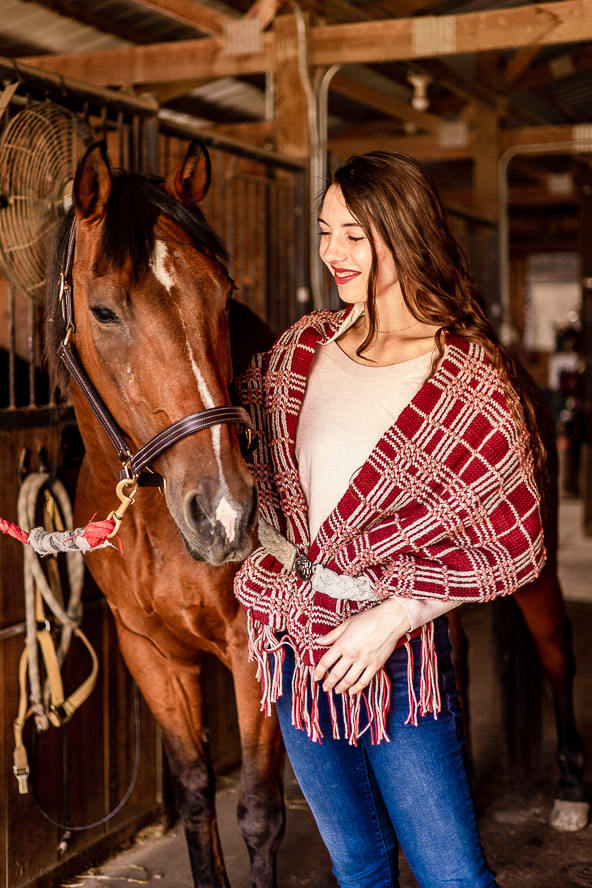
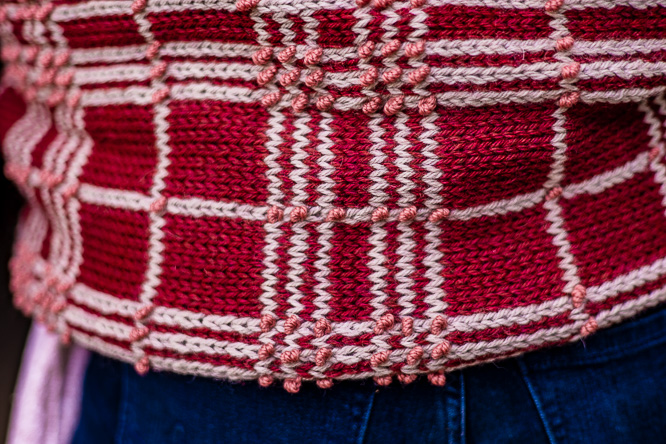
An elevated version of a classic plaid design; this wrap is knit using stranded colorwork in two colors of worsted weight yarn. The wrap is then embellished with fringe and french knot embroidery. The completed wrap is set off with an antique-style cabled belt and fabric backing, to create the perfect fall or winter accessory.
Time: 2-3 Week Project
Skill Level: Intermediate
Size: 19” x 64” (not including fringe) + 1.75” wide belt
Gauge: 20 sts and 28 rows = 4” [10 cm] in St st
Materials
 Yarn: Cascade 220 (100% Peruvian Highland Wool; 220 yards [200 meters]/100 grams): #1000 Auburn Heather (MC, 3 hanks), #8011 Aspen Heather (CC1, 3 hanks), #9681 Crabapple (CC2, 1 hank)
Hook/Needles: US size 7 (4.5 mm) 24” circular needle and 3 DPNs (for belt)
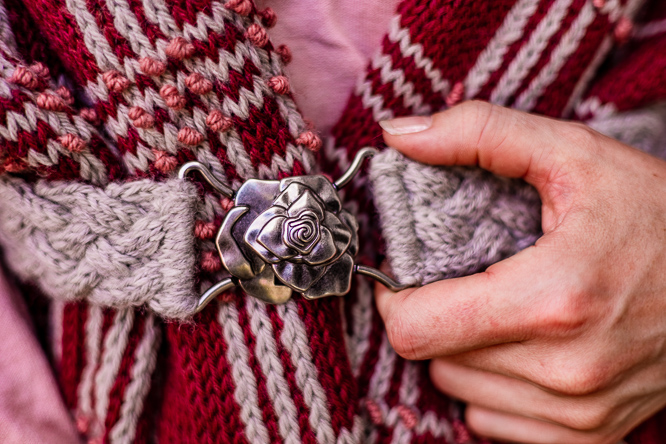
Notions: tapestry needle, cable needle, scissors, sewing pins, 2 yds cotton backing fabric and matching thread, 1.5” inch metal belt buckle (project shown used a Dritz Antique Rose Fashion Belt Buckle)
- Rowena Plaid Wrap Stitch Key
- Rowena Plaid Wrap Alternate Colorwork Chart
- Rowena Plaid Wrap Alternate French Knot Chart
- Rowena Plaid Wrap Alternate Stitch Key
- Rowena Plaid Wrap Colorwork Chart
- Rowena Plaid Wrap French Knot Chart
Special Stitches
French Knots
www.barrettwoolco.com/blogs/news/skating-hat-french-knot-tutorial
www.lovecrafts.com/en-us/c/article/french-knot-embroidery
Cable 6 Front (c6f): place 3 sts on cable needle and hold in front, K3 from left needle, K3 from cable needle
Cable 6 Back (c6b): place 3 sts on cable needle and hold in back, K3 from left needle, K3 from cable needle
Pattern
Wrap Body
With MC and a circular needle; cast on 89 stitches using a Long Tail Cast On, or your method of choice.
ROWS 1-32: Work the Plaid chart using colors MC and CC1 in Stockinette Stitch, beginning with a Knit row
Repeat Rows 1-32 ten times, ending with Row 31 on the last repeat. BO.
Block to measurements; 20” x 68”. After blocking, the wrap should relax to a size of approximately 19” x 64”, depending on your yarn and stranding tension.
French Knots
Using CC2; embroider a 3-wrap French Knot over each of the stitches shown on the chart below.
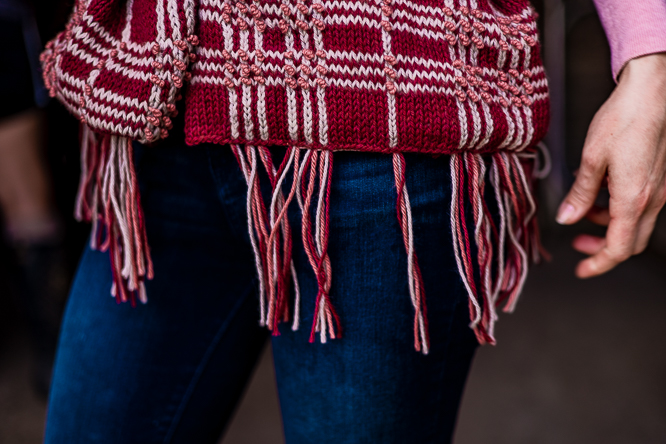
Fringe
Cut 40 eight-inch lengths each of MC, CC1 and CC2 (120 lengths total). Group them into sets of 3 (one strand of each color) and knot each set close to one end, to hold them together. Set the fringe aside.
Fabric Backing
Cut a piece of cotton fabric for the backing that is 3” wider and 3” longer than the finished size of your wrap. Depending on your tension and yarn, this may vary slightly from the sample shown. For our 19” x 64” wrap, we used a 22” x 67” piece of fabric.
With the WS of the fabric facing up, fold your edges in ~1.5” on each side, then iron and pin down to crease your folds. Once your fabric is pinned, set the knitted wrap on top of the fabric and align the two short ends. Using pins or a water soluble pencil, make 20 marks on the backing fabric where each of the CC columns of stitches will fall, when the backing is attached. You will be using these marks as guides, to attach the fringe to the backing fabric, in such a way that the sets of fringe will align with the CC columns on the plaid of the knitted front (see pictures for reference). Repeat this process on the other short side of the backing fabric, then set the knitted piece aside.
Using a sewing machine (ideally), or by hand, stitch each set of fringe to the WS of the fabric backing; one set of fringe over each mark. Once the fringe is secured to the fabric, cut the knots off each set of fringe and discard.
Lay the knitted wrap out flat with the WS facing up. Set the backing fabric on top, so the wrong sides of both pieces are touching and pin in place all around.
By hand, or using a machine, stitch the backing to the knitted piece, being careful on the short ends to make sure that the fringe is aligning correctly with the plaid lines on the knitted side of the wrap.
Once the wrap is complete, trim the fringe to achieve your desired length. Sample shown has 6” fringe.
Belt
Note: The belt for this project is knitted, then attached to a fabric backing with a decorative metal belt buckle.
Your finished belt (including the closed buckle) should measure 3” more than the wearer’s waist circumference. To determine how long to make your belt, measure the recipient’s waist, or approximate using the standard waist measurements chart below.
WAIST CIRCUMFERENCE CHART
| XS | SM | MED | LG | XL | 2XL | 3XL | 4XL | 5XL |
| 23.5” | 26” | 29” | 33” | 37” | 41” | 44.5” | 46.5” | 49.5” |
BELT LENGTH CALCULATION:
(recipient waist circumference) + 3 inches – (length of closed buckle) = length of knitted belt
The sample shown is a Women’s Medium (for a 29” waist circumference), using a 2.5” buckle. Therefore, the sample belt was knitted to 29½ inches, which results in a 32-inch finished belt, after adding the buckle.
With CC1 and 2 DPNs, cast on 30 stitches (15 per needle) using Judy’s Magic Cast On.
Using a third DPN, knit once around all 30 sts.
Setup Row 1: You should have two DPNs, each with 15 active stitches. Insert one of the DPNs through one end of the belt buckle, so that you have half your stitches on each side of the buckle, to attach the knitting to the buckle. Using the third DPN, (K2tog) fifteen times, taking one stitch from the front needle and one from the back needle, until you reach the end of the row. One piece of the belt buckle should now be seamlessly connected to the knitting and you should have 15 stitches total, all on one DPN.
Setup Row 2: Purl
Row 1: K3, (c6f) twice
Even Rows 2-8: Purl
Row 3: Knit
Row 5: (c6b) twice, k3
Row 7: Knit
Repeat Rows 1-8 until the knitted portion of the belt measures the desired length, ending with row 1 or 5.
LAST ROW (WS): Pf&b to end of row (30 sts)
Divide the stitches onto two needles, alternating back and forth, so you have 15 stitches on each needle (mirroring the effect of a Judy’s Magic Cast On). Cut yarn, leaving a tail for grafting. Thread the tail onto a tapestry needle and graft the two sets of stitches around the other half of the belt buckle (not the one already connected to the cast on end), to complete the belt.
Weave in all yarn ends.
Cut a piece of backing fabric 1” wider and 1” longer than the knitted portion of your belt. Fold and pin the backing in place, using a 0.5” seam allowance, then stitch in place by hand, or using a machine.