

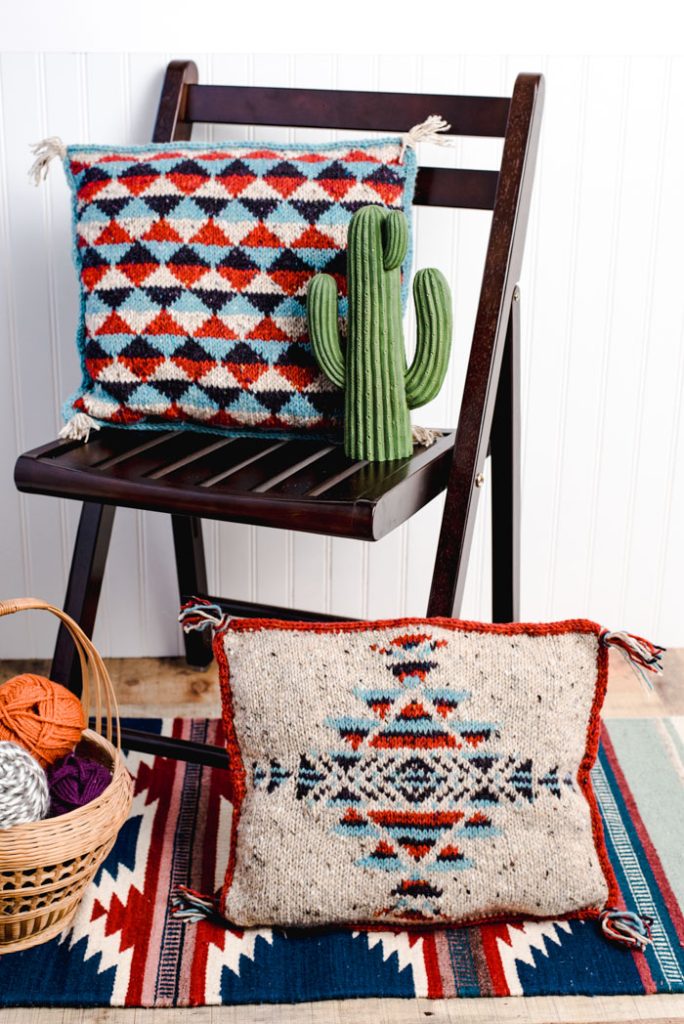
Transform your living space with the timeless elegance of the Oasis Pillows, a striking pair of cushions that seamlessly combine artistry and coziness. Designed with a mix of traditional Fair Isle and intarsia techniques, these pillows showcase intricate colorwork patterns that are sure to captivate. The complementary designs add texture and visual interest, making them stand out as statement pieces while still feeling perfectly at home in any room.
Whether you’re dressing up a sofa, bed, or favorite chair, these pillows deliver a handcrafted touch that’s both sophisticated and inviting. The combination of bold color choices and geometric patterns makes them look effortlessly chic—so much so, that guests will be asking where you found such designer-worthy décor.
Skill Level: Intermediate
Size: Diamonds: 17” / [42 cm] x 14” / [38 cm]; Triangles: 17” / [42 cm] x 16” / [40 cm]
Gauge: 18 sts and 21 rows = 4” [10 cm] in St st after wet blocking.
Materials
 Yarn: Studio Donegal Donegal Aran Tweed (100% Wool; 88 yards [80 meters]/50 grams):
Diamonds: 4585 Oatmeal (MC, 4 balls), 4886 Rust (CC1, 2 balls), 4843 Aubergine (CC2, 1 ball), 4847 Teal (CC3, 1 ball); Triangles: 4585 Oatmeal (CC1, 2 balls), 4886 Rust (CC2, 2 balls), 4843 Aubergine (CC3, 2 balls), 4847 Teal (CC4, 3 balls).
Needles: US size 7 (4.5 mm) 24” straight; US size 7 (4.5 mm) DPNs
Notions: Markers, US size 8/H (5.0 mm) crochet hook for making tassels, tapestry needle, eight 0.5” buttons, matching thread.
Abbreviations
k2tog-tbl: Knit 2 sts together through the back loop. Dec 1 st.
Special Stitches
I-cord Binding
With DPNs CO 3 sts, *pick up st on Cushion edge, insuring to pick up sts through both layers of Cushion. Slide sts to other end of the needle, k2 sts, k2tog-tbl*; rep from * to * until you reach the corner, then work 2 rnds of I-cord (i.e. k3, slide sts to end of needle, etc.), then continue along edge of Cushion working from * to *.
Diamonds Pillow Pattern
Front
With MC, CO 65 sts.
Rows 1-67: Follow Diamonds Chart from Row 1 through Row 67, including all color changes.
BO all sts.
Back 1
With MC, CO 65 sts.
Rows 1-40: Work in St st.
Rows 41-48: Work in Garter st.
BO all sts.
Back 2
With MC, CO 65 sts.
Rows 1-26 Work in St st.
Rows 27-30: Work in Garter st.
Row 31 (Buttonhole band): K12, (yo, k2tog, k11) 3 times, yo, k2tog, k12.
Rows 32-34: Work in Garter st.
BO all sts.
Finishing
Weave in all ends.
Block Cushion pieces to dimensions.
I-cord Binding
Pin Cushion pieces together with WS facing each other, ensuring the Buttonhole Band and the button band are aligned on top of each other.
With CC1 and with the front of the Cushion facing, starting from the corner, work I-cord Binding all around the edge of the Cushion.
Break yarn leaving a long tail, pull yarn through live sts using a tapestry needle.
Using duplicate stitch, sew beginning and end of I-cord Binding together.
Add Buttons
Sew on buttons using matching thread, using buttonholes as a guide to placement.
Tassels
Make multi-colored tassels by cutting four 12” lengths of each color and using crochet hook, pull yarn from the centre of the lengths through gaps in the binding at each corner.
Loop around the loose threads and trim.
Triangles Pillow Pattern
Front
With CC1, CO 70 sts.
Rows 1-20: Work correct row of Triangles Chart 7 times.
Rows 21-60: Rep Rows 1-20 twice.
Rows 61-70: Work Rows 1-10 of Triangles Chart 7 times.
BO all sts.
Back 1
With CC1, CO 70 sts.
Rows 1-20: Work correct row of Triangles Chart 7 times.
Rows 21-40: Rep Rows 1-20 once.
Rows 41-50: Work in Garter st.
BO all sts.
Back 2
With CC1, CO 70 sts.
Rows 1-10: Work Rows 11-20 of Triangles Chart 7 times.
Rows 11-20: Work Rows 1-10 of Triangles Chart 7 times.
Rows 21-25: Work in Garter st.
Row 26 (Buttonhole band): K13, (k2tog, yo, k12) 3 times, k2tog, yo, k13.
Rows 27-30: Work in Garter st.
BO all sts.
Finishing
Weave in all ends.
Block Cushion pieces to dimensions.
I-cord Binding
Pin Cushion pieces together with WS facing each other, ensuring the Buttonhole Band and the Button Band are aligned on top of each other. With CC4 and the front of the Cushion facing, starting from the corner, work I-cord Binding all around the edge of the Cushion.
Break yarn, leaving a long tail, pull yarn through live sts using a tapestry needle.
Using duplicate stitch, sew beginning and end of I-cord Binding together.
Add Buttons
Sew on buttons using matching thread, using buttonholes as a guide to placement.
Tassels
Make multi-colored tassels by cutting four 12” lengths of each color and using crochet hook, pull yarn from the centre of the lengths through gaps in the binding at each corner.
Loop around the loose threads and trim.