

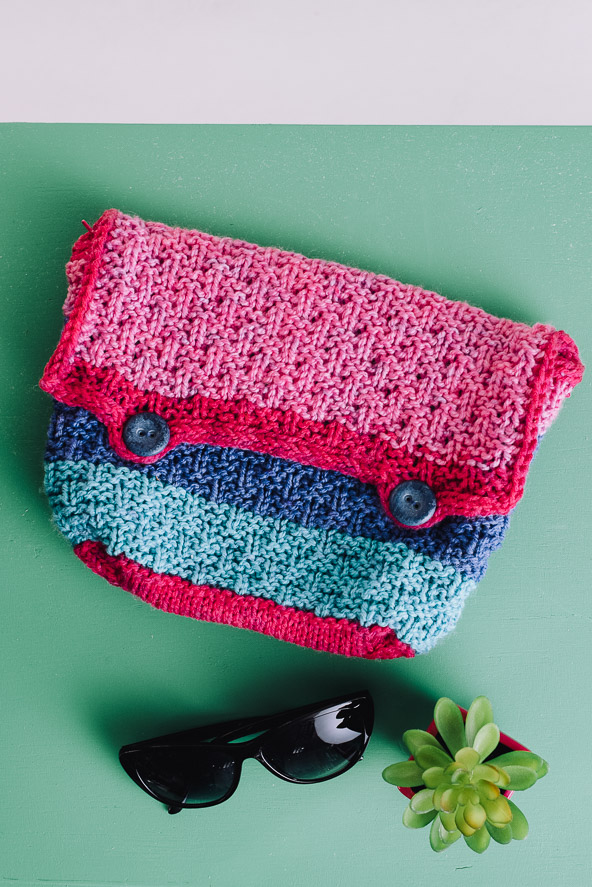
This textured clutch is knit in the round and includes a fabric lining plus a zipper for added durability. Customize the colors to your liking and enjoy using this cutie on all your summertime and fall adventures.
Skill Level: Intermediate
Size: 10” wide x 8” deep.
Gauge: 18 sts and 24 rows = 4” [10 cm] in St st after wet blocking.
16 sts and 26 rows = 4” [10 cm] in Textured patt after wet blocking.
Materials
 Yarn: Caron Cakes (80% Acrylic, 20% Wool; 383 yards [350 meters]/200 grams):
#17024 Mixed Berry (1 skein).
Needles: US size 8 (5 mm) circular, US size 8 (5 mm) set of DPNs.
Notions: Tapestry needle, scissors, stitch marker, stitch holder or extra set of circular needle, two 1” [2.5 cm] buttons, crochet hook and scrap yarn (or as preferred for Provisional CO), 11” long zipper in pink color, sewing needle, pins, pink sewing thread, rectangular piece of fabric for lining measuring 10.5” / [26.5 cm] long x 21” / [53.25 cm] wide.
Special Stitches
I-cord Bind Off technique
Use the I-cord bind off technique for bind off.
CO 3 additional sts on left needle.
*Knit first 2 sts, knit next 2 sts together. Return the 3 sts back onto left needle, rep from * to end.
I-cord Edges
Cont with I-cord, attaching it along the side of the flap of the clutch by picking up 1 st through the edge.
*Knit first 2 sts, knit next 2 sts together. Pick up 1 st through the knit piece before you return the 3 sts back onto left needle; rep from *.
3-Needle Bind Off technique
Position two DPNs with an equal number of sts held parallel to each other. *With a third DPN, knit 1 st from both DPNs at the same time; rep from * once, then BO a st by passing the first st worked on the RH needle over the 2nd st worked on the RH needle. Cont in this manner until the required number of sts are bound off.
Textured Pattern (worked in the rnds over multiple of 4 sts)
Rnds 1, 3, 5, and 7: Knit.
Rnds 2 and 4: *K1, p3; rep from * around.
Rnds 6 and 8: P2, *k1, p3; rep from * until 2 sts rem, k1, p1.
Rep Rnds 1-8 for patt.
Textured Pattern (worked flat over multiple of 4 sts):
Rows 1 and 3: P2, *k1, p3; rep from * until 2 sts rem, k1, p1.
Rows 2, 4, and 6: Purl.
Rows 5 and 7: *K1, p3; rep from * to end of row.
Row 8: Purl.
Rep Rows 1-8 for patt.
Pattern Notes
This textured clutch starts with Provisional CO.
The clutch is worked in the rounds, then continue working back and forth knitting flat for the flap.
Finish by using I-cord BO, creating two button holes, and using the I-cord around the entire top edge for a neat finish.
From Provisional CO, work the bottom of the cluth in the rounds finishing with 3-Needle BO on the wrong side.
Insert fabric liner and sew zipper to the top of the clutch.
Two buttons are sewn to the front.
Pattern
Body
Using the Provisional CO technique of your choice, CO 80 sts.
Attach yarn, place a stitch marker on the first st and begin working in the rnd.
Rnds 1-48: Work in Textured Patt in the rnds.
Rnds 49-52: Work in Textured Patt Rnds 1-4 only.
Rnds 53: Knit.
Transfer the last 40 sts onto a stitch holder or extra circular needle, cont to work with the first 40 sts, working flat back and forth for flap. Do not turn the work around.
Row 54 (RS): P2, (k1, p3) times, k1, p1.
Row 55 (WS): P40.
Row 56: P2, (k1, p3) 9 times, k1, p1.
Rows 57, 59, and 61: P40.
Row 58: (K1, p3) 10 times.
Row 60: (K1, p3) 10 times.
Rows 62-93: Rep Rows 54-61 for patt.
BO with I-cord technique. After approximately 2” / [5 cm] from the beg (8 sts I-cord BO) create the first button hole by working I-cord for 5 rows without attaching it to the edge.
Cont with I-cord BO, creating the second button hole approximately 2” / [5 cm] from the end (32 sts I-cord BO) working the I-cord for 5 rows without attaching it to your work. After you finish the I-cord BO, make 1 row of I-cord at the corner without attaching it to your work.
Cont with I-cord Edge, attaching it around the side of the flap until you reach the end of the side.
Cont with I-cord BO technique for the live sts on your extra set of needles (if using the stitch holder, transfer the live sts onto an extra set of needles) until you BO the last st.
Cont with I-cord Edge, attaching it around the side of the flap until you reach the end of the side and the beg of your I-cord BO. Cut the yarn, leaving a long tail and thread end on tapestry needle. Pull the end through the rem sts on needles, gather up and close the hole, stitch to secure.
Bottom of the clutch
Remove the scrap yarn from Provisional CO sts and place the resulting live sts on a spare needle.
Attach yarn and begin to work in the rnd.
Rnds 1, 3, and 5: Knit.
Rnd 2: Purl
Rnd 4: K3, ssk, k2tog, k26, ssk, k2tog, K6, ssk, k2tog, k26, ssk, k2tog, k3. (72 sts)
Rnd 6: K2, ssk, k2tog, k24, ssk, k2tog, k4, ssk, k2tog, k24, ssk, k2tog, k2. (64 sts)
Rnd 7: K1, ssk, k2tog, k22, ssk, k2tog, k2, ssk, k2tog, k22, ssk, k2tog, k1. (56 sts)
Rnd 8: Ssk, k2tog, k20, ssk, k2tog, ssk, k2tog, k20, ssk, k2tog. (48 sts)
Turn work inside out. Arrange equal number of the live stitches onto two needles for 3-Needle BO. BO all sts using 3-Needle BO technique.
Finishing
Weave in ends, wash and block to measurements.
Fold fabric and sew the sides together, leaving one side open. To create the bottom of the fabric liner, fold the bottom edge, creating a triangle at the corner.
The bottom of the triangle measures 2.5” / [6 cm]. Sew the two layers together. Repeat at the second bottom corner. This creates the bottom of the clutch. Insert the fabric liner inside the knitted piece. Fold the top of the fabric liner inside, between the fabric liner and knitted fabric. Carefully attach the zipper between the two layers. Use pins to secure the layer and make sure the zipper moves freely and is not catching onto the fabric. Sew the zipper to the knitted and fabric layer, using a sewing thread and sewing needle.
Arrange the two buttons on the front of your clutch, making sure the buttons are aligned with the button holes. Sew the two buttons through both layers of the fabric. To ensure the fabric liner stays in place, sew the two layers together at four corners of the bottom of the clutch.