

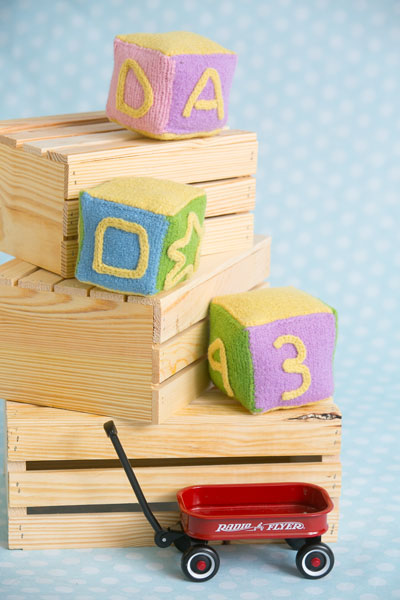
Looking for a quick shower gift? Combine traditional ideas and needle felting with easy intarsia to make this adorable set of blocks. This project is a great stash buster and can be customized to match any nursery décor.
Skill Level: Intermediate
Size: Single panel before felting = 4″ x 5″; Single panel after felting = approximately 3.5″ x 3.5″
Gauge: 18 sts x 24 rows = 4″ [10 cm] in St st
Materials
Yarn: Cascade Yarns Cascade 220 (100% wool; 220 yards [200 meters]/100 grams): #9477 Tutu (A, 1 ball), #8912 Lilac Mist (B, 1 ball), #4147 Lemon Yellow (C, 1 ball), #8905 Robin Egg Blue (D, 1 ball), #8903 Primavera (E, 1 ball)
Needles: US size 8 (5.0 mm) needles, 2 US size 3 (3.25 mm) double pointed needles
Notions: Tapestry needle, needle felting tool, small felting mat, sewing needle, invisible thread, fiber fill
Pattern Notes
Blocks are worked in one piece using intarsia. Make bobbins for each color and take care to twist yarns on wrong side of work when switching colors. Don’t worry if your tension is a little off since the felting process will address this.
If the fabric’s dimensions become distorted during the felting process, block aggressively while still wet to match finished dimensions. Once the piece is dry, it can also be shaped with steam.
I-cord embellishments (letters – A, B, C, D; numerals – 1, 2, 3, 4; and shapes – circle, square, triangle, and star) are attached to 4 sides of each block by needle felting. For extra security and durability, sew embellishments onto block with yarn before needle felting.
Pattern
Block 1
Cast on 17 with A, 17 with B, 17 with A, 17 with B.
Row 1: K17 with B, switch to A and k17, switch to B and k17, switch to A and k17.
Row 2: P17 with A, switch to B and p17, switch to A and p17, switch to B and p17.
Rep rows 1-2 twenty eight more times for a total of 30 rows.
Top Flap
Next row: Join C and k17, then switch to A and bind off 17, switch to B and bind off 17, then switch to A and bind off 17.
Cont with C and work evenly in St st for 29 more rows then bind off.
Bottom Flap
Turn work upside down with RS facing. With C and starting at upper right hand corner, pick up and knit 17 sts. Work evenly in St st for 29 more rows then bind off.
Block 2
Cast on 17 with D, 17 with E, 17 with D, 17 with E.
Row 1: K17 with E, switch to D and k17, switch to E and k17, switch to D and k17.
Row 2: P17 with D, switch to E and p17, switch to D and p17, switch to E and p17.
Rep rows 1-2 twenty eight more times for a total of 30 rows.
Top Flap
Next row: Join C and k17, then switch to D and bind off 17, switch to E and bind off 17, then switch to D and bind off 17.
Cont with C and work evenly in St st for 29 more rows then bind off.
Bottom Flap
Work same as for Block 1.
Block 3
Cast on 17 with B, 17 with E, 17 with B, 17 with E.
Row 1: K17 with E, switch to B and k17, switch to E and k17, switch to B and k17.
Row 2: P17 with B, switch to E and p17, switch to B and p17, switch to E and p17.
Rep rows 1-2 twenty eight more times for a total of 30 rows.
Top Flap
Next row: Join C and k17, then switch to B and bind off 17, switch to E and bind off 17, then switch to B and bind off 17.
Cont with C and work evenly in St st for 29 more rows then bind off.
Bottom Flap
Work same as for Block 1.
Finishing
Machine or hand wash to felt pieces, then block to match finished measurements.
I-cord Embellishments
Using dpns, cast on 3 sts with C. Work in I-cord for desired length, then bind off. (Note: the letter A will require 2 pieces – one short and one long.) Place one side of block onto felting mat and apply I-cord embellishment using needle felting tool. (For more secure attachment, see pattern notes.) Rep this process on 3 more sides leaving the top and bottom of each block empty of embellishment.
Filling Blocks
With sewing needle and invisible thread, seam top and bottom flaps leaving an opening for stuffing. Fill block with fiber fill then sew closed. 