

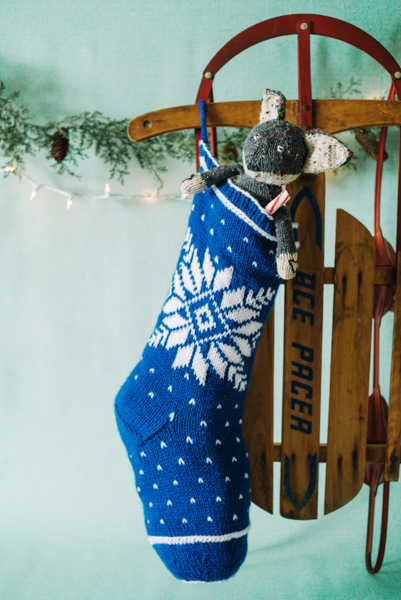
Snowflakes are a very popular motif in northern Europe, where the snow falls for much of the winter and mountains are always covered in snow. Inspired by the knitting traditions in Norway, this intricate pattern will bring a little Norwegian style into your home. This particular Christmas stocking features one of the elaborate snowflake patterns.
Skill level: Intermediate
Finished Size: 16” circumference x 24” long.
Gauge: 18 sts and 20 rows = 4” [10 cm].
Materials
Yarn:
![]() Hobby Lobby I Love this Yarn (100% Acrylic; 355 yards [325 meters]/198 grams): #80 Royal blue (MC), 1 skein; #10 white (CC), 1 skein.
Hobby Lobby I Love this Yarn (100% Acrylic; 355 yards [325 meters]/198 grams): #80 Royal blue (MC), 1 skein; #10 white (CC), 1 skein.
Needles: US size 8 (5mm): 16” circular and double pointed needles
Notions: Stitch marker; tapestry needle
Abbreviations
CC – Contrast Color
dpn(s) – double pointed needle(s)
K2tog – knit two together
MC – Main Color
m1 – pick up bar between sts, knit into the back twisting the bar
P2tog – purl two together
RS – Right Side
Sl – slip the stitch from the left needle to the right
skp – slip one stitch as if to knit, knit the next stitch, pass the slipped stitch over the stitch that you just knit.
St(s) – stitches
WS – Wrong Side
Special Stitches
Double Purl Stitch – According to Sheila McGregor, in Traditional Scandinavian Knitting, the Double Purl Stitch was originally described in a Finnish knitting book but was also used in Norway. It is worked in an entire row for a raised ridge or separation of work.
Directions – Each stitch is wrapped with the yarn before purling. Keep the wraps loose for best effect. With the yarn held in front, slip one stitch from left needle to right needle as to purl, move yarn to back between needle points, slip the stitch just moved back to left needle, bring yarn to front again and purl this stitch as usual. Continue around – slip, wrap, and purl each stitch as before. At end of round, slip first stitch purlwise with yarn in front, bring yarn to back and slip stitch back to left needle. Work as usual on next round.
I-cord – With dpn, CO 4 sts, *without turning the needle, slide sts to right needle tip, pull yarn around back, and knit the sts as usual; rep from * for 6” or desired length.
Pattern Notes
The gauge is not critical in this project but you will want a fairly tight, smooth fabric. If you knit very loosely try a smaller needle size. If you would like a smaller stocking choose a light worsted weight, DK, sport or fingering weight yarn and smaller needles to match those suggested by the yarn. Any weight of yarn will work for this stocking but each will give you a different size depending on your yarn and needle choice.
When working the charts some of the changes from one color to the other will be long. To keep the floats on the inside from catching on your stocking stuffers you can twist or catch your yarns every 4-5 sts if you wish. Keep the floats loose so they don’t bunch up the stitching or show through. I personally don’t like to catch my floats at all because it can show through so easily. We have been using stockings like this one for several years and have not had any problem with the floats.
You may want to line this stocking if you are worried about your gifts getting caught on the floats. You can use new fabric or even an old T-shirt. A knit is nice because of the stretch. Lay the stocking as flat as you can over your fabric. Trace around it and cut 2 layers of fabric. Using a ¼” seam, sew fabric pieces with right sides together. Leave top edge open. Turn top edge down to match bottom edge of ribbing. Insert into stocking with wrong sides of fabric facing inside of stocking. Whip stitch fold of top edge to the purl bumps of the first stockinette row.
Pattern
Cuff and Leg
With CC, CO 72 sts, using a long tail cast-on method with CC over thumb and MC over finger. Join to work in the rnd, being careful not to twist. Place marker to mark beginning of rnd.
Rnds 1-5: Work k1, p1 ribbing.
Rnd 6: With CC, knit.
Rnd 7: Work Double Purl Stitch.
Rnds 8-19: With both colors, work Chart A Rnds 1-12.
Rnds 20-52: Work Chart B Rnds 1-33.
Rnds 53-65: Work Chart A Rnds 7-12, then Rnds 1-7 once more.
Heel
Note: Keep marker in place and slip as you come to it.
Row 1 (RS): Using MC only, k18, turn.
Row 2 (WS): Slip 1 purlwise, p35, turn – 36 sts are working and the other 36 sts are resting.
Rows 3-14: Knit every RS row, turn and purl all WS rows, slipping first stitch knitwise on knit rows and purlwise on purl rows.
Heel Turn
Row 1: Sl1kw, k20, skp, k1, turn – there will be 12 unworked sts rem on the left needle.
Row 2: Sl1pw, p7, p2tog, p1, turn – 12 sts will rem as before.
Row 3: Sl1kw, k8, skp, k1, turn.
Row 4: Sl1pw, p9, p2tog, p1, turn.
Row 5: Sl1kw, k10, skp, k1, turn.
Row 6: Sl1pw, p11, p2tog, p1, turn.
Row 7: Sl1kw, k12, skp, k1, turn.
Row 8: Sl1pw, p13, p2tog, p1, turn.
Row 9: Sl1kw, k14, skp, k1, turn.
Row 10: Sl1pw, p15, p2tog, p1, turn.
Row 11: Sl1kw, k16, skp, k1, turn.
Row 12: Sl1pw, p17 p2tog, p1, turn.
Row 13: Sl1kw, k18, skp, k1, turn.
Row 14: Sl1pw, p19 p2tog, p1, turn – 22 sts.
Foot
Note: To pick up sts along the side of the heel flap, make sure you are placing your needle under both loops of the slipped stitches, then wrap as if to knit and pull the new stitch through.
Rnd 1 (pick up rnd): With RS facing and MC, cont working in the round, k22 sts across heel, pick up 7 sts in slipped st edge along side of heel flap, m1 before instep sts, k36, m1, pick up 7 sts in slipped st edge, k11 to marker – 74 sts around.
Rnd 2: With MC, k17, k2tog, k36, skp, k17 – 72 sts.
Rnds 3-33: Adding in CC as needed, work Chart A Rnds 9-12 once, Rnds 1-12 twice, then Rnds 1–5 once more.
Rnd 34: With CC, knit.
Rnd 35: Work Double Purl.
Toe shaping
Note: Change to double pointed needles when circle gets too small for the 16” circular.
Rnd 1: With MC, knit.
Rnd 2: *K7, k2tog; rep from * around – 64 sts
Rnd 3-7: Knit.
Rnd 8: *K6, k2tog; rep from * around – 56 sts.
Rnds 9-12: Knit.
Rnd 13: *K5, k2tog; rep from * around – 48 sts.
Rnd 14 -16: Knit.
Rnd 17: *K4, k2tog; rep from * around – 40 sts.
Rnd 18: With CC, knit.
Rnd 19: With CC, purl.
Rnd 20: With MC, *k3, k2tog; rep from * around – 32 sts.
Rnd 21: Knit.
Rnd 22: *K2, k2tog; rep from * around – 24 sts.
Rnd 23: Knit.
Rnd 24: *K1, k2tog; rep from * around – 16 sts.
Rnd 25: *K2tog; rep from * to end – 8 sts.
Cut yarn leaving a tail. Using a tapestry needle, thread yarn through rem sts and pull tight to close.
Finishing
Weave in all ends.
Hanging loop
Make an I-cord about 6” long or braid or twist several strands together and attach securely to ribbing section at top of stocking.
View this post on Instagram
The pattern deviates from the picture shown in Rnds 53-65 which calls for Rnds 1-7 after the Chart A. The picture doesn’t show ribbing or the Double Purl round in the middle of the sock.
All of Rnds 8-70 are worked from the charts. In Rnds 58-70 you work Chart A rnds 7-12 then work rnds 1-7 of the same chart. You do not go back to the beginning rounds of the cuff with the ribbing and double purl.
From the designer: All of Rnds 8-70 are worked from the charts. In Rnds 58-70 you work Chart A rnds 7-12 then work rnds 1-7 of the same chart. You do not go back to the beginning rounds of the cuff with the ribbing and double purl.
Rnds 8-24: With both colors, work Chart A Rounds 1-12, then work Rnds 1-5 again.
Rnds 25-57: Work Chart B Rounds 1-33.
Rnds 58-70: Work Chart A Rounds 7-12, then Rounds 1-7 once more. Break CC.
Can I print this? I don’t see a link for printing. Thanks!
Hi! You can print using your browser’s print function or the printer icon on the left hand of your screen.
Where is the graph for the snowflake located?
Hello Jane! Charts are always on the far right side of the pattern page underneath the photos. Here is a direct link to the charts as well:
https://www.ilikeknitting.com/wp-content/uploads/Norwegian-Snowflake-Stocking-Chart-A.png
https://www.ilikeknitting.com/wp-content/uploads/Norwegian-Snowflake-Stocking-Chart-B.png
Thanks! – Nicola, Editor