

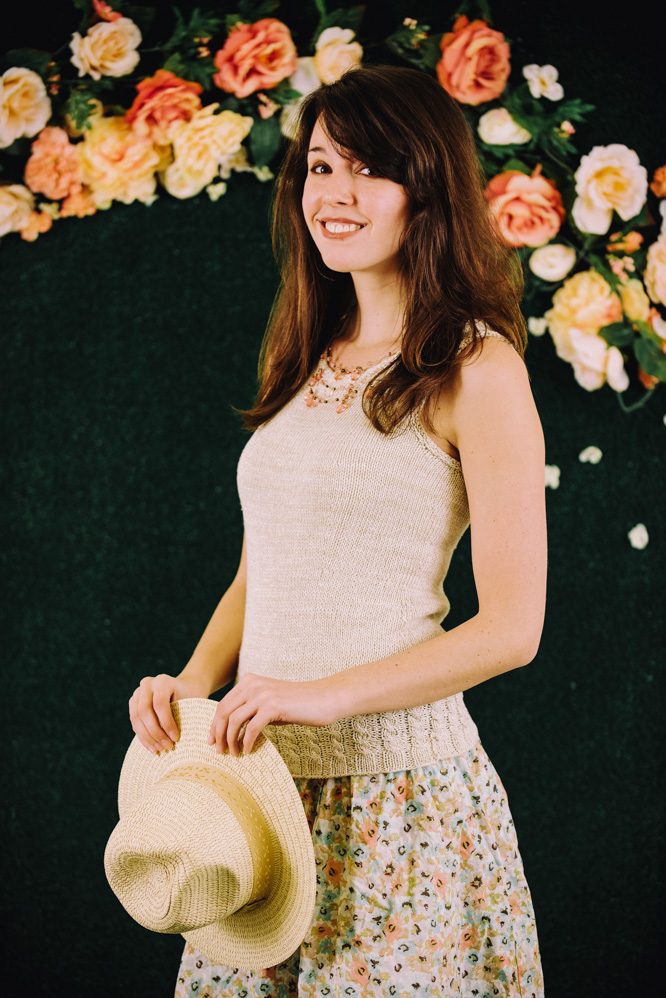
This ivory colored tank is almost too elegant for words. The cabled edging perfectly complements the timeless simplicity of the bodice. Combine this with a flowing skirt and fun beach hat for the perfect summer outfit.
Skill Level: Intermediate
Size: 32 (34, 36, 38, 42)”
2″ negative ease recommended
Shown in size 34”
Gauge: 22 sts and 30 rows = 4” [10 cm] in St st, unblocked
20 sts and 28 rows = 4” [10 cm] in St st, blocked.
Note: Stitch gauge is more important than row gauge as the fabric has a fluid hand and will form itself to the body.
Materials
Yarn:
![]() Blue Heron Rayon Metallic (85% Rayon, 15% Metallic; 550 yards [501 meters]/230 grams): Polar Bear, 1 (2, 2, 2, 3) skeins
Blue Heron Rayon Metallic (85% Rayon, 15% Metallic; 550 yards [501 meters]/230 grams): Polar Bear, 1 (2, 2, 2, 3) skeins
Needles: US Size 6 (4 mm): 24-32″ circular; US Size 5 (3.75 mm): 24-32″ circular, 16″ circular or DPNs
Notions: Tapestry needle; cable needles; four stitch markers; stitch holders or scrap yarn
Special Stitches
Edge Stitch
On WS, work all edging rnds with WS facing as foll:
Rnd 1 (WS): Knit.
Rnd 2: *Sl1 with yarn held on RS, k1; rep from * around.
Rnd 3: *Sl1 with yarn held on RS, p1; rep from * around.
Rnd 4: Knit.
BO all sts knitwise tbl.
C2F (cable 2 front): Sl1 st to cable needle, hold to front, k1, k1 from cable needle
Pattern Notes
This tank top is worked in the round to the armhole, at which point the back and front are worked separately and seam using a 3-needle bind off at the shoulder prior to working the trim.
When shaping, the bust increases are only done on the front. The straps are designed to present at a bit of an angle along the back to enhance the female form. For more ease, the same may be done on the back.
When shaping the armholes and neckline, the stitches are not bound off, they are slipped to a holder or scrap yarn so the live stitches may be used, in combination with picked up stitches, to work the border edging. Using the live stitches and slipped stitches creates a smoother transition between the two than picking up bound off stitches.
All slipped stitches are slipped as if to purl throughout unless otherwise noted.
Two needle sizes are used for this tank top because when working the cabled band it is easier to transition to the bodice because the two different needle sizes creates less of a horizontal line as the stitches transition from the ribbed cable to the stockinette. When blocked, the cabled band is slightly stretched horizontally which will hug the hips when worn and minimize gapping.
When neck stitches and armhole stitches are completed, these openings will be tightened up therefore, while the measurements for the armholes may seem too large, they will close up based upon the number of stitches for which the edge stitch is used.
Increases to enhance the bust are done where needed, beneath the widest part of the bust rather than simply along the seams so as to maintain a smoother line across the back to minimize gapping under the arm or along the shoulder.
Pattern
With smaller needle, CO 90 (96, 102, 108, 114) sts, PM, CO 90 (96, 102, 108, 114) sts, PM, join in the round – 180 (192, 204, 216, 228) sts.
Rnds 1-10: *K4tbl, p2; rep from * around.
Rnd 11: *C2F, p2tbl; rep from * around.
Rnds 12-15: Rep Rnd 1.
Rnd 16: Rep Rnd 11.
Rep Rnds 12-16, 3 (3, 3, 4, 4) more times.
Rep Rnds 1-8, 1 (1, 1, 1, 2) more times.
Switch to larger needles.
Work even in St st in the rnd until piece meas 4½ (4½, 5, 6, 6½)” from CO edge.
Bodice Decreases
See pattern notes for additional details.
Rnd 1: Ssk, k to 2 sts before m, k2tog, sm, ssk, k to 2 sts before m, k2tog – 4 sts dec’d; 176 (188, 200, 212, 224) sts.
Rnds 2-7: Knit.
Rep Rnds 1-7, 4 more times – 80 (86, 92, 98, 104) sts rem between each marker.
Work even without shaping until piece meas 10½ (11, 11½, 12½, 13)” from CO edge.
Bust Shaping
See pattern notes for additional details.
Rnd 1: K20, pm, k1, m1l, k38 (44, 50, 56, 62), m1r, k1, pm, k20, k to end of rnd – 2 sts inc’d on Front; 82 (88, 94, 100, 106) sts for Front; 80 (86, 92, 98, 104) sts for Back.
Rnds 2-5: Knit.
Rnd 6: M1l, k to m, sm, k1, m1l, k to 2 sts before next m, m1r, k1, k to m, m1r, k to end of rnd – 4 sts inc’d on Front; 86 (92, 98, 104, 110) sts for Front; 0 sts inc’d on Back; 80 (86, 92, 98, 104) sts for Back.
Rnds 7-11: Knit.
Sizes 38 (42)” only
Rep Rnds 2-6, 1 (2) times – 108 (118) sts.
All Sizes
Rnds 12-21: Rep Rnds 1-10 – 92 (98, 104, 114, 124) sts for Front; 80 (86, 92, 98, 104) sts for Back.
Rnds 21-26: Rep Rnds 1-5 – 94 (100, 106, 116, 126) sts for Front; 80 (86, 92, 98, 104) sts for Back.
Rnd 27: K to m, k2tog, k to m, ssk, k to end of rnd – 2 sts dec’d on Front; 92 (98, 104, 114, 124) sts for Front; 80 (86, 92, 98, 104) sts for Back.
Rnds 28-31: Knit.
Rnd 32: Rep Rnd 27 – 90 (96, 102, 112, 122) sts for Front; 80 (86, 92, 98, 104) sts for Back.
Sizes 38 (42)” only
Rep Rnds 27-31, 1 (2) times – 110 (118) sts.
All Sizes
Work even without shaping until piece meas 16 (16, 17, 18, 19)” from CO edge.
Shape Armholes Front
Row 1: Rm and clip it to the last st of Back, k to 6 (6, 8, 10, 10) sts from second m, place these 6 (6, 8, 10, 10) sts on holder, rm, clip second m to first stitch on Back of the work, turn work.
Begin working flat from this point forward.
Row 2: Sl2, p to 6 (6, 8, 10, 10) sts from end of row, place these 6 (6, 8, 10, 10) sts on holder, turn work – 78 (84, 86, 90, 98) sts.
Sizes 32 (34, 36) only
Row 3: Sl2 to holder, k to 1 st from end, sl2 to holder.
Row 4: Sl2 to holder, p to end.
Row 5: Sl2 to holder, k to end.
Rep Rows 4-5 until 54 (60, 72) sts, rem or desired width is reached.
All Sizes
54 (60, 72, 90, 98) sts on needles.
Cont in patt without decreasing until Armhole meas approx. 5 (5, 6, 6½, 7½)” / [13 (13, 15, 17, 18) cm), ending with Row 5.
Move center 16 (20, 24, 28, 30) sts to scrap yarn, use a piece about 36” in length as it will be used to hold other live stitches as you work the neckline – 19 (20, 24, 31, 34) sts each side which will be worked for the shoulders
Shape Neck at Left Front Shoulder
Note: “sts to work” represents the stitches to be worked on the next row, not those moved to the scrap yarn.
Row 1: Sl1, p to end – 19 (20, 24, 31, 34) sts.
Row 2: Sl2 to scrap yarn, k to end of row – 17 (19, 22, 29, 32) sts to work.
Row 3: Sl1, p to 1 st from end of row, sl1 to scrap yarn – 16 (18, 21, 28, 31) sts to work.
Row 4: Sl2 to scrap yarn, k to end of row – 14 (16, 19, 26, 29) sts to work.
Row 5: Sl1, p to 1 st from end of row, sl1 to scrap yarn – 13 (15, 18, 25, 28) sts to work.
Row 6: Sl2 to scrap yarn, k to 2 sts from end of row, k2tog – 10 (12, 15, 22, 25) sts to work.
Row 7: S1, p to 1 st from end of row, sl1 to scrap yarn – 9 (11, 14, 21, 24) sts to work.
Work 8 rows or until desired length without shaping, knitting and purling sts as presented, slipping the first of each row.
Place rem 9 (11, 14, 21, 24) sts on holder, these will be used for the 3-needle bind off to form the shoulder seam. Leave a 36” tail.
Work Neck at Right Front Shoulder, reversing shaping, using same number of stitches on the Right Front Shoulder.
Move rem Front sts to scrap yarn.
Shaping Armholes Back
Note: There will be fewer stitches on the Back as increases for bust were done only on the Front. This creates a nicer frame for the shoulder blades and lies flatter along the Back, so as to present with minimal or no gapping between the knit fabric and back of the person wearing it
Row 1: Rm, sl8 to scrap yarn, k to end.
Row 2: Sl1, p to 8 from end, sl8 to scrap yarn.
Row 3: Sl1, k to end.
Row 4: Sl1 to scrap yarn, sl1, p to end.
Row 5: Sl1 to scrap yarn, k across to last st, sl1 to scrap yarn.
Row 6: Sl2 to scrap yarn, p to 1 st from end, sl1 to scrap yarn.
Row 7: Sl2 to scrap yarn, k to end.
Row 8: P2tog, p to 2 sts from end, skp.
Row 9: Sl1, k to end.
Row 10: Sl1, p to end.
Row 11: Sl1, k2tog, k to 3 sts from end, ssk, k1.
Row 12: Sl1, p to end.
Row 13: Sl1, k to end.
Rep Rows 12-13, ending with Row 13 when Back meas 1 (1, 1½, 2, 2½) sts shorter than Front.
Back Neck Shaping
Place center 24 (30, 30, 36, 36) sts on shorter circular needle or two DPNs with stoppers, these will be the neck stitches.
Working with the remaining stitches on each side, begin with the Left Back Shoulder shaping:
Row 1: K to neck sts, turn work.
Row 2: Sl2 to circular needle, p to end.
Row 3: Sl1, k to 5 sts from end, slip these 5 sts to circular needle.
Row 4: Sl2 to circular needle, p to end.
Cont decreasing in patt until 10 (10, 12, 13, 14) sts rem.
Place these 10 (10, 12, 13, 14) sts on holder.
Work Right Back Shoulder same as Left Back Shoulder, reversing shaping.
With RS facing each other and using the 3-needle bind off, BO all sts.
Finishing
Sew side seams. Weave in end.
Transfer Front Left and Back Left Shoulder sts to DPNs. With RS facing each other and using the 3-needle bind off, BO 10 (10, 12, 13, 14) sts.
Rep on right side.
Pick up total of 92 (98, 98, 104, 104) sts along neckline on the smaller circular needle (pick up sts includes a combination of the live sts off the scrap yarn and slipped sts along the neckline). If there are gaps, pick up extra sts on the first rnd and decrease as necessary to begin edging, PM.
Use Edge Stitch patt to complete the neckline.
Pick up 86 (90, 90, 94, 98) sts around the left armhole (pick up sts includes a combination of slipped sts and live sts off the scrap yarn). To eliminate gapping, pick up extra sts on this first rnd and decrease if necessary to begin edging.
Use Edge Stitch patt to complete the armhole.
Rep for right armhole. 
I agree with Allison. The picture doesn’t clearly show neckline or sleeves.
Love the pattern, but no way to download it.
Hi! We don’t offer downloads for our patterns (currently) but you are welcome to print using your browser our our print icon on the left side of the screen.
Seems like a nice design, but I really wish the pictures showed the neckline. Between the model’s hair and jewelry, there’s really no way to see it well.
Hi Allison! Thank you for the feedback, I will look into potentially re-photographing this design in the future. – Nicola, Editor