

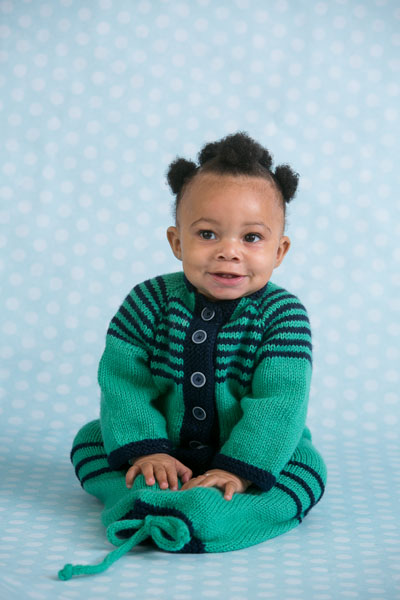
This comfy little bunting has a button-front closure and a lapped back opening to allow for seatbelts in car seats or strollers. Perfect for an advanced beginner, this baby bunting is the best way to keep your little one cozy and secure during trips and doubles as a wrap for chilly nights.
Skill Level: Easy
Size: Newborn to about 6 months; Body circumference = 23”, Back neck to hem = 24.5”, Sleeve from underarm to cuff = 6”
Gauge: 20 stitches x 24 rows = 4” (10 cm)
Materials
Yarn: Berroco Vintage (50% acrylic, 40% wool, 10% nylon; 217 yards [198 meters]/100 grams): #5133 Spring Green (3 skeins), #5143 Dark Denim (1 skein)
Needles: US size 7 (4.5 mm) 24” circular and double pointed needles
Notions: Markers, stitch holder or waste yarn, scissors, tapestry needle, buttons (5/8” to 3/4” – 8 buttons).
Abbreviations
M1L (Make one left): Insert left needle into the front of the bar between stitches in the row below, knit into back.
M1R (Make one right): Insert left needle into the back of the bar between stitches in the row below, knit into front.
Pattern
Cast On 46 in Main Color.
Row 1 (WS): Purl.
Row 2 (RS): Set up row. K6, pm, p1, k5, pm, p1,k20, pm, p1, k5, pm, p1, k6. (46 sts). On future right side rows you will make increases on each side of the p1 stitches.
Row 3: *P to 1 st before marker, k1, sm, repeat from * to last marker, sm, p to end.
Row 4: *K to first marker, *M1L, sm, p1, M1R, k to next marker, repeat 3 more times knitting to end on last repeat. (54 sts)
Rows 5-8: Repeat rows 3 & 4 two more times. (70 sts)
Rows 9-10: With CC, repeat rows 3 & 4. (78 sts)
Rows 11-12: With MC, repeat Rows 3 & 4. (86 sts)
Rows 13-36: Repeat rows 9-12 six times. (178 sts) Cut CC.
Row 37: Repeat row 3.
Separate body and sleeves: *K to marker, M1L, remove marker, K purl stitch, M1R, slip next 39 sleeve sts to scrap yarn, remove next marker, M1L before purl stitch, K purl stitch, M1R*, K 54 sts before next marker, repeat between *, knit to end of row. (112 sts on needle)
Body
Continue in stockinette stitch for 10 inches.
With CC knit 2 rows. With MC knit 4 rows. Repeat these 6 rows one more time. Then knit 2 rows CC. Knit 2 rows MC.
Back Opening for Seatbelt: Knit 49, Bind off 12 sts, knit to end of row.
Purl to bind off stitches, Cast on 12 stitches over bind off, purl to end of row.
Work 5 rows in stockinette, ending on a knit row, do not turn after this row. Cast on 5 stitches and join to knit in the round, place marker between 2nd and 3rd cast on stitches. (117 sts)
Continue knitting every round until work measures approximately 5” from newly cast on stitches. Work should measure approximately 18” from underarm. You can adjust the length here if you like.
Eyelet Edging
Change to CC. Knit one round, purl one round for 6 rounds. (There should be 3 garter ridges on the right side.)
Eyelet row: K2, *yo, k2tog, k4, yo, k2tog, k5 repeat from * a total of 8 times, yo, k2tog, k4, yo, k2tog, k3. (18 eyelets formed)
Purl one round, knit one round, for 5 rounds. (3 garter ridges) Bind off.
updated 4/7/2016
Sleeves
Place stitches from scrap yarn on double pointed needles. With MC pick up 5 stitches at underarm. Try to close up any places where a gap will form. (44 sts) Continue knitting around for approximately 5”.
Decrease row: *K4, k2tog, k3, k2tog, repeat from * around. (36 sts)
Change to CC. *Knit one round, purl one round, repeat from * two more times. Bind off.
Button Band
Pick up new stitches in CC. Starting at top of left front edge on RS, insert needle between first and second stitch of first row, yarn over and pull through a new stitch in CC. Continue down front picking up 2 stitches for every 3 rows of the garment. Pick up the last stitch in the row just above the cast on stitches at the bottom of the opening. Working back and forth, knit 11 rows. (There should be 6 garter ridges on the right side.) Bind off. Sew bottom edge of band to stitches across bottom of opening.
Buttonhole Band
Pick up new stitches using CC as for button band. Starting at bottom of right front edge, pick up first stitch in the row just below the cast on stitches at the bottom of the opening, pick up 2 stitches for every 3 rows of the garment. Knit 5 rows. (There should be 3 garter ridges on the right side.)
Mark buttonholes: From top mark stitches # 4, 13, 22, 31, 40, 49, 58, 67 with a pin type stitch marker or scrap of yarn. Make sure there are at least 2 inches below the last buttonhole for the seat belt access.
*Knit to 2 stitches before marker, k2tog, yo, repeat from * across row, knit to end. Knit 5 rows. Bind off. (Knit last 2 stitches together as you bind off for a nice finish without leaving a point.)
Sew bottom edge of buttonhole band to outside of bottom opening over button band.
Collar
Using CC pick up stitches around neckline starting and ending where front bands join the body. Pick up in each stitch, skipping one at each raglan seam where purl stitches were worked and one at center back. (5 sts skipped) Knit 5 rows. Bind off, knitting last 2 stitches together as in buttonhole band.
Seatbelt Opening Flaps
Bottom Edge (inside flap): Pick up 12 stitches with CC on lower edge of opening. Knit 3 rows. Bind off.
Top Edge (outside flap): Pick up 15 stitches with CC on upper edge of opening being sure to pick up one stitch on each side of opening. Knit 5 rows. Bind off.
Finishing of Flaps: Tuck bottom flap inside and up toward contrast ridges. Stitch down side edges of flap invisibly on the inside. Leave bind off edge open. Bring top flap down to cover opening and stitch side edges down neatly.
I-cord Drawstring
With double pointed needles and MC, CO 4 stitches. *Without turning the needle, slide stitches to right needle tip, pull yarn around back of stitches, and knit the stitches as usual; rep from * for approximately 30 inches or desired length.
Finishing
Weave in all ends. Thread I-cord through eyelets with ends on either side of center front. Tie knots in ends of I-cord to keep it from slipping out of the eyelets. Sew buttons to match buttonholes. Be sure to attach buttons securely so baby can’t get them off. 